Sunday, July 16, 2017

Quick start: Print a worksheet

Quick start: Print a worksheet

Before you print a worksheet, it's a good idea to preview it to make sure that it looks the way you want. When you preview a worksheet in Microsoft Excel, it opens in the Microsoft Office Backstage view. In this view, you can change the page setup and layout before you print.

Did you know?

If you don't have an Office 365 subscription or the latest Office version, you can try it now:

Try Office 365 or the latest version of Excel

Click on one of the tabs below for instructions specific to your Excel version (topics for Excel for Windows are listed first, then Mac).

How?

Icon image

Preview the worksheet

  1. Click the worksheet or select the worksheets that you want to preview.

  2. Click File > Print > Print Preview.

    Keyboard shortcut    Press Ctrl+P.

Icon image

Set printing options

Do one or more of the following:

  1. Click the worksheet or select the worksheets that you want to preview.

  2. Click File > Print.

  3. To change the printer, click the drop-down box under Printer, and select the printer that you want.

  4. To make page setup changes, including changing page orientation, paper size, and page margins, click Properties.

Icon image

Print all or part of the worksheet

  1. To print the active sheet or sheets, or the whole workbook, in the Print dialog box, select from Selection, Active Sheet(s), Entire workbook, or Table.

  2. Click Print.

    Note:  If a worksheet has a defined print area, Excel prints only that area. If you don't want to print only the defined print area, click Ignore print area.

How?

Icon image

Preview the worksheet

  1. Click Microsoft Office Button Office button image , and then click Print.

    Keyboard shortcut  You can also press CTRL+P.

Icon image

Set printing options

Do one or more of the following:

  1. To change the printer, click the drop-down box under Printer, and select the printer that you want.

  2. To make page setup changes, including changing page orientation, paper size, and page margins, select the options that you want under Settings.

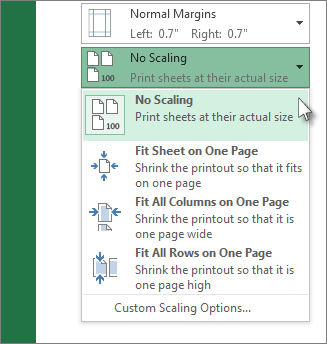
To scale the whole worksheet to fit on a single printed page, under Settings, click the option that you want in the scale options drop-down box.

Under Settings, click the scaling option you want

Tip    For information about how to set headers and footers, see Use headers and footers in worksheet printouts. For information about how to repeat specific rows or columns on printed pages, see Repeat specific rows or columns on every printed page.

Icon image

Print all or part of the worksheet

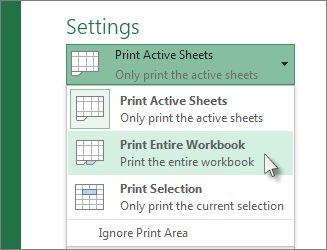
To print the active sheet or sheets, or the whole workbook, under Settings, select the option that you want.

Under Settings, click Print Entire Worksheet

  1. To print a portion of the worksheet, do the following:

    1. Click the Home tab to return the worksheet, and then select the range of data that you want to print.

    2. On the File tab, click Print.

    3. Under Settings, click Print Selection.

      Note    If a worksheet has a defined print area, Excel prints only that area. If you don't want to print only the defined print area, click Ignore print area.

  2. Click Print.

Next steps

For detailed instructions on how to print a worksheet, see Print a worksheet or workbook and Define or clear a print area on a worksheet.

No comments:

Post a Comment