Export your contacts from Outlook and use them in Google Gmail
If you want to see and use your Outlook contacts in Google Gmail, export them from Outlook, and then import them into Google Gmail. It's not a one-click button but there's a wizard that'll walk you through the steps.
Note: You can only export the contacts in your contact list, not the contacts in your address book, which also includes people from your company's Global Address List (GAL) and other kinds of address lists, such as Lightweight Directory Access Protocol (LDAP) internet directories.
Export contacts from Outlook
-
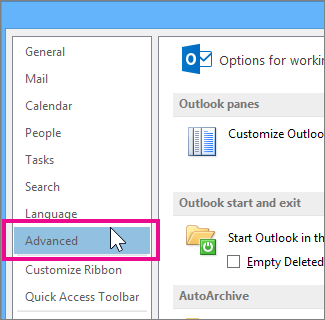
In Outlook, click File > Options > Advanced.
-
Under Export, click Export.

-
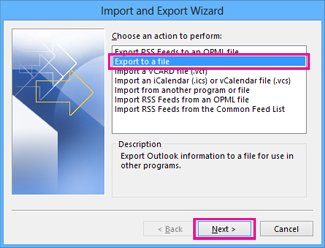
On the first page of the Import and Export Wizard, click Export to a file, and then click Next.
-
Click Comma Separated Values, and then click Next.
-
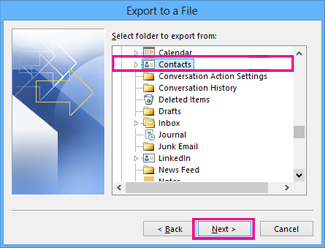
In the folder list, click the contacts folder you want to export, and then click Next.
-
Choose a location on your computer to temporarily save the file, either use the default name or type a custom name for the exported file, and then click Next.
Note: You can delete this file after your contacts are imported into Google Gmail.
-
If you want to change how contact information is saved in the file, click Map Custom Fields.
Note: If the Map Custom Fields button isn't available, under The following actions will be performed, make sure the Import box is checked
-
Click Finish.
Import your contacts into Google Gmail
-
Log on to your Google Gmail account.
-
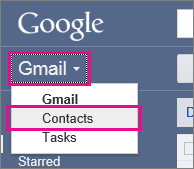
Click Gmail>Contacts.
-
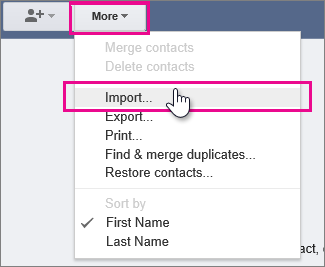
Click More >Import.
-
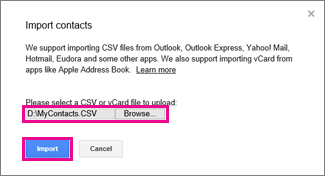
Under Import Contacts, click Browse.
-
Select the file you exported in step 6 of the previous procedure, and then click Import.
No comments:
Post a Comment