Delete or remove a workflow
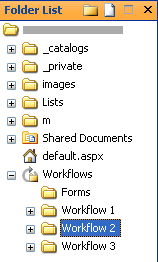
When a workflow is no longer in use, you can delete it from the server to make room for other workflows. You do this in Microsoft Office SharePoint Designer 2007 by deleting the workflow folder in the Folder List.
You can also make the workflow unavailable to users without actually deleting it. You do this through the browser by removing the workflow from the list or library to which it is attached. Later, you can add the workflow back to the list or library to which it is attached. But note that a workflow designed in Office SharePoint Designer 2007 is always attached to exactly one list or library. You can add a workflow only to the list or library to which it was originally attached. Note also that if you remove a workflow and then modify and recompile it by using the Workflow Designer, Office SharePoint Designer 2007 automatically makes the workflow available again — you do not need to subsequently add it.
What do you want to do?
Remove a workflow from a list or library
A workflow that is created with Office SharePoint Designer 2007 is always attached to a list or library. Through the browser, you can remove a workflow from a list or library so that the workflow is no longer available to users.
Removing a workflow from a list or library does not delete the actual source files used to compile the workflow. Rather, the workflow is no longer attached to the list or library, but the source files remain stored in the Workflows document library of the site. To delete the workflow, see the next section.
-
In a Web browser, browse to the site that contains the workflow that you want to delete, and then browse to the specific list or library to which the workflow is attached.
-
On the list or library menu bar, click Settings, and then click either List Settings or Document Library Settings, whichever is present.

-
Under Permissions and Management, click Workflow Settings.
-
On the Change Workflow Settings page, click Remove a workflow.
Note: You can use the option Add a workflow to make a workflow that was previously removed available again. But note that a workflow that was designed in Office SharePoint Designer 2007 is always attached to exactly one list or library. You can add a workflow only to the list or library to which it was originally attached.
-
On the Remove Workflows page, click Remove, and then click OK.

-
Click OK to confirm that you want to remove the workflow.
Delete a workflow
When you delete a workflow in the Folder List, you delete the workflow source files from the server. Doing this also makes the workflow unavailable to users on the site. You do not need to subsequently remove the workflow from the list or library that it was attached to.
-
On the File menu, click Open Site.
-
In the Open Site dialog box, browse to and select the SharePoint site where you want to delete the workflow, and then click Open.
-
In the Folder List, click the plus sign (+) next to Workflows to see all the available workflows.

-
Click the workflow folder that you want to delete, and then press DELETE.
Tip: You can delete multiple workflows by holding down CTRL while you click the workflow folders that you want to delete.
-
Click Yes to confirm that you want to delete the workflow. If you don't want to delete the workflow, click No. If you selected several workflows to delete, click Yes to all.
No comments:
Post a Comment