Add metadata columns to a content type
The columns for a content type represent metadata. You can customize these columns to specify the metadata that you want to collect by adding columns.
For example, your organization might want to track specific metadata for purchase orders, such as account number, project number, and project manager. If you add columns for this information to the purchase order content type, users are prompted to provide this metadata when they save their work.

Add a column to a content type
To add a column to a content type, you must first select the content type.
Warning: If the content types that appear are not hyperlinks or cannot be selected, it means that the site inherits its content types from a different site. To add a column to the content type, you must change it on the other site.
To select a site content type, start here .
-
Go to the site for which you want to change a site content type by adding a column.
-
Select the Options button
 and then select Site Settings.
 -
Under Web Designer Galleries, choose Site content types.
-
Click the name of the content type that you want to add a column to.
To select a list content type, start here.
-
Go to the list or library in which you want to change the content type by adding a column.
-
Do one of the following:
-
If you are working in a list, click the List tab, and then click List Settings.
-
If you are working in a library, click the Library tab, and then click Library Settings.
-
-
Under Content Types, click the name of the content type that you want to add a column to.
.After you select the content type, follow these steps.
-
Under Columns, click Add from existing site columns.
-
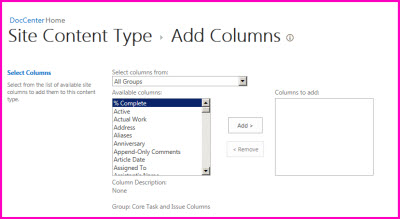
In the Select Columns section, under Select columns from, click the arrow to select the group from which you want to add a column.
-
Under Available columns, click the column that you want to add, and then click Add to move the column to the Columns to add list.
-
In the Update List and Site Content Types section, under Update all content types inheriting from this type?, check Yes if you want to update all content types that inherit from this site content type. If you do not want to update the content types that inherit from this site, check No.
More information about content type columns
Change column order
To add a column for a content type, follow these steps.
Start here for a site content type.
-
Go to the site for which you want to change a site content type by adding a column.
-
Select the Options button
 and then select Site Settings.
 -
Under Web Designer Galleries, choose Site content types.
.
Start here for a list content type
-
Go to the list or library in which you want to change the content type by adding a column.
-
Do one of the following:
-
If you are working in a list, click the List tab, and then click List Settings.
-
If you are working in a library, click the Library tab, and then click Library Settings.
-
-
Under Content Types, click the name of the content type that you want to change.
.
-
Under Columns, click Column order.
-
In the Column Order section, click the arrow next to the column that you want to reorder in the Position from Top column, and then select the order number that you want.
-
Click OK.
Make a column required, optional, or hidden
To make a column required, optional or hidden, follow these steps.
Start here for a site content type.
-
Go to the site for which you want to change a site content type by adding a column.
-
Select the Options button
 and then select Site Settings.
 -
Under Web Designer Galleries, choose Site content types.
.
Start here for a list content type
-
Go to the list or library in which you want to change the content type by adding a column.
-
Do one of the following:
-
If you are working in a list, click the List tab, and then click List Settings.
-
If you are working in a library, click the Library tab, and then click Library Settings.
-
-
Under Content Types, click the name of the content type that you want to change.
-
Under Columns, click the name of the column that you want to make required.
-
In the Column Settings section, do one of the following:
-
To require users to specify information for a column, click Required.
-
To make it optional for users to specify information for a column, click Optional.
-
To hide a column so that it does not appear in any forms for the content type, click Hidden.
-
-
Click OK.
No comments:
Post a Comment