Thursday, September 30, 2021

Create a space plan

A space plan is a visual tool that allows you to move and track resources between spaces within your organization. Use the Space Plan template to create a drawing that uses Space shapes and resource shapes to track the approximate location of resources in a floor plan.

  1. Open Visio.

  2. In the Maps and Floor Plans template/category, click Space Plan > Create.

  3. On the first page of the Space Plan Startup Wizard, select the type of image or drawing you want to add as a background to your space plan, and then click Next.

    You can add an existing floor plan image or drawing as a background so you don't have to create one later.

  4. On the next wizard page, select how you want to add rooms (spaces) to your space plan, and then click Next.

    You can use a new or existing spreadsheet so you don't have to type room numbers later.

  5. On the final wizard page, review the instructions on how to add spaces to your drawing, and then click Finish.

  6. If there are unplaced spaces in the Space Explorer or Category Explorer windows, add them to your drawing.

    1. From the Space Explorer or Category Explorer window, drag an unplaced space on top of the area you want to designate as a space, such as an office.

    2. To resize the Space shape, drag a selection handle Selection handle image, or right-click the Space shape and click Auto-Size.

      Note: Do not overlap space shapes.

    3. To change what appears by default on all Space shapes, on the Plan tab on the ribbon, click Display Options, click the Spaces tab, and then choose the options you want.

  7. If there are no spaces in the Space Explorer or Category Explorer windows, do one of the following:

    Manually add spaces

    1. From Resources shapes, drag a Space shape on top of the area you want to designate as a space, such as an office.

    2. To resize the Space shape drag a selection handle Selection handle image, or right-click the Space shape and click Auto-Size.

      Note: Do not overlap space shapes.

    3. If the Shape Data pane is not already open, right-click the shape, click Data > Shape Data..

    4. In the Shape Data pane, click the Name field, and then type the area identifier, such as office room number.

      If you plan to import data from a spreadsheet or database later, you must enter a value in the Name field. The value you enter must match a unique identifier in the spreadsheet or database. For example, if the value of an office room number in the database is 1N101, then enter 1N101 in the Name field.

    5. To change what appears by default on all Space shapes, on the Plan tab, click Display Options, click the Spaces tab, and then choose the options you want.

    Import space data

    1. On the Plan tab on the ribbon, click Import Data.

    2. Select Store them in the Explorer window under Unplaced Data and click Next. In the next window, you will be asked to select the data source (from Excel, Active Directory, Exchange Server, or ODBC), and based on your selection, you will be asked to select files, address books, data types, server configuration, or other data sources. Enter the data as appropriate.

    3. When asked what kind of shape you want to add to your drawing, select a Space shape.

    4. Drag unplaced spaces from the Space Explorer or Category Explorer window onto the drawing page.

  8. Add resources (such as people and assets) to your drawing by doing one of the following:

    Manually add resources

    1. From Resources, drag a resource shape onto the appropriate Space shape in the drawing.

    2. If the Shape Data pane is not already open, right-click the shape, click Data > Shape Data..

    3. In the Shape Data window, click the Name field, and then type the resource name.

    Import resource data

    1. On the Plan tab on the ribbon, click Import Data.

    2. Follow the wizard pages to import data into your space plan.

      If the Import Data Wizard cannot put your data into the drawing, the wizard stores your data in the Space Explorer and Category Explorer windows under Unplaced Data.

    3. To associate an unplaced resource with a space, drag a resource from Unplaced Data onto the appropriate space in the Space Explorer.

      You can also drag unplaced resouces onto the appropriate Space shapes in the drawing.

    Notes: 

    • Each page in your drawing can represent a floor in your facility, as long as all of the floors are in the same building. You can also split floors across multiple pages.

    • If you do not need a detailed floor plan of your building, you can use drawing tools from the Visio Drawing toolbar to sketch your floor plan, or just drag Space shapes onto the drawing page to designate offices.

    • When you are finished creating your space plan, lock the space layer to prevent accidental changes to the Space shapes. To lock the space layer, on the View menu, click Layer Properties, and then for the Space layer, select the Lock check box.

Accessibility support for sharepoint online

Screen reader content Screen reader content

This article is for people with visual impairments who use a screen reader program with the Office products and is part of the Office Accessibility content set. For more general help, see Microsoft Support home.

On this page you can find links to accessibility help articles that are written for people who use screen readers with SharePoint in Microsoft 365. To find information on how to create SharePoint sites that are accessible to people with disabilities, see Make your SharePoint site accessible to people with disabilities.

Get started using accessible features in SharePoint Online

Create documents or folders or upload files

Check out, check in, or edit files

Move or copy folders and files

See also

Make your SharePoint site accessible to people with disabilities

Add accessible content and links to a SharePoint Online site

Add accessible pictures and media to a SharePoint Online site

Resources for creating accessible sites in SharePoint Online

Accessibility features in SharePoint Online

Creating a blog with communication sites and news posts 

On this page you can find links to accessibility help articles that are written for people who use screen readers with SharePoint in Microsoft 365. To find information on how to create SharePoint sites that are accessible to people with disabilities, see Make your SharePoint site accessible to people with disabilities.

Get started using accessible features in SharePoint Online Modern Experience

Create documents or folders or upload files

Check out, check in, or edit files

Add text, images, media, or forms to a SharePoint page

Highlight files and folders or edit file or folder information

Copy file and folder links

Move or copy files and folders

Review file activity or version history or get change notifications

Create or edit document library views

See also

Make your SharePoint site accessible to people with disabilities

Add accessible content and links to a SharePoint Online site

Add accessible pictures and media to a SharePoint Online site

Resources for creating accessible sites in SharePoint Online

Creating a blog with communication sites and news posts 

On this page you can find links to accessibility help articles that are written for people who use screen readers with SharePoint in Microsoft 365 app for iOS.

Get started using accessible features in SharePoint Online app for iOS

Display answers and points on quiz questions

Create interactive quizzes that display the correct answer as students complete each question.

  1. Open the form or quiz that you want to manage.

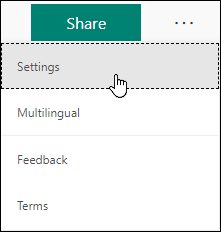
  2. Select the More form settings icon ( ... ) next to Share, then select Settings.

    Settings for forms

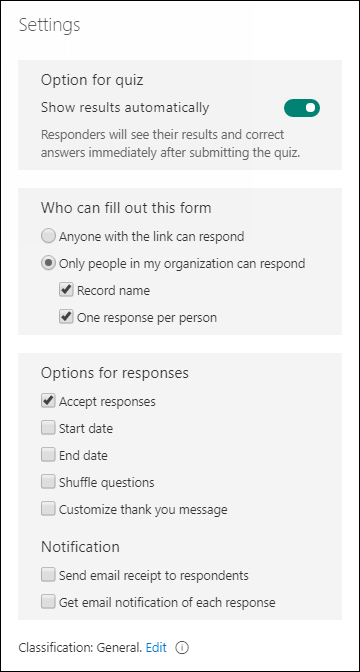
  3. Select the Show results automatically toggle. Students will then be able to see their results and correct answers after submitting the quiz.

    Tip: This option must be turned on to show students how many points each quiz question is worth.

Settings for quizzes.

Using word prediction for inclusive classrooms

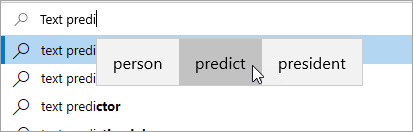
Empower students to articulate their thoughts by enabling text suggestions on their device. As students type, suggestions appear above their cursor to help them complete challenging words and continue working. Words are predicted based upon the student's spelling; as they type more letters, new and more accurate suggestions will appear. 

To enable text suggestions:

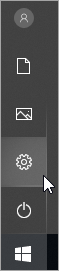
  1. From the Windows icon, select Settings.

    Settings icon pic
  2. From the Settings window, select Devices.

    Windows device settings pic
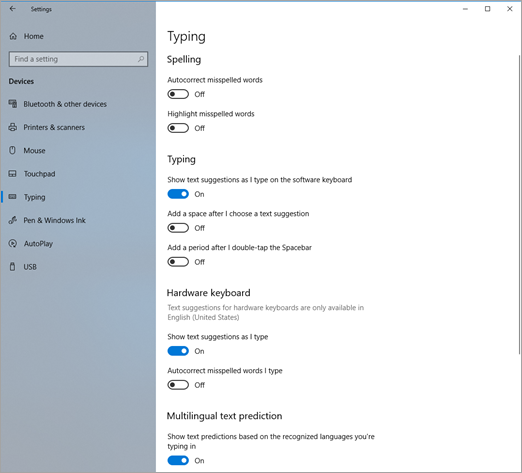
  3. Select Typing from the left navigation pane.

    Typing settings pic
  4. Under Hardware keyboard toggle Show text suggestions as I type to On. This enables text suggestions when typing on the physical keyboard of your device.  

  5. Under Typing toggle Show text suggestions as I type on the software keyboard to On. This enables text suggestions when using a keyboard on the screen of your device.

  6. (optional) To support multilingual students toggle Show text predictions based on the recognized languages you're typing in to On.

    Additional typing settings pic
  7. After updating the settings, suggested words will be provided as you type in Teams Chat, word processing programs, browsers and more. 

    Text prediction pic

Learn more

Accessibility support for Windows - Office Support 

Convert ink to shapes in office

In Microsoft 365 and Office 2019, PowerPoint, Excel, and Word let you convert your ink drawings to standard shapes with the tap of a button. You can quickly draw flow charts and diagrams, combining the ease of drawn shapes with the uniformity of Office graphics.

Convert your ink drawings to shapes

  1. On the Draw tab, select Ink to Shape. (This mode must be turned on before you draw the shape.)

  2. Draw the shape of your choice. It automatically converts to the equivalent Office graphic shape.

    The shape you create is the same color as your ink color choice was. Once the shape is created, you can edit the fill color, transparency, and style by using the Format tab.

  3. To continue inking but stop having your drawings automatically converted to shapes, select Ink to Shape once again.

Ink shapes that can be converted to Office shapes

Ink drawing

Corresponding shape

Rectangle

Shows a rectangle drawn in inking.

Rectangle

Shows a rectangle.

Square

Shows a square drawn with inking.

Square

Shows a square.

Diamond

Shows a diamond drawn in inking.

Diamond

Shows a diamond shape.

Parallelogram

Shows a paralellogram drawn in inking.

Parallelogram

Shows a parallelogram shape.

Trapezoid

Shows a trapezoid drawn in inking.

Trapezoid

Shows a trapezoid shape.

Irregular quadrilateral

Shows an irregular quadrilateral ink drawing.

Irregular quadrilateral

Shows a closed freeform shape with four sides.

Pentagon

Shows a pentagon drawn in inking.

Pentagon

Shows a pentagon shape.

Hexagon

Shows a hexagon drawn in inking.

Hexagon

Shows a hexagon shape.

Ellipse

Shows and ellipse drawn in inking.

Ellipse

Shows an ellipse shape.

Circle

Shows a circle drawn with inking.

Circle

Shows a circle shape.

Single-headed arrow

Shows an arrow drawn in inking.

Arrow

Shows an arrow.

Double-headed arrow

Shows a double-headed arrow drawn in inking.

Double arrow

Shows a double-headed arrow.

Connector between two shapes

Shows a connector drawn in inking between two circles.

Connector

Shows a connector between two circular shapes.

Right triangle

Shows a right triangle drawn in inking.

Right triangle

Shows a right triangle shape.

Equilateral triangle

Shows an equilateral triangle drawn in inking.

Equilateral triangle

Shows a triangle with all three sides equal in length.

Isosceles triangle

Shows an isoceles triangle drawn in inking.

Isosceles triangle

Shows a triangle with two sides equal in length.

Irregular triangle

Shows an triangle with three different side lengths drawn in inking.

Irregular triangle

Shows a triangle with three sides of different lengths.

Block arrow

Shows a block arrow drawn in inking.

Block arrow

Shows a large arrow shape.

The feature works differently in PowerPoint. See Convert ink to shapes or text in PowerPoint for Microsoft 365.

Add "Convert to Shape" to the ribbon

In Visio, Convert to Shape isn't available by default. Customize the ribbon to see this command.

  1. Select File > Options.

  2. On the left side of the dialog box, select Customize Ribbon.

  3. In the list box on the right side of the dialog box, select Draw.

  4. Select New Group, and then click Rename to give the new custom group a name, such as Shapes. Make sure the new group stays selected.

  5. On the left side of the dialog box, , under Choose Commands From, select All Commands.

  6. In the long, alphabetic list of commands, select Convert to Shape, and then click the Add button between the two long list boxes.

    Convert to Shape is now added to the ribbon.

  7. Click OK.

Now you may use Convert to Shape to convert an ink drawing to a Visio shape.

Convert a drawn ink shape to a standard Visio shape

  1. On the Draw tab, select Draw with Touch, then select an ink pen, and draw on the canvas.

    Draw tools in Visio Pro for Office 365
  2. On the Draw tab, choose the Select tool.

  3. Click and drag to select the drawn object you want to convert to a standard shape.

    Selection handles appear on the shape.

  4. On the Draw tab, select Convert to Shape. The Convert to Shape button converts an ink drawing to a Visio shape

  5. On the Home tab, select Change Shape, and then select a shape from the drop-down gallery.

    Tip: If you don't see a list of shapes with the shape you want, in the Shapes pane, select More Shapes, and then select the stencil that contains your desired shape.

The ink drawing is replaced with the selected shape, and it retains the size, position, and formatting of that ink shape. Continue styling the shape as appropriate. (See Format a Shape for details.)

Fixes or workarounds for recent issues on outlook com

This article is for Outlook.com. If you're using Outlook for Windows, see Fixes or workarounds for recent issues in Outlook for Windows.

If you're having problems accessing Outlook.com, you can see the status of Microsoft Office Online Services at the Service Health portal.

If you're having problems sending or receiving email, read how to Fix Outlook.com email sync issues.

Last updated: 12 May 2021

Outlook.com issues affecting email messages, attachments, and features

Last updated: 12 May 2021

ISSUE

We are aware of and have released a fix for the current issue with Outlook. It might take a few hours for your computer to get the update.

STATUS: FIXED

Please restart your computer to receive the update. We are sorry for the inconvenience.

Last updated: 6 January 2021

ISSUE

We're aware of an issue where some users see the error message "Your message can't be displayed right now".

STATUS: WORKAROUND

To resolve this, please clear your browser's cache & cookies:

Last updated: 7 December 2020

ISSUE

If you access your Outlook.com account through the iOS Mail app, you may be repeatedly asked to enter your username and password.

STATUS: WORKAROUND

We recommend using the Outlook for iOS app instead.

Get the app

Last updated: 10 November 2020

ISSUE

Users with Outlook.com accounts are seeing emails they delete from the Inbox reverting back to the Inbox.  

STATUS: INVESTIGATING

The Outlook Team is investigating the issue for a fix.  We will update this article as soon as we have more information on a fix.

In the meantime, if the emails being reverted are coming from connected accounts you may be able to go to the Inbox of the originating account and delete the email to workaround the issue.  For example, if you have a Gmail connected account, go to Gmail.com and delete the email from there.  

Last updated: 7 September 2020

ISSUE

A recent change to the Family Calendar also removed some functionality that allowed the calendar to be viewed as a shared calendar in other applications like the Windows 10 Mail app and the Outlook desktop app as well as some third party apps. 

WORKAROUND

None of the events or information was lost in the move to the new calendar. The Family group calendar now appears in the Outlook.com groups area in the left nav on Outlook web and in the groups area of the Outlook mobile app. It is also added to your favorites automatically.

Learn more about using the Family Calendar in Outlook.com.

Last updated: 13 August 2020

ISSUE

We are aware of an issue where some customers cannot see images or pictures in their emails, or they are corrupted.

We are currently investigating and apologize for the inconvenience.

WORKAROUND

Ask the sender to resend the picture as an attachment.

Some customers may see a News folder. This is a limited experiment for a sample of customers. Although it's not possible at the moment to turn the feature off entirely, you can choose to remove it from your favorites list by right clicking the folder and selecting Remove from Favorites.

Last updated: 12 May 2020

ISSUE

Some users may not be able to see the left folder pane. 

SOLUTIONS

  1. Sign out of Outlook.com

  2. Clear your browser cache. Learn how to do that for Edge, Chrome, Firefox or Safari.

  3. Close all browser tabs and windows.

  4. Sign in again at www.outlook.com.

Tips: When viewing on a small screen, you may still need to:

  1. Maximize your browser window, or scroll left to view the folder list.

  2. Expand the folder pane only when you need it. Select the three line icon 3 line icon in outlook.com in the left side bar to show or hide folders.

  3. Open your layout settings and select Hide reading pane then Save. This will give the screen more space to show the folders.

ISSUE

We are aware that some users may not be able to get support in the Outlook.com Help pane when using the Safari browser.

WORKAROUND

  1. In the Safari app Mac Safari icon on your Mac, choose Safari > Preferences > Privacy.

  2. Uncheck Website Tracking: Prevent cross-site tracking.

  3. Uncheck Always allow cookies: Block all cookies.

For more information, read Apple's guide to Manage cookies and website data in Safari on Mac.

ISSUE

We are aware that some users may not be able to receive email from Gmail accounts. We are investigating a possible problem.

WORKAROUND

Check that you have not accidentally blocked the Gmail domain when blocking one Gmail user.

  1. Open your Blocked Senders list.

  2. If Gmail.com is in the list, select the Remove next to the entry and press Save.

ISSUE

Some users may not be able to empty their Deleted Items folder.

SOLUTIONS

  • If you have deleted a lot of email, it may take some time for those items to move to or be deleted from the Deleted Items folder - leave the browser window open while the deleting takes place.

  • If the email still fails to delete properly, select a smaller batch to delete.

  • If deleted email comes back, it could be because you have deleted a lot of email recently. Please try again later.

ISSUE

Some customers may not be able to see their Profile, Account or Sign Out options when selecting their picture on the top toolbar.

WORKAROUNDS

Some Firefox users may be able to solve the problem by clearing cookies and site data. Learn how.

If not, you can access your Microsoft account Profile at https://account.microsoft.com/profile/.

You can see all other aspects of your Microsoft Account at https://account.microsoft.com/.

You can also Sign out manually then close all browser windows.

ISSUE

Some customers may experience a delay when trying to create a new email address, or alias, for their Outlook.com account.

RECOMMENDED ACTION

  1. Please sign out of Outlook.com and close all browser windows.

  2. Sign in to start using your new email address/alias.

ISSUE

Customers using the contact support buttons at the foot of the support pages, or the "email us" links in support Virtual Agent, are unable to open the Help Pane.

RECOMMENDED ACTION

  1. Sign in to get Outlook.com support.

    Important: If you can't sign in, go to Account support.

  2. Select the ? at the top of the Outlook.com window. Once you have signed in and have a browser window open, then the links will work.

  3. Learn more about how to contact support when using the Help Pane.

Blocking an item already in your Junk Email folder won't delete it. If you're still receiving email from a sender you blocked, see Receiving email from blocked senders in Outlook.com.

Blocking someone doesn't stop their email from coming to your mailbox, but it does automatically move the message to your Junk Email folder where you can review it (in case it was blocked in error). 

Learn more about Receiving email from blocked senders in Outlook.com.

ISSUE

Some browsers will have problems loading emails, time-out or run very slowly if advert and pop-up blockers are enabled, specifically:

  • AdBlock

  • Ublock

WORKAROUND

  1. Use Microsoft Edge or another web browser.

  2. Exclude Outlook.com from the AdBlock settings. At the top right corner of Google Chrome, select AdBlock and then select Don't run on pages on this domain. Refresh your browser to load Outlook.com again.

  3. Remove the problematic ad-blockers by managing extensions in Microsoft Edge, Internet Explorer, Firefox, Chrome. or Safari.

ISSUE

Certain add-ons in the Firefox browser may prevent your Outlook.com Inbox from loading.

WORKAROUND

Visit Firefox support to learn how to Disable or remove Add-ons.

ISSUE

If you are having issues sending email, this might be due to validation issues with your Microsoft Account.

WORKAROUND

  1. Go to https://account.live.com/reputationcheck to validate your Microsoft Account.

  2. Ensure your Microsoft Account profile is up-to-date and complete. Make sure you accept the Terms Of Use, if requested.

If you're still unable to send or receive email, read how to Fix Outlook.com email sync issues.

Outlook issues after connecting Outlook to Outlook.com

ISSUE

After adding an email account to Outlook for Windows (Outlook 2016, 2013, 2010 versions) you may experience the following:

  • Your email account name shows up as outlook_[long series of letters and numbers]@outlook.com in the Folder Pane and when composing emails using Outlook for Windows.

  • Recipients will also receive the email from the sender with the outlook_[long series of letters and numbers]@outlook.com format.

  • When recipients reply to the email, the email bounces and you may receive the message "Undeliverable message when you send Internet mail in Outlook."

This issue can occur when you register a 3rd party email address (e.g., an email address that is not Outlook.com or Hotmail.com) for your Microsoft Account and don't use Outlook.com for sending and receiving email.

If you typically use an Outlook.com account for email, this issue can occur if there are multiple aliases on the account and the 3rd party email address is the primary alias. Please see the ALTERNATIVE WORKAROUND section below.

WORKAROUND

Set up your account manually as an IMAP or POP account in Outlook.

  1. Close Outlook

  2. Use Windows Key + R then type "outlook /profiles" (omitting the quotes) in the Run window and hit "OK" Note: There is a space between outlook and the forward slash (/)

  3. In the launched "Choose Profile" box, select Options > New

  4. Type a new, unique profile name and select OK

  5. Choose Advanced options > Let me set up my account manually.

  6. Enter your account password, then choose Connect.

  7. If setup fails, select Change Account Settings. Update the account information with the one you received from your email provider or from the POP and IMAP server name reference topic. Choose Connect then then select Done.

  8. In the Choose Profile window, select Set as default profile and select OK.

ALTERNATIVE WORKAROUND

Switch your alias to an Outlook.com or Hotmail.com account.

Note: If you do not have another alias, select the link on the page to create one. Choose Add email and a new alias and then choose the option Create a new email address and add it as an alias.

  1. Go to https://account.live.com/names/Manage and sign in to your Outlook.com account.

  2. Set your Outlook.com email as the primary alias.

  3. In Outlook for Windows, remove and re-add the account. See the steps in this article: Add your Outlook.com account in Outlook for Windows

Last updated: February 8, 2017

ISSUE

If Outlook is connected to a primary Outlook.com account that is also connected to other secondary non-Microsoft accounts (such as Gmail, Yahoo, etc.), when sending an email in Outlook, you are not able to choose the other secondary connected account as the "From" sending account.

If you manually type in the secondary connected account email address in the "From" field, the email is sent as "On behalf of" your primary Outlook.com account.

STATUS: WORKAROUND

Outlook supports sending from a secondary connected account for Microsoft owned domains such as @outlook.com, @live.com, @hotmail.com but has not implemented this functionality for third-party domains.

The Outlook team is listening to your feedback and investigating adding this functionality to future updates. To learn more about how to provide feedback, see How do I give feedback on Microsoft Office. In the meantime, please use the following workaround:

WORKAROUND

You can also add the secondary connected accounts (Gmail, Yahoo, etc.) in Outlook.com as additional accounts in the Outlook profile.

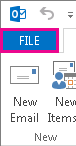
  1. In Outlook, choose the File tab.

    Screenshot of left section of Outlook ribbon with File selected
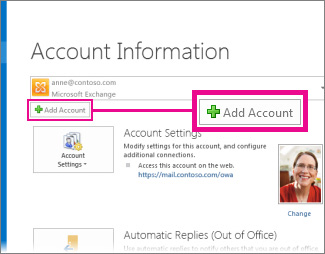
  2. Under Account Information, choose Add Account.

    Add Account command in the Backstage view
  3. On the Auto Account Setup page, enter your name, email address, and password, and then choose Next.

    Note: If you receive an error message after choosing Next, double check your email address and password. If both are correct, see the next section.

  4. Choose Finish.

For more information, please see Outlook email setup.

Last updated: May 2, 2017

Currently, you can't use Outlook on Windows to edit calendars that are shared with your Outlook.com account, even if you've reconnected your Outlook.com account to Outlook. We're working to make it possible to edit shared calendars in Outlook 2016 for Windows.

To edit a shared calendar, go online to your own Outlook.com calendar, open Calendar for Windows 10, or use a mobile device. Read how to Add your Outlook.com account to another mail app.

Last updated: May 2, 2017

ISSUE

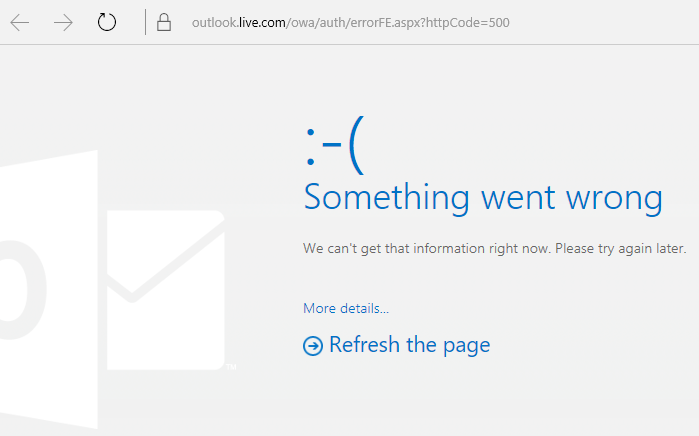
When you try to accept a shared Outlook.com calendar using your Microsoft 365 for business account in Outlook 2016, you might receive the "Something went wrong" error or your sign-in might fail.

STATUS: WORKAROUND

To access the calendar shared with your Microsoft 365 for business account, you'll need to accept the invitation from Outlook on the web, iOS, or Android. If you've already clicked the Accept button in Outlook 2016, you won't be able to re-accept the invitation from another Outlook application. The person who sent you the invitation will need to remove your permissions and then send a new invitation.

Outlook.com "Something went wrong" error code 500

Still need help?

Note: You will need to sign in first to get support. If you can't sign in, go to Account support.

Community Forum button Contact Support button

Have a feature request?

Lightbulb - Idea

We love reading your suggestions on new features and feedback about how you use our products! To learn more about how to share your feedback, see How do I give feedback on Microsoft Office. We're listening.