Sunday, February 28, 2021

Add tasks to a project timeline in project online

The Schedule page lists all of a project's tasks when the project is opened for viewing or editing. The timeline on the Schedule page is a good tool for illustrating tasks at the individual project level.

Tip: You can also add projects and tasks to a timeline in the Project Center to show work happening across your organization.

  1. Open the project for editing.

  2. Click anywhere on the timeline, then on the Tasks tab, in the Tasks group, click Add to Timeline.

    MT12 - Add to Timeline

    Tip: You can change the appearance of the timeline to use different colors, fonts, dates, and callouts.

  3. To add another timeline, click the current timeline, and then click Add in the Timeline Bar group on the Timeline tab.

    Note: Multiple timelines are available in Project Online and Project Server 2016.

    MT05 - Add Another Timeline

  4. To move tasks between timelines, click the task, and then click Move Up or Move Down in the Current Selection group on the Timeline tab.

    MT11 - Move Up/Down

Import contacts to outlook com

You can import contacts from a different email provider or account to your Outlook.com account.

Step 1: Export your list of contacts from your email provider to a CSV file

When you export your contacts, they will typically be stored in a comma separated values file (CSV). 

Tips: 

  • If you have your own contacts list you want to import, see Create your own import contacts template below. 

  • If the file doesn't have UTF-8 encoding, the import tool may not recognize and display all text correctly.

Step 2: Import the contacts to your Outlook.com account

Use a comma separated values file (CSV) to import your contacts into your Outlook.com account.

  1. In Outlook.com, select People at the lower left corner of the page to go to the People page.

  2. On the far right of the toolbar, select Manage > Import contacts.

  3. Select Browse, choose your CSV file, and then select Open.

  4. Select Import.

If possible, export one contact from Outlook.com to a CSV file to use as a template, or use Microsoft Excel to create your own file for importing contacts.

  1. Create a new blank workbook

  2. Add any of these popular entries as column headers in row 1:

    • First Name

    • Middle Name

    • Last Name

    • Title

    • Suffix

    • Nickname

    • E-mail Address

    • E-mail 2 Address

    • E-mail 3 Address

    • Home Phone

    • Business Phone

    • Business Phone 2

    • Mobile Phone

    • Company

    • Home Street

    • Home City

    • Home State

    • Home Postal Code

    • Home Country/Region

    • Web Page

    • Birthday

    • Anniversary

    • Notes

  3. Start a new row for each contact and add the information you want to each column. You don't have to have something in every column.

  4. Save the file as CSV UTF-8 (Comma delimited).

Typically, you can import contacts without worrying about the underlying details of how the text is stored in the CSV file. However, if the contact information includes characters not found in the English alphabet, such as Greek, Cyrillic, Arabic, or Japanese characters, this can cause problems when importing contacts. Therefore, you should save the contacts file with UTF-8 encoding if you have that option during export.

If you can't export your contacts using UTF-8 directly, you can convert the exported CSV file using Excel or third-party apps. How to do this will be different between apps and app versions.

How to convert your CSV file to UTF-8 using Microsoft Excel 2016:

  1. In Excel, create a new blank document (workbook).

  2. From the Data menu, select From Text/CSV. Browse to your exported CSV file (you may have to select to display Text Files (....csv) to see it). Select Import.

  3. In the dialog box that appears, under File Origin, choose the encoding that makes the characters in the text appear correctly, for example, Cyrillic Windows 1251, and then select Load.

  4. Check that characters are displayed correctly in Excel.

  5. Select File >Save As. Enter a name for your file, and select CSV UTF-8 (Comma delimited) (*.csv) as your file type.

  6. Select Save.

Need help?

If you're having trouble importing contacts to your Outlook.com account, see Fix problems importing contacts to Outlook.com.

Related Topics

Create, view, and edit contacts and contact lists in Outlook.com
Export contacts from Outlook.com to a CSV file
Clean up or remove duplicate contacts in Outlook.com
Import and export Outlook email, contacts, and calendar
What version of Outlook do I have?
Add your other email accounts to Outlook.com

Add a new domain in microsoft office 365

Create a document

Your browser does not support video.

Try it!

To create a document, simply open Word, select a blank document or template, and start typing. Word offers many professionally designed templates to help you create letters, resumes, reports, and more.

Create a blank document

  1. Open Word. Or, if Word is already open, select File > New.

  2. Select Blank document.

Create a document using a template

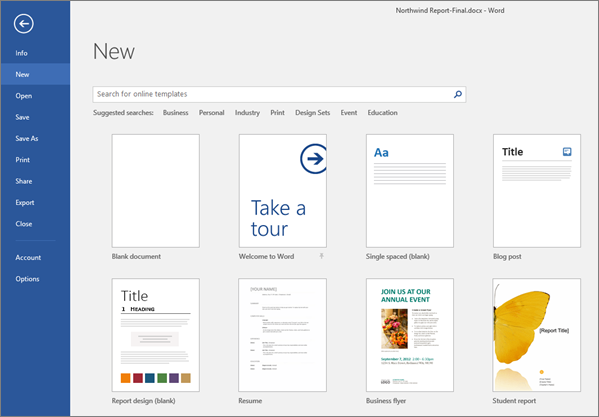
  1. Open Word. Or, if Word is already open, select File > New.

    A list of available Word templates is shown.

  2. Double-click a template to open it.

    Tip: Pin templates you like, so you always see them when you start Word. Select the template and then select the pin icon that appears next to the name of the template.

Search for a template

  1. Open Word. Or, if Word is already open, select File > New.

  2. In the Search for online templates box, enter a search word like letter, resume, or invoice.

    The search box for finding online Word templates is shown.

    Or, select a category under the search box like Business, Personal, or Education.

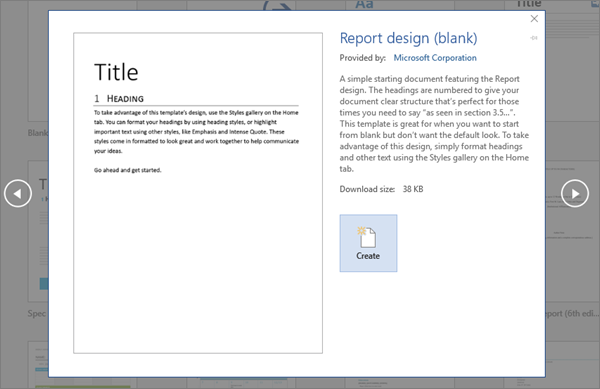
  3. Click a template to see a preview. Click the arrows on the side of the preview to see more templates.

    Shows a Report design template preview in Word 2016.

  4. Select Create.

    For more templates, see Office templates & themes.

Want more?

Create a document in Word

Office templates & themes

Download free, pre-built templates

Save documents online

Discover more Word training at LinkedIn Learning

Transform a word document into a sway

Your browser does not support video.

Saturday, February 27, 2021

Video create accessible links in word

Your browser does not support video.

Learn how to create hyperlinks that use natural language so they're easy to understand.

Create a more meaningful hyperlink

  1. Copy the link you want to work with into a Word document and turn it into a hyperlink.

    Note: Someone using a screen reader to access this link will hear one character read aloud at a time, which is difficult to understand.

  2. Select the whole URL, including the "http" at the beginning and the domain at the end.

  3. Right-click to open the context menu, then find and select Edit Hyperlink.

  4. In the dialog box, look for a text box labeled Text to display. Type in the description text you want.

  5. Click OK.

Want more?

Accessibility in Microsoft 365

If you have hyperlinks in your document, changing their display text to ordinary language can make them much easier to understand for users who rely on screen-reading programs.

Here's a typical URL in the text of a document.

For a sighted user, this might seem fine.

But if you rely on a screen reader or text-to-speech program, it might read the URL out one letter at a time, like this:

"http://www.nps.gove/olym/planyourvisit/lodging.htm"

You can make hyperlinks more accessible by changing their display text to something more natural and meaningful.

Just right-click the hyperlink on the page and then choose Edit Hyperlink.

When you select the link like this, Word automatically copies it into the Edit Hyperlink dialog. But we can change the display text to ordinary language that people -- and screen readers -- can more easily understand.

In the Text to display box, we'll type "National Park Reservations".

And we'll click OK.

Now users who rely on screen-readers will have a much better idea of where this link is sending them.

National Parks Reservation link.

One last thing to keep in mind: When adding display text, avoid phrases like "Click here" or "Learn more".

People who rely on screen readers often browse a list of the article's links to get an idea of its content.

If the display text for all those links is the same generic phrase, it could sound something like this:

"Click here, link. Click here, link, Click here, link."

Not very helpful.

For more on creating accessible documents, visit aka.ms/accessible.

Filter tasks or resources

With Project, you can filter your view so that you only see the critical tasks, milestones, and other information that's most important to you. There are three ways to filter the tasks or resources in your project provides predefined filters for viewing specific aspects of tasks and resources. If none of these filters meet your needs, you can create a new filter or modify an existing filter.

  • Predefined filters    These are filters that ship with Project. These are used to quickly filter for tasks or resources, such as tasks that are incomplete, or resources that are overallocated.

  • Custom filters    These are filters that you design for you own project needs.

  • AutoFilters    When these are turned on, they appear as arrows at the top of each column in a sheet view. Use these to quickly filter the items in a column.

In this article

Filter tasks or resources

There are times when you want to view only a particular type of information in your project. For example, you may want to view only the milestones of your project or see tasks that haven't started. If your project has many tasks and involves many resources, filters can be very useful for viewing a specific range of information. Filters allow you to display only the information you are interested in and hide the rest.

You can filter task or resource data using the pre-defined Project filters. If none of the filters meet your needs, you can create a new filter or modify an existing filter.

Apply or remove a filter

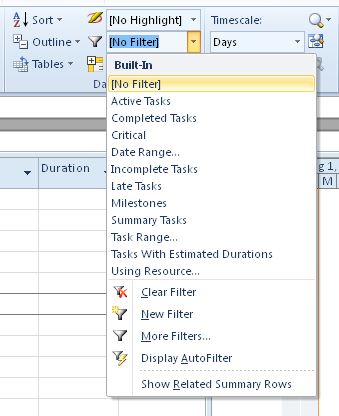
  1. On the View tab, in the Data group, choose a filter in the filter list.

    Filter command

    To apply a filter that isn't on the list, choose More Filters, and then do one of the following:

    • To select a task filter, choose Task, choose a filter name in the Filters list, and then choose Apply.

    • To select a resource filter, choose Resource, choose a filter name in the Filters list, and then choose Apply.

      Note: You cannot apply task filters to resource views or resource filters to task views.

  2. If you apply an interactive filter, type the requested values, and then choose OK.

  3. To turn off a filter, choose No filter in the list of filters.

Apply a color to filtered tasks using a highlight

When filtering tasks or resources, you can apply a highlight. Highlighted tasks or resources appear with non-filtered tasks, but with a different color.

  1. On the View tab, in the Data group, select a filter in the filter list., and then choose More Filters.

  2. Select a filter in the filter list, and then choose Highlight.

Tip:  To apply a different color to the highlighted tasks, use a different text style. Choose the Format tab, and then choose Text Styles. In the Item to Change list, select Highlighted Tasks, and then select formatting options.

Create a custom filter

  1. On the View tab, in the Data group, choose the arrow next to Filter, and then choose More Filters.

    The Project ribbon, showing how to create a custom filter.

  2. Select Task or Resource (depending on which type of filter you want to create), and then choose New.

  3. Type a name for your new filter. Select Show in menu if you want to include this filter in the Data group list.

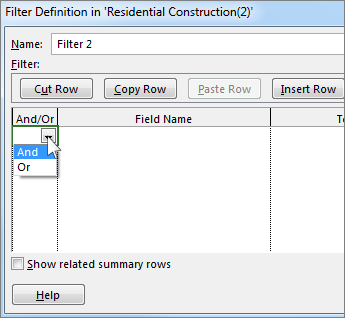
  4. In the And/Or column, choose And to show results that meet more than one of your filter criteria. Choose Or to show rows that meet one or the other.

    Choose And or Or, depending on the type of results you want from your filter.

  5. In the Field Name column, choose which field you want to filter.

  6. In the Test column, decide how you want to match what you chose for the Field Name column to the Value(s) column in the next step.

  7. In the Value(s) column, choose the value you want, or type a new one.

    If you chose Equals or Does Not Equal in the Test column, you can type a wildcard character in the Values column (instead of choosing an option from the list). For example, typing a question mark (?) would find single characters. Typing an asterisk (*) finds any number of characters. If you use wildcards, be sure that your choice for the Field Name column involves text (like Name), instead of numbers (like Duration).

  8. To add another row to your filter (and to choose another field name to filter on), choose Insert Row. You can group rows by adding a blank row. Add an And or Or in the blank row to filter one group against another.

  9. When you're done, choose Save.

Tip: To quickly remove all of your filters, use the F3 key. Keep in mind that task filters only work with task views, and resource filters only work with resource views.

Modify an existing filter

  1. On the View tab, in the Data group, select the filter list, and then choose More Filters.

  2. Do one of the following:

    • To modify a task filter, choose Task, choose the filter you want to modify, and then choose Edit.

    • To modify a resource filter, choose Resource, choose the filter you want to modify, and then choose Edit.

  3. Modify the settings for the filter using the controls in the Filter Definition dialog box.

Use AutoFilters

You can apply an AutoFilter to fields in any sheet view. In addition to standard filters, project provides AutoFilters, visible at the top of each column in sheet views.

Apply and remove AutoFilters

  1. On the View tab, in the Data group, choose the arrow for the filter list, and then choose Display AutoFilter.
    Filter command

  2. Choose the AutoFilter arrow next to the column heading that contains the information you want to display, and then choose a value to filter the table.
    The AutoFilter arrow and field heading turn blue.

  3. To apply an additional condition based on a value in another column, repeat step 2 for the other column.

  4. To remove the filtering on a specific row, choose Clear All Filters in the AutoFilter list for that field.

  5. To turn off AutoFilters, choose Display AutoFilter again.

    Note:  If information changes in one of the rows in your view, you can refresh your AutoFilter settings by choosing the arrow and re-selecting the filtering values.

Create a custom AutoFilter

  1. Display AutoFilters.

  2. Choose an AutoFilter arrow, point to Filter, and then choose Custom.

  3. Choose the operator you want to use in the first box, and then type or select the value you want to match in the second box.

    For example, to match a specific date in a date field, choose the equals operator in the first box, and then select the date you want to match in the second box.

  4. To apply two conditions to the AutoFilter, do one of the following:

    • To display rows in your view that meet both conditions, choose the operator and value you want in the second row of boxes, and then choose And.

    • To display rows in your view that meet either one condition or another condition, choose the operator and value you want in the second row of boxes, and then choose Or.

  5. To save your AutoFilter settings, choose Save.

    If your view already has a predefined filter applied, then the conditions you set for the AutoFilter are included as additional conditions to the current filter. When you save an AutoFilter setting, the filter is saved with other filters in your file and is available only through the More Filters dialog box.

Turn on AutoFilters automatically for new projects

  1. On the File tab, choose Options.

  2. Choose Advanced, and then in the General section, select the Set AutoFilter on for new projects check box.

Top of Page