Use options on the Line and Paragraph Breaks tab to control how lines and paragraphs break between text boxes or columns. These options apply only to selected text or paragraphs.
Widow/Orphan control Widows and orphans are single lines of text in a paragraph that print at the top or bottom of a text box or column. To prevent widows and orphans by always having at least two lines of text at the top or bottom of a text box, select the Widow/Orphan control check box.
Keep with next You can prevent two paragraphs from being split between two text boxes or columns. To keep a selected paragraph and the one that follows it together in the same text box or column, select the Keep with next check box.
Keep lines together You can prevent a paragraph from being split between two text boxes or columns. To keep all the lines of a selected paragraph together in the same text box or column, select the Keep lines together check box.
Start in next text box To make sure that a selected paragraph always starts at the top of a text box, select the Start in next text box check box.
You can quickly add a shape, such as a circle or an arrow, from the Insert tab in Publisher.
On the Insert tab, click Shapes.
Scroll through the menu of choices, including basic shapes, lines, block arrows, flowcharts, callouts, and stars and banners.
Click in your publication where you want the shape to appear, and then click any image handle and drag until you have the size and proportions that you want.
Tip: When you click the shape in your publication, the Format tab appears. You can use the options on this tab to further customize aspects of your shape, including fill, outline, effects, arrangement in relation to other objects, rotation, and exact size measurements.
Visio has several tools to help you lay out shapes and connectors neatly and evenly.
Align options make shapes line up straight.
Position options make even spacing between shapes.
Template-specific layout commands: Some diagram templates come with their own layout commands that are designed specifically for that diagram type, including the Organization Chart and Brainstorming Diagram templates.
Position options make even spacing between shapes.
Template-specific layout commands: Some diagram templates come with their own layout commands that are designed specifically for that diagram type, including the Organization Chart and Brainstorming Diagram templates.
How to auto-align and evenly space your shapes at the same time
This option is leaves your shapes as close as possible to their current positions, but aligned with each other and evenly spaced.
Select the shapes you want to align and space, or click outside the diagram to remove any selection. If nothing is selected, all shapes will be affected.
Select Home > Arrange > Position > Auto Align & Space.
Align shapes
The commands in this section align shapes without changing the spacing between the shapes. You can hold the pointer over a command to see a preview of the effect it will have before you commit to the change.
Straighten your connectors
This option adjusts the alignment of the shapes to make the connector lines as straight as possible.
Select the shapes you want to align.
On the Home tab, in the Arrange group, click Align and then click Auto Align.
Choose an alignment direction
Select the primary shape that you want the other shapes align to.
Press and hold the Shift key while you select the other shapes you want to align to the primary shape.
On the Home tab, in the Arrange group, click Align and select an alignment option.
Position commands
The Position button, on the Home tab in the Arrange group, helps you evenly space shapes or change the orientation of a shape or shapes.
Space shapes evenly
The commands in this section even up the spacing between shapes without changing their alignment. You can hold the pointer over a command to see a preview of the effect it will have before you commit to the change.
Select the shapes you want to space, or click a blank area of the page to remove any selection. If nothing is selected, all shapes will be affected.
Click Home > Arrange > Position > Auto Space to make even spacing between the shapes.
To set the amount of spacing precisely, click Spacing Options and then set the distance you want.
For another spacing method, select the heading below to open it and see the detailed instructions.
The spacing commands from earlier versions of Visio are still available, which present different spacing options.
Select three or more shapes by holding down Shift or Ctrl while clicking shapes.
Note: If you don't select three or more shapes, the commands for distributing shapes are unavailable.
On the Home tab, in the Arrange group, click Position, and then select a Distribute option.
For other distribution options, select More Distribute Options. In the dialog box:
For vertical distribution, the boundaries are defined by the top and bottom shapes in the selection.
For horizontal distribution, the boundaries are defined by the leftmost and rightmost shapes in the selection.
To add guides and glue the shapes to them, select the Create guides and glue shapes to them check box. If you choose this option, you can move an outermost guide to redistribute all the shapes.
Keep shapes away from printed page breaks
If a diagram is going to be printed, you can make sure that no shapes are divided at page breaks.
Select shapes that you want to move off page breaks, or click outside the diagram to remove any selection. If nothing is selected, all shapes will be affected.
Select Home > Arrange > Position, and then select Move off Page Breaks.
Another option is to set Auto Align and Auto Space options so these commands are prevented from placing shapes on page breaks:
Select Home > Arrange > Position and check whether Avoid Page Breaks is turned on. If not, click to select it.
A check mark appears on the menu next to the command when it's turned on.
Re-orient shapes
The options on the Rotate Shapes submenu rotate or flip a selected shape.
Select a shape, and then click the appropriate command.
On the Home tab, in the Arrange group, click Position, and then click Rotate Shapes, and select an option.
If more than one shape is selected, these commands rotate or flip them while maintaining their relative positions to each other, as though the page were turned.
In contrast, the commands on the Rotate Diagram submenu rotate or flip the diagram orientation, but leave the shape orientation as it is.
Manually position shapes
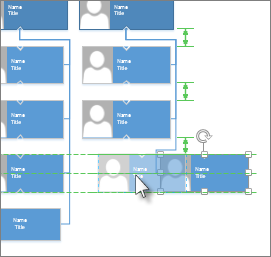
When you drag a shape, green positioning guides help you place it exactly where you want it. In the illustration below, the distribution arrows appear when the shape is dragged to match the distribution of other nearby shapes. Dashed lines appear to help you align horizontally or vertically with other shapes.
Template-specific layout commands
If the template you're using for a diagram has a tab devoted to that specific diagram type, like the Organization Chart and Brainstorming Diagram templates do, check whether it has a layout command designed for that diagram. If so, try it and see if you like the results.
Align options make shapes line up straight.
Space options make even spacing between shapes.
Template-specific layout commands: Some diagram templates come with their own layout commands that are designed specifically for that diagram type, including the Organization Chart and Brainstorming Diagram templates.
Auto Align & Space button
The Auto Align & Space button is located on the Home tab, in the Arrange group. This tool is designed to leave your shapes as close as possible to their current positions, but aligned with each other and evenly spaced.
Select the shapes you want to align and space, or click outside the diagram to remove any selection. If nothing is selected, all shapes will be affected.
Click Auto Align & Space.
Position commands
The Position button is located on the Home tab, in the Arrange group. Click the arrow to see commands for aligning, spacing, and orienting selected shapes.
Align Shapes
The commands in this section align shapes without changing their spacing. You can hold the pointer over a command to see a preview of the effect it will have before you commit to the change.
To use Auto Align
Select the shapes you want to align.
On the Home tab, in the Arrange group, click Position.
Click Auto Align.
To specify an alignment direction
Select the shape to which you want to align other shapes, and then press SHIFT and click the shapes you want to align to it.
The primary shape has a thick magenta outline.
On the Home tab, in the Arrange group, click Position.
Click the alignment option you want.
The specific Align commands align the selected shapes with the primary shape. However, the Auto Align command does not align to a primary shape.
Space Shapes
The commands in this section even up the spacing between shapes without changing their alignment. You can hold the pointer over a command to see a preview of the effect it will have before you commit to the change.
To use Auto Space
Select the shapes you want to space, or click outside the diagram to remove any selection. If nothing is selected, all shapes will be affected.
On the Home tab, in the Arrange group, click Position.
Click Auto Space to move all selected shapes to a specified distance from neighboring shapes.
To change the spacing distance, click Spacing Options and then set the distance.
To use the Distribute options
The spacing commands from earlier versions of Visio are still available, which present different spacing options.
Select three or more shapes by holding down SHIFT or CTRL while clicking shapes. The commands for distributing shapes are disabled if you don't select three or more shapes.
On the Home tab, in the Arrange group, click Position, and then point to Space Shapes.
Choose a distribution option. Click More Distribute Options to open the Distribute Shapes dialog box.
For Vertical distribution, the boundaries are defined by the top and bottom shapes in the selection.
For Horizontal distribution, the boundaries are defined by the leftmost and rightmost shapes in the selection.
To add guides and glue the shapes to them, select the Create guides and glue shapes to them check box. If you choose this option, you can move an outermost guide to redistribute all the shapes.
Move shapes off page breaks
If a diagram is going to be printed, you can make sure that no shapes are divided at page breaks.
Select shapes that you want to move off page breaks, or click outside the diagram to remove any selection. If nothing is selected, all shapes will be affected.
On the Home tab, in the Arrange group, click Position.
Point to Space Shapes, and then click Move off Page Breaks.
Another option is to set Auto Align and Auto Space behavior so these commands are prevented from placing shapes on page breaks.
On the Home tab, in the Arrange group, click Position.
Point to Space Shapes, and check whether Avoid Page Breaks is selected. If not, click to select it.
Orient Shapes
The commands on the Rotate Shapes submenu rotate or flip a selected shape.
Select a shape, and then click the appropriate command.
If more than one shape is selected, these commands rotate or flip them while maintaining their relative positions to each other, as though the page were turned.
In contrast, the commands on the Rotate Diagram submenu rotate or flip the diagram orientation, but leave shape orientation as it was.
Template-specific layout commands
If the template you're using for a diagram has a tab devoted to that specific diagram type, like the Organization Chart and Brainstorming Diagram templates do, check whether it has a layout command designed for that diagram. If so, try it and see if you like the results.
Re-layout shapes
On the Shape menu, click Re-layout Shapes.
The Re-layout Shapes command works best with connected drawings, such as flowcharts, network diagrams, organization charts, and tree diagrams. As well as when shapes are connected in the correct order. For example, in a top-to-bottom drawing, the connector's begin point should be connected to the top shape, and the connector's end point should be connected to the bottom shape.
Configure the shape layout
Do one of the following:
To lay out an entire page, make sure that no shapes are selected.
To lay out part of a page, select those shapes.
On the Shape menu, click Configure Layout.
Under Apply settings to, click either Selection or Current page.
Under Placement, click the placement options that you want:
Style Click this option to set the style for how the shapes will be laid out. Look at the preview to see if what you select is what you want. Click Circular for drawings with no direction, such as network drawings.
Direction Click this option to set the direction that is used to place shapes. Look at the preview to see if what you select is what you want.
Alignment Click this option to set how the shapes are aligned. This option is enabled only if you select the Hierarchy placement style.
Spacing Click this option to set the spacing between shapes.
Under Connectors, click the connector options that you want:
Style Click this option to set the type of drawing path, or route, that is used to connect shapes. Look at the preview to see if what you select is what you want.
Appearance Click this option to specify whether the connectors are straight or curved. Look at the preview to see if what you select is what you want.
To apply the connector options that you selected, select the Apply routing style to connectors check box.
To enlarge the drawing page when shapes are laid out, select the Enlarge page to fit drawing check box.
Click OK.
You can align selected shapes on the same vertical or horizontal axis.
You can position shapes evenly by making the spacing between them consistent.
Align shapes
Open the diagram for editing.
Select two or more shapes.
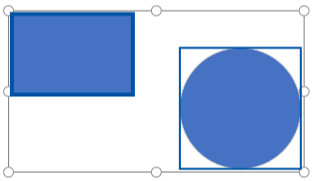
Select Home > Align Shapes, and then select from the list of options.
Align Left, Align Center, and Align Right work best when you're starting with a vertically oriented set of shapes.
Align Top, Align Middle, and Align Bottom work best when you're starting with a horizontally oriented set of shapes.
In this illustration, we've selected Align Top:
Position shapes
Select three or more shapes.
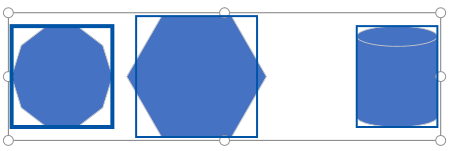
Select Home > Position Shapes, and then select from the list of positioning options. In this example, you select Distribute Horizontally.
You can distribute shapes horizontally or vertically.
On OneNote for the web, you can export a page to PDF (portable data format), which you can then print later.
Note: You can't export an entire notebook or section to PDF. You can print only one page at a time.
Export to PDF using a web browser on Windows
From your web browser, go to the OneNote for the web page you want to export as a PDF.
Click or tap File > Print, and then click or tap Print again.
To export to PDF, in the Printer list, select Microsoft Print to PDF.
OneNote will save the PDF to your Documents folder.
Open the PDF file from your Documents folder to print it.
Export to PDF using a web browser on a Mac
From your web browser, go to the OneNote for the web page you want to export as a PDF.
On the File menu, click Export as PDF.
In the Export As box, type a file name and choose where you want to save the PDF.
Click Save.
Open the PDF file from your Documents folder to print it.
Note: When you save notes as a PDF file, you're saving a static snapshot of those notes. Any changes to those notes that you later make in OneNote won't get changed in the PDF file you created.
PDF files you create with OneNote can be viewed and printed on your Mac with the free Adobe Reader software.
On Windows touch devices, you can use the Ruler on the Draw tab of the Ribbon to draw straight lines or to measure distance. The ruler pivots to any position you want: horizontal, vertical, or any angle in between. It has a degrees setting so that you can set it at a precise angle, if necessary. You can manipulate the ruler by using your fingers.
Draw a line
Select the page where you want to use the ruler.
Tap the Ruler on the Draw tab to make it appear on your note.
Position the ruler at the angle you want.
Use one finger to move the ruler up/down or left/right.
Use two fingers to rotate the ruler to the angle you want.
Use three fingers to rotate the ruler by five-degree increments.
To draw a line Tap a pen or highlighter on the Draw tab, and begin drawing.
Hide the ruler
Tap the Ruler on the Draw tab to make it disappear from the drawing surface of your notes.
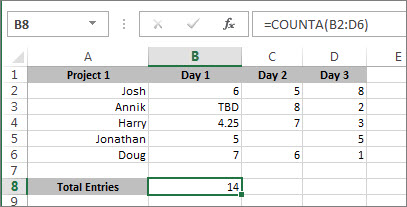
Suppose you need to know if your team members have entered all their project hours in a worksheet. In other words, you need to count the cells that have data. And to complicate matters, the data may not be numeric. Some of your team members may have entered placeholder values such as "TBD". For that, use the COUNTA function.
Here's an example:
The function counts only the cells that have data, but be aware that "data" can include spaces, which you can't see. And yes, you could probably count the blanks in this example yourself, but imagine doing that in a big workbook. So, to use the formula:
Determine the range of cells you want to count. The example above used cells B2 through D6.
Select the cell where you want to see the result, the actual count. Let's call that the result cell.
In either the result cell or the formula bar, type the formula and press Enter, like so:
=COUNTA(B2:B6)
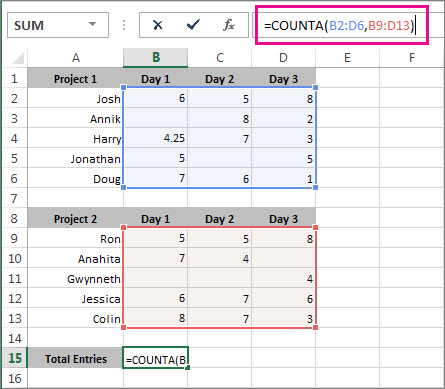
You can also count the cells in more than one range. This example counts cells in B2 through D6, and in B9 through D13.
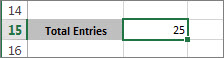
You can see Excel highlights the cells ranges, and when you press Enter, the result appears:
If you know you don't need to count text data, just numbers and dates, use the COUNT function.
Whether you receive a link in an email that appears to be from your bank but isn't, fake notifications from social networking sites, or malicious advertisements, we can help you protect your account. We keep up with the latest scams so you don't have to. Though we guard against many different types of threats to your account, there are also several steps you can take to keep your account and your personal information safe.
Email
If you receive a message that looks suspicious, or contains an attachment you're not expecting, look for the trusted sender icon and mail header. If you see this icon, the email is safe to open. If you don't see the trusted sender icon, contact the sender to verify they sent the message.
If you see a yellow safety bar at the top of your message, then the message contains blocked attachments, pictures, or links to websites. Make sure you trust the sender before downloading any attachments or pictures or clicking any links. Emailing the sender to verify they intended to send you an attachment is also a good practice for any attachments you're not expecting.
A red safety bar means that the message you received contains something that might be unsafe and has been blocked by Outlook.com. We recommend that you don't open those email messages and delete them from your inbox.
If the URL that appears in the address bar when you sign in doesn't include login.live.com, you could be on a phishing site. Don't enter your password. Try to restart your browser and navigating to Outlook.com again. If the problem continues, check your computer for viruses.
Your account
A strong password contains letters, numbers, punctuation, symbols, and numbers. Create a unique strong password for Outlook.com and change it periodically. We don't recommend using the same password for other services.
Don't
Do
Don't use the same password for different accounts.
Do make the new password significantly different from previous passwords.
Don't recycle passwords.
Do change your password regularly.
Don't use a single word for your password.
Do use a password phrase with no spaces between words.
Don't use easy-to-remember personal information like your name, names of family members, your address, or phone number.
Do use an easy-to-remember sentence or phrase converted into a string of initials, numbers, or symbols.
Don't use passwords like "password," "money$$$," or "12345678."
Do make your password hard to guess even if someone knows a lot about you (avoid names and birthdays of your family, or your favorite band).
Microsoft will never ask for your password in email, so never reply to any email asking for any personal information, even if it claims to be from Outlook.com or Microsoft.
Two-step verification helps protect your account by making it more difficult for a hacker to sign in, even if they have your password. Any time you sign in from a device that isn't trusted, you'll be prompted to enter a security code. For more information, see Use two-step verification with Outlook.com.
If you receive an email notifying you of unusual activity on your account, you can see when and where your account has been accessed, including successful sign-ins and security challenges, on the recent activity page at https://account.live.com/activity. If you're not sure the email is from Microsoft, see How to recognize phishing email messages, links, or phone calls. It has tips to help you determine if an email is from a legitimate source.
Add security info to your account to make it easier to recover your account if it's hacked. Because this information can help keep your account safe, it's a good idea to add as much as possible.
If you ever lose access to your account, having a secondary email address and mobile phone number can help us restore your access quickly. Get more information about why it's a good idea to add security information.
Your computer
Most operating systems have free software updates to enhance security and performance. Because updates help keep your PC or phone safer, we strongly recommend that you set up your PC or phone to get these updates automatically.
You can help protect your computer against viruses by using antivirus software and updating it regularly.
Still need help?
Note: You will need to sign in first to get support. If you can't sign in, go to Account support.


 should be connected to the top shape, and the connector's end point
 should be connected to the bottom shape.
 , and then select from the list of options.

 , and then select from the list of positioning options. In this example, you select Distribute Horizontally.
 on the Draw tab to make it appear on your note.