Tuesday, December 14, 2021

Export and import onenote notebooks

No matter what version of OneNote you use, you can download a copy of any of your OneNote notebooks to your PC or Mac — either as a backup or to upload its contents to another account.

Note: Exporting and importing notebooks through OneNote for the web is only available for notebooks stored on personal OneDrive accounts, not for notebooks stored on OneDrive for Business or SharePoint. For information about exporting notebooks to PDF files from OneNote 2016 for Windows, see Export notes from OneNote as a PDF.

Export a OneNote notebook

To download a notebook from OneNote to your computer, do the following:

  1. In any modern Web browser, go to OneNote for the web.

    Tip: Exporting notebooks is not currently supported in Windows Internet Explorer. We recommend using Microsoft Edge on Windows 10, or any other modern browser in older versions of Windows.

  2. Enter your credentials for the Microsoft account containing the notebook you want to download. (Skip this step if you're already signed in.)

  3. Under My Notebooks, right-click (PC) or Control-click (Mac) the name of the notebook that you want to export, and then click Export notebook.

  4. On the screen that opens, click Export.

  5. Follow your browser's prompts to save the file in the location you choose.

Tip: If the notebook you're exporting is very large or contains a large number of image or file attachments, it could take a long time to download your content. Make sure you have enough space on your hard drive to complete the download.

Each downloaded notebook is saved to your hard drive in Zip file format. If you want to later import a downloaded notebook, you'll need to first unzip its notebook folder from the Zip file, and then import the folder to OneNote for the web.

Import a OneNote notebook

To import a notebook to OneNote that you've previously downloaded, do the following:

  1. Unzip the folder found in the file you previously downloaded (see "Export a OneNote notebook" earlier in this article). This unzipped folder is your notebook folder.

  2. In any modern Web browser, go to the OneNote Notebook Importer.

    Tip: Importing notebooks is not currently supported in Windows Internet Explorer. We recommend using Microsoft Edge on Windows 10, or any other modern browser in older versions of Windows.

  3. On the screen that opens, click Import.

  4. On your computer, navigate to the location of your notebook folder (see Step 1), click to select it, and then click Open to import it.

Tip: If the import process begins but then appears not to finish, your OneDrive account might be low on available space. Manually delete any unnecessary files from your OneDrive storage (including any failed notebook uploads) and then try importing the notebook folder again.

Troubleshooting

If you're running into any issues while exporting or importing your notebooks, try the suggestions below.

My notebook download doesn't seem to finish

Over time, notebooks can significantly increase in size, especially if you use OneNote to collect embedded documents, image scans, PDFs, or video and audio clips as part of your notes. Before attempting to download large notebooks, make sure you have several gigabytes (GB) of available space on your computer's hard drive. If a download is interrupted because you ran out of storage, you'll need to restart the download again after you've recovered enough hard drive space.

My download contains only an "errors.txt" file, but no notebook folder

Whenever a notebook is downloaded successfully, it is saved as a Zip file that contains a folder with the same name as the notebook. In rare cases, it's possible that a downloaded Zip file doesn't contain any notebook folders but only shows a file called errors.txt. When this happens, something went wrong during the export process. To troubleshoot this issue, open the errors.txt file from the downloaded Zip file in a text editor and read its contents for more specific information.

OneNote doesn't recognize the notebook I'm trying to import

If OneNote rejects a notebook file that you're trying to import, it's likely that you're trying to upload the original Zip file that was created when you previously downloaded the notebook. To solve this issue, double-click to open the original Zip file, and then extract (copy) the notebook folder from the Zip file to any location on your hard drive (for example, the desktop). When the notebook folder has been successfully saved outside of its Zip file, you can import the folder into OneNote.

I got an error message saying I don't have enough space to import my notebook to OneDrive

If your OneDrive account is low on available space, manually delete any unnecessary files from your OneDrive storage (including any failed notebook uploads) and then try importing the notebook folder again.

I got an error message saying my notebook is too large to export

Please move portions of your notebook into separate, smaller notebooks and then try exporting these smaller notebooks instead.

I'm still having trouble and need help

If you've tried the suggested troubleshooting tips in this article but are still having trouble exporting or importing your OneNote notebooks, please report your in the OneNote forums on Microsoft Answers so we can investigate the cause and help you find a solution. Thank you!

Important: If your exported Zip file contained an errors.txt file, please be sure to include the information it contains.

Add edit or delete list items

Lists can include a variety of list items, such as contacts, calendars, announcements, and issues-tracking. Your list can also include the following items: Text, Number, Choice, Currency, Date and Time, Lookup, Yes/No, and Calculated columns.  

You can create lists in Microsoft SharePoint, the Lists app in Microsoft 365, or Teams. Learn to get started with Lists in Microsoft Teams.

You can also attach files to a list item to provide additional details, such as a spreadsheet containing supporting numbers or a document containing background information.

Note: To add, edit, or delete list items, you must have edit permissions. If you don't see any options to add or edit list items, contact your SharePoint admin. To delete a complete list, see Delete a list in SharePoint.

Add an item to a list

There are two ways to add an item to a list - single items in list view, or multiple items in grid view (formerly known as "Quick Edit"). The following steps use the modern Microsoft 365 experience.

  1. Navigate to the site containing the list where you want to add an item.

  2. Above the list, select the + New or + New item link to open the New item window.

    Note: A site can be significantly modified in appearance and navigation. If you cannot locate an option, such as a command, button, or link, contact your administrator.

  3. Enter the information for the list item.

    • Note: You must enter data into a column (field) that has an asterisk * next to it.

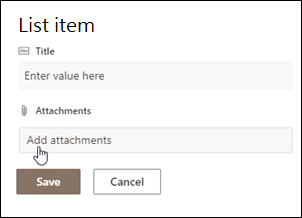
    • To attach a file or files to the list item, in the New item window, select Add attachments, and then select the file. Hold down the CTRL key when selecting files to attach more than one file.

      Click item to add attachments

      Select Open, and then select OK. If the Add attachments command is unavailable, your list doesn't support attachments.

  4. Select Save.

  1. Navigate to the site containing the list where you want to add an item.

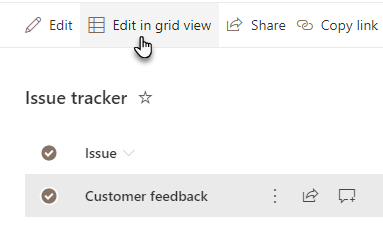
  2. At the top of the list, select Edit in grid view. 

    Edit in grid view

  3. Enter the information for the list item.

    For columns that require information, an error dialog appears if you don't enter anything.

    Important: You can't attach a file to multiple list items when using Edit in grid view. 

  4. Do one of the following:

    • When you're finished entering the information, select Exit grid view.

    • To delete an item, select the circle to the left of the item, and then select Delete in the command bar.

Just as with adding items, there are two ways to edit an item in a list. You can edit an item in list view, which is the default method, or you can edit multiple items in the Edit in grid view.

Edit Item

  1. Navigate to the site containing the list where you want to edit an item.

  2. Select the name or title of the list.

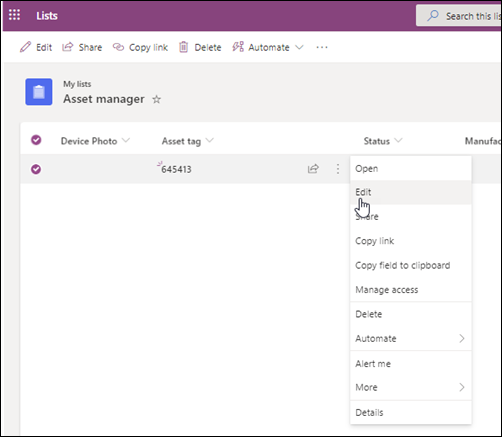
  3. Select the circle next to the item you want to edit, right click, and then select in the dropdown.

    • If you want to edit multiple items, select the circle for both items.

  4. In the list item, edit the information you want to change.

  5. Click Save.

  1. Navigate to the site containing the list that you want to add an item.

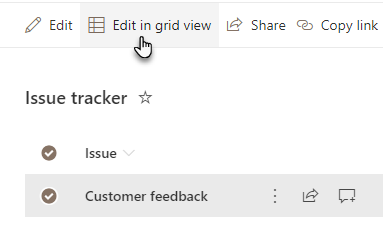
  2. At the top of the list, select Edit in grid view.

    Edit in grid view

    You can also select the List tab, and then select Edit in grid view.

  3. Edit item information as you would in a spreadsheet.

    Important: You can't attach a file to multiple list items when editing in grid view. 

  4. When you are finished editing the information, select Exit grid view.

  1. Navigate to the site containing the list where you want to edit an item.

  2. Select the name or title of the list.

  3. Select the circle next to the item you want to edit, and in the dropdown, select Edit. If you're in Quick edit view, select the circle next to an item.

  4. Select Add attachments, and then select the file. Hold down the CTRL key when selecting files to attach more than one file.

    Click item to add attachments

    Select Open, and then select OK. If the Add attachments command is unavailable, your list doesn't support attachments.

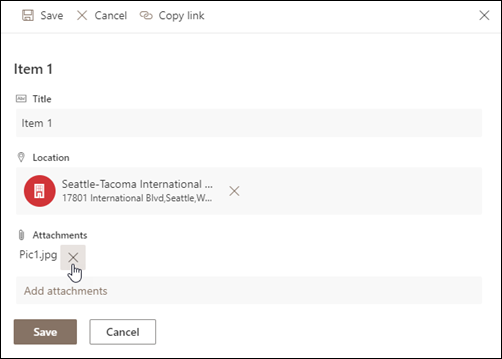
  5. To delete an attachment from a list item, select Edit Item. In the Attachments section on the form next to the attachment you want to remove, select Delete.

    Delete attachment

  6. Select Save.

Caution: Deleting items may be permanent and you might not be able to recover them. Consider moving or archiving the items instead. Depending on how your site was configured, you may be able to recover the items and its contents from the Recycle Bin. For more info, see Restore deleted items in Site recycle bin.

  1. Navigate to the site containing the list where you want to delete the items.

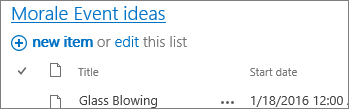
  2. Select the title of the list in which you want to work.

    List Web Part with arrow pointing at the title link.

    Note: A site can be significantly modified in appearance and navigation. If you cannot locate an option, such as a command, button, or link, contact your administrator or manager.

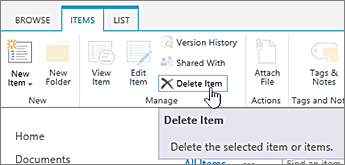
  3. You can select one or more items to delete at a time. Select the checkmark to the left of the items you want to delete, and from the Manage section of the Items tab, select Delete Item.

    Delete Item

To add columns to lists, see Create a column in a list or library.

To delete columns from lists, see Delete a column in a list or library.

Views can show different columns, so you can hide columns without deleting. For more info, see Create, change, or delete a view of a list or library.

Additional resources

Hide names and addresses in a personal distribution list

To keep the names and e-mail addresses of people included on a personal distribution list private, or hidden, use the Bcc field.

Notes: 

  • It's not possible to display the distribution list name in the To box without allowing recipients to expand it and show the entire list of names and e-mail addresses.

  • The following procedure will use the sender's name/address in the To box and the distribution list will be kept hidden in the Bcc box.

Add the Bcc box to your email if it isn't there already

  • In an open message, on the Message Options or Options tab, in the Fields or Show Fields group, click Show Bcc or Bcc.

Hide the distribution list in the Bcc box

  1. In an open message, add your e-mail address in the To box.

  2. In the Bcc box, add the distribution list.

  3. Type your message and click Send.

For information about creating a contact group or distribution list, go to Create a contact group or distribution list in Outlook.

Take notes in onenote

Type notes

  1. Click anywhere on a page and then start typing.

    As you type, a note container appears around the text, which lets you resize or move the note on the page.

  2. Keep typing within the same note container, or click elsewhere on the page to create a new note.

alternate text

Add a page

In OneNote, you can add new pages to your notebook whenever you want. Each page can be given a title to make searching for information in your notebook easier.

  1. At the bottom of the page list, click the + Page button.

    Note: If you don't see the page list, click the Show Notebooks button alternate text.

  2. When the blinking cursor appears on the page header, type a title or description for the new page, and then press Enter to start taking notes on it.

Screenshot of the Add Page button in OneNote

Rename a page

As you edit and change notes over time, the titles of some of your pages might no longer be accurate since you first created them. You can easily rename pages to better summarize their contents.

  1. In the page list, right-click the page title you want to change, and then click Rename Page.

    Note: If you don't see the page list, click the Show Notebooks button alternate text.

  2. Type the new page title you want, and then press Enter.

Screenshot of a page being renamed in OneNote

Add a section

In OneNote, you can add new sections to your notebook whenever you want. Sections can be named to better identify the pages they contain and how they relate to a particular subject.

  1. At the bottom of the section list, click the + Section button.

    Note: If you don't see the section list, click the Show Notebooks button alternate text.

  2. When the New Section placeholder name is highlighted, type a name or description for the new section, and then press Enter.

    Each new section you create will automatically contain a blank, untitled page for you to start taking notes on.

Screenshot of the Add Section button in OneNote

Rename a section

As you add and remove pages from your notebook over time, the names of some of your sections might no longer be accurate since you first created them. You can easily rename sections to better summarize the pages they contain.

  1. In the section list, right-click the section name you want to change, and then click Rename Section.

    Note: If you don't see the section list, click the Show Notebooks button alternate text.

  2. Type the new section name you want, and then press Enter.

Screenshot of a section being renamed in OneNote

Sharepoint 2013 workflow throttling and performance in sharepoint online and project online

Introduction

This article contains information about throttling scenarios and limitations for workflows that use the SharePoint 2013 workflow platform type in SharePoint and Project in Microsoft 365.

Note: SharePoint 2010 workflows have been retired since August 1, 2020 for new tenants and removed from existing tenants on November 1, 2020.  If you're using SharePoint 2010 workflows, we recommend migrating to Power Automate or other supported solutions. For more info, see SharePoint 2010 workflow retirement.

More Information

To learn more about throttling in SharePoint, go to How to: Avoid getting throttled or blocked in SharePoint.


To learn more about email message limits for SharePoint workflows, go to "Daily email limit has exceeded and your workflow has been suspended" error in SharePoint.


SharePoint 2013 workflow activity can be regulated by two levels of throttling:

  • SharePoint throttling

  • Workflow service throttling

Workflow service throttling

Throttling is performed to allow for fair resource usage. It also protects the environment from harmful workflows and workflows that don't follow best practices. Workflow service throttling isn't controlled by SharePoint. The workflow service and SharePoint are two independent services, and each service throttles requests in the interest of overall service health. In the workflow service, throttling is performed at the workflow scope level that aligns with SharePoint sites. Throttling isn't globally accounted for. Instead, each workflow back-end service tracks a workflow scope's usage independently. There may be one or more workflows in a workflow scope. Workflow throttling is dynamic and will be reevaluated periodically by workflow scope and by workflow service back end. 

The Workflow service also limits the number of outbound requests that a single workflow instance can generate. In a 24-hour period, a single workflow instance can generate up to 5,000 outbound requests. After 5,000 outbound requests are generated in a 24-hour period, the workflow is suspended by the Workflow service.

The Workflow Status page for the workflow will contain information about the suspended workflow. In this scenario, the information balloon for the Internal Status will display the following message:

  • The instance has exceeded the outbound http request quota for a 1.00:00:00 time period. The 5000 request limit was reached in <time>.

    NOTE: The <time> placeholder represents the time that it took to reach the 5,000 request limit for your workflow.

You can resume the suspended workflow instance by clicking Resume for the workflow or by using the SharePoint Workflow Client Object Model after 24 hours have passed. This must occur before the workflow is terminated.

If the workflow exceeds the CPU usage limit, the Workflow Status page for the workflow will contain information about the suspended workflow. In this scenario, the information balloon for the Internal Status will display the following message: 

  • The workflow instance exceeded the CPU usage limit of throttle of 00:00:01.2000000 and could not be unloaded because it was not persistable.


Suspended workflow instances will be terminated after 10 days. The information balloon for the Internal Status will display the following message if the workflow is terminated:

  • System.Activities.Statements.WorkflowTerminatedException: The instance has been moved from the Suspended state to the Terminated state because it has expired.

A terminated workflow will eventually be cleaned up. After a terminated workflow is cleaned up, it will display the following message:

  • Sorry, something went wrong.
    We can't find that workflow. Completed instances are automatically cleaned up

Workflow scopes

A workflow scope is defined as a site in a site collection. For example, the following URL is for a root site collection and is considered a workflow scope:

    https://contoso.sharepoint.com/sites/rootsite

An example of another workflow scope that's in the same site collection is as follows. However, this workflow scope is in a subsite.

    https://contoso.sharepoint.com/sites/rootsite/subsite

What's a request?

SharePoint 2013 workflows are built upon the add-ins model for SharePoint, and they use REST APIs to interact with SharePoint data. To learn more, go to Get to know the SharePoint 2013 REST service.

A request is a network call from the workflow service to a SharePoint or Project REST API endpoint. There's no difference between the kind of request or the response for a given request. An action and its composing activities don't contribute to the request count unless the request involves a SharePoint 2013 REST API. For example, the Log to History List action may generate five or more requests for a healthy operation. Also, retry logic is built into workflows in case something goes wrong. This can generate additional requests.

Many actions produce requests, and requests can be minimized by using best practices. For example, you can use a single Update List Item action instead of multiple Set Field in Current Item action to reduce the number of requests being made by a workflow scope, and yet achieve the same results. 

Workflow design recommendations

There are many ways to generate lots of requests in a workflow that can result in throttling. Some general examples are as follows:

  • A single aggressively looping workflow or multiple aggressively looping workflows

  • A workflow that is associated with a list or library while content is being migrated into SharePoint.

  • Previous problematic workflow versions that were corrected and that continue to run workflow instances that have the problematic configuration until the workflow is terminated.

The workflow scope throttling that is enforced by the workflow service should allow for typical workflow use case scenarios. However, as a workflow's logic grows more sophisticated, the workflow can exceed safe limits.

The following specific workflow scenarios will also result in throttling.

Scenario 1: A workflow that loops to monitor for changes

For example, you could check an item for updates instead of waiting for an item to be updated.

Scenario 2: Using a workflow to execute complex algorithms

Workflows are intended to manage document-driven, human processes and not to dispatch significant computational tasks.

Scenario 3: Having multiple workflows running that use the Wait for Event in List Item" activity

In this scenario, each workflow will listen for changes in the target list. If there are many workflows running, each workflow will have to react to the raised event and possibly call back into SharePoint to perform some work. 

NOTE: This can also occur if there are many changes to a list for which a workflow is configured to start when an item is created or changed.

Alternatives to scenario 1: A workflow that loops to monitor for changes

Option 1: Use SharePoint add-ins and external event receivers

The workflow design should be reevaluated, and a different design approach should be used. SharePoint add-ins or external event receivers are more appropriate for this task.

Option 2: Add a pause action

You can improve the design of the workflow somewhat by adding a delay (that is, a pause action). This should reduce the traffic that is generated. However, it doesn't change the overall shortcomings of this design.

Option 3: Use the "Wait for Field Change in Current Item" activity

Instead of looking for changes by using a loop, it's better to use the default event receivers. A workflow can be started when an item is created or changed. Executing multiple workflow instances instead of having one workflow in an aggressive loop is a better approach. The conditions in the workflow can be configured to perform work only when it's needed.

The Start Options dialog box

Only one workflow instance of a workflow can be running at a given time. 

Another approach is to use the Wait for Field to Change in Current Item activity. 

The workflow design can use a choice column that has multiple values to drive the workflow execution. Only when an appropriate option is picked by an end-user will the workflow resume. This can prevent aggressive looping and unnecessary workflow instances from being started. The workflow executes when the item is ready instead of executing or starting multiple instances.

You can monitor for multiple values from multiple fields by using multiple parallel blocks. The workflow can wait for a specific state and then continue to execute down a given path, as in the following example:

  1. Create a Boolean type variable.

    The Edit Variable dialog box

  2. Set the value to No.

  3. Insert a parallel block, right-click the block, and then click Advanced Properties.

    The Properties dialog box

  4. In the drop-down, select the variable that you created in step 1.

  5. Insert two parallel blocks in the inserted parallel block that has the CompletionCondition property.
     

  6. In the first of the two parallel blocks that you inserted in step 5, insert the Wait for Field Change in Current Item activity. Change the activity so that it's monitoring a choice column. Do not monitor the default choice.

  7. Set the workflow variable that is used to stop the other parallel blocks to Yes.

  8. Repeat steps 1-7 for the other choice column values.

  9. Move the other parts of the original workflow to a position after the parallel blocks.

When one of nested parallel blocks has all its activities executed, the parent parallel block will end the other activities in the other parallel blocks. This enables the workflow to continue. The nested parallel blocks are monitored by the parent parallel block by using a variable.

Option 4: Start a SharePoint 2010 workflow from the SharePoint 2013 workflow

You can use the SharePoint 2010 workflow platform type to perform some of the work that the SharePoint 2013 Workflow Platform type is performing. This can reduce the number of requests.

Specifically, a SharePoint 2010 workflow can be started to monitor field changes by using the Wait for Field Change in Current Item activity or to perform many other basic operations.

Alternative to scenario 2: Using a workflow to execute complex algorithms

If your solution demands significant computational tasks, you should consider developing an add-in for SharePoint. For more information, go to SharePoint add-ins.


Still need help? Go to the Microsoft Community.

Video inspect files for compatibility issues

Your browser does not support video.

If your organization works with several versions of Office, use the Compatibility Checker to make sure your files can be opened in older versions.

  1. Open the file that you want to be compatible with older versions of Office.

  2. Select File > Info.

  3. Select Check for Issues > Check Compatibility.

  4. Review the list of issues found in the compatibility check.

    To open a web browser and find an explanation of an issue, select Help, if available.

    Tip: To have the Office app check for compatibility issues whenever you save the file as an earlier version, select Check compatibility when saving documents.

  5. To return to the document and fix the compatibility issues, select OK.

Want more?

Check file compatibility with earlier versions

Word training

PowerPoint training

Excel training

Outlook training

If you work with business partners who use an older version of Office, make sure the files you share with them are compatible.

In your app, select File.

Select Check for Issues, and then select Check Compatibility.

Office searches the file to see whether formatting, editing, and other features you've used will work properly in earlier versions.

The Compatibility Checker found an issue that needs to be addressed.

Some graphics in the file can't be edited in earlier versions of the app.

Here, the summary helps you find the graphics in question.

For more details, select Help.

On this web page, you see information about how the Compatibility Checker works with the app along with your specific compatibility issue.

To fix it, follow the step-by-step solution.

Return to the file, and to the place that has the compatibility issue.

Then, follow the recommended steps.

And when you're done, the file is ready to share with others who use an older version of Office.

Negative slack task field

Data Type    Duration

Entry Type    Calculated

Description    The Negative Slack field shows the amount of negative slack for a task on the Gantt Chart, indicating the amount of time that must be saved so that successor tasks are not delayed. Negative slack indicates that there is not enough time scheduled for the task and is usually caused by constraint dates or task dependencies. This field is available only in the Bar Styles dialog box and is represented as a bar on the Gantt Chart.

How Calculated    When you use the Negative Slack field on a Gantt bar, Project displays a graphical representation of a task's negative slack value based on the value in the Total Slack field. Total slack is calculated as the smaller value of the Late Finish field minus the Early Finish field, and the Late Start field minus the Early Start field. If total slack is a negative number, there is negative slack. Therefore, on the Gantt Chart, negative slack indicates the date by which a task must be started to prevent successor tasks from being delayed.

Best Uses    Add the Negative Slack field as a Gantt bar style when you want to indicate graphically on the Gantt Chart the amount of negative slack for tasks.

Example    You want to view graphically how much time needs to be recovered in your schedule for various tasks. You add the Negative Slack field to the Gantt Chart. You add a Gantt bar that displays the amount of negative slack to the start date.

Remarks    You can set the negative slack bar on the Gantt Chart in the Bar Styles dialog box.