

Wednesday, December 15, 2021

Change how you view your outlook calendar

Looking for something else?

Keep upcoming calendar items visible

Keep your upcoming appointments and meetings in view by opening the Calendar peek on the right side of your Mail.
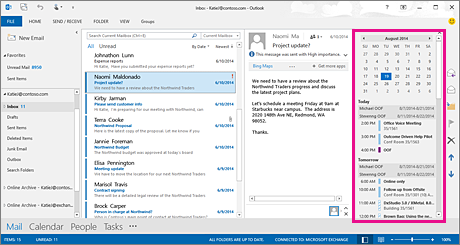
Keep upcoming calendar items visible
  • Right-click Calendar on the Navigation Bar, and then click Dock the peek.
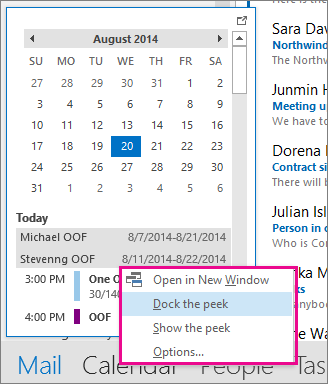
    Dock the peek

Learn more about keeping your calendar, appointments, and meetings always in view.

Top of Page

Change to Month view with a Monday start date and show U.S. holidays

View the Calendar by month to see what you are doing at-a-glance. A common way to view the calendar is by setting the work week to start on a Monday, with U.S. holidays.
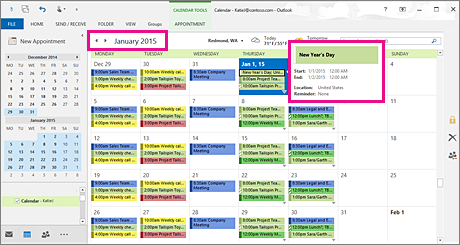
Month view with a Monday start date and U.S. holidays
  1. Click Calendar.

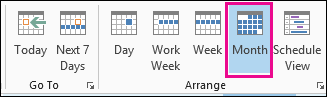
  2. Click Home > Arrange > Month.

    Month view
  3. Click the File tab.

  4. Click Options, and then click Calendar.

  5. Under Work time, for First day of week, select Monday.
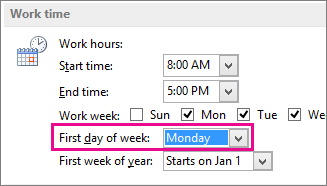
    Monday
  6. Under Calendar options, for Add holidays to the Calendar, click Add Holidays.
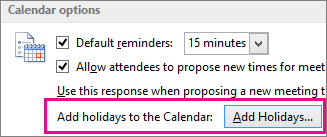
    Add holidays to the Calendar
  7. Click United States, and then click OK.
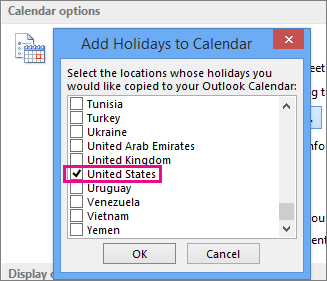
    U.S. holidays

Learn more about adding holidays to your calendar.

Top of Page

Change Work Week view to Sunday-Tuesday with 12-hr days (non-traditional work week)

If you work a non-traditional work schedule, you can set your Work Week view to only show those working times. For example, if you are a nurse you may only want to view your Sunday – Tuesday, 12-hour shift at the hospital.
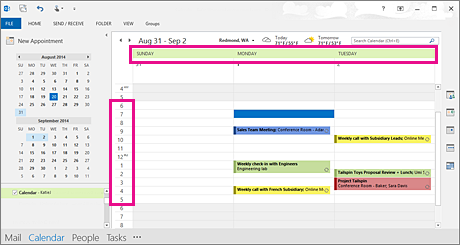
Non-traditional work week
  1. Click Calendar.

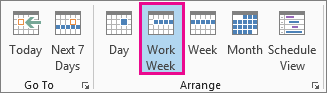
  2. Click Home > Arrange > Work Week.

    Work Week view
  3. Click the File tab.

  4. Click Options, and then click Calendar.

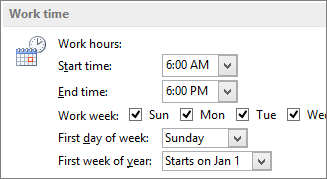
  5. Under Work time, for Start time, select 6:00 AM.

  6. Under Work time, for End time, select 6:00 PM.

  7. For Work week, select Sun, Mon, and Tue and clear any other selected check boxes.

  8. For First day of week, select Sunday.

    Work time
  9. Click OK.

Tip: To view all your hours during a long shift in the Work Week view, use Zoom in the bottom-right corner of the Calendar to make it smaller.
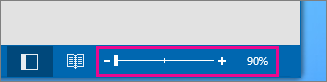
Calendar zoom

Top of Page

View two time zones in the Week view

When working with partners in different time zones, it's helpful to see both time zones in the Week view. For example, when I schedule meetings from the New York office (Eastern time zone), I want to view my Australian co-worker's schedule (Brisbane time zone) so I don't book her during non-working hours.
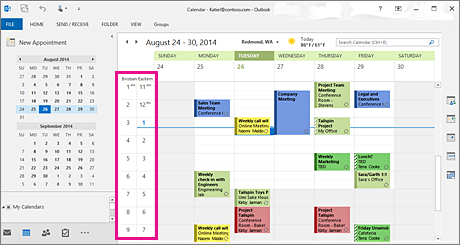
Two time zones in the Week view
  1. Click Calendar.

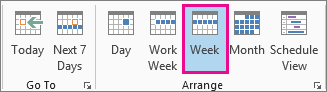
  2. Click Home > Arrange > Week.

    Week view
  3. Right-click the empty space at the top of the time bar, and then click Change Time Zone on the shortcut menu.
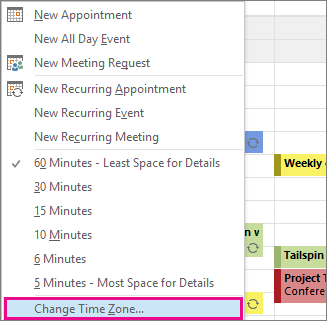
    Change Time Zone
  4. Under Time zones, type Eastern Time Zone in the Label box.

  5. In the Time zone list, click (UTC-05:00) Eastern Time (US & Canada).
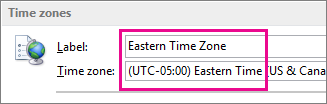
    Eastern Time Zone
  6. Select Show a second time zone.

  7. Type Brisbane in the Label box.

  8. In the Time zone list, click (UTC+ 10:00) Brisbane.
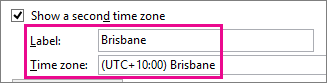
    Brisbane time zone
  9. Click OK.

Learn more about how time-zone normalization works.

Top of Page

Looking for something else?

If you find yourself filtering calendar items or modifying fields, you can easily create a custom view so the information you need is always available.

  1. Click View.

  2. In the Current View group, click Change View, and then click Manage Views.

  3. Click New.

  4. In the Name of new view box, type a name for the view.

  5. In the Type of view box, select a view type.

  6. To change where the view is available, select an option under Can be used on, and then click OK.

  7. In the Advanced View Settings: New View dialog box, select the options that you want to use.

  8. When you are finished selecting options, click OK.

  9. To use the view immediately, click Apply View.

Learn more about changing or customizing a view.

Top of Page

Customize your calendar in outlook for windows

Change the view

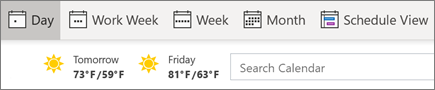
In your calendar, choose from the following views:

  • Day

  • Work week

  • Week

  • Month

  • Schedule View

Changing views in Outlook's calendar

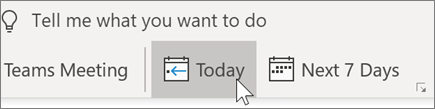
Get back to today

Anytime you're browsing your calendar, save yourself time and select Today to go straight back to the current day.

Get to Today in Outlook

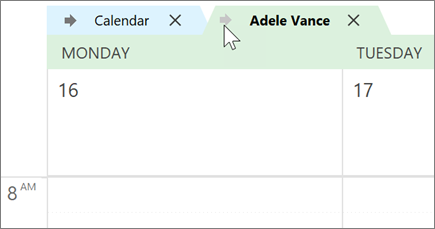
Overlay or show calendars side-by-side

  1. Select two or more calendars.

  2. Select the arrow on one of the calendars to overlay the two (or more) calendars.

  3. Select the arrow again to make them side-by-side.

Calendars overlayed in Outlook

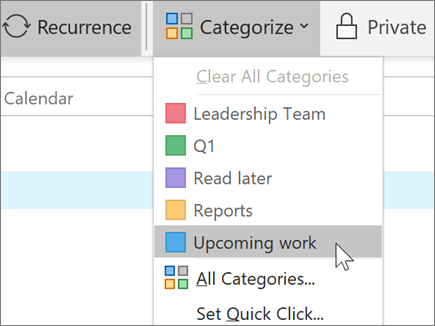
Categorize your events

  1. Select an appointment or meeting.

  2. Select Categorize.

  3. Choose a color.

    Or choose All categories to edit existing categories or create a new one.

Adding a category to a calendar in Outlook

Note: Features and information in this guide apply to Outlook as available through Microsoft 365.

Guid property

Applies to

Reference Object

The GUID property of a Reference object returns a GUID that identifies a type library in the Windows Registry. Read-only String.

expression.Guid

expression Required. An expression that returns one of the objects in the Applies To list.

Remarks

The GUID property is available only by using Visual Basic for Applications (VBA) code.

Every type library has an associated GUID which is stored in the Registry. When you set a reference to a type library, Microsoft Office Access 2007 uses the type library's GUID to identify the type library.

You can use the AddFromGUID method to create a Reference object from a type library's GUID.

Example

The following example prints the value of the FullPath, GUID, IsBroken, Major, and Minor properties for each Reference object in the References collection:

Sub ReferenceProperties()
Dim ref As Reference
' Enumerate through References collection.
For Each ref In References
' Check IsBroken property.
If ref.IsBroken = False Then
Debug.Print "Name: ", ref.Name
Debug.Print "FullPath: ", ref.FullPath
Debug.Print "Version: ", ref.Major & _
"." & ref.Minor
Else
Debug.Print "GUIDs of broken references:"
Debug.Print ref.GUID
EndIf
Next ref
End Sub

Tuesday, December 14, 2021

Sign up for office 365 with your g suite domain

Your browser does not support video.

The first step in moving your business from G Suite to Microsoft 365 is to sign up for a subscription.

  1. Go to Office365.com and choose For business.

  2. Choose See plans & pricing, and then Small Business. For customers moving from G Suite, we recommend Microsoft 365 Business Standard.

  3. Choose Buy now.

  4. Under Your order summary, enter the total number of people you want to use Microsoft 365, choose a monthly or annual billing plan, and then choose Next.

  5. Under Tell us about yourself, enter your contact information, and then choose Next.

  6. To prove you're not a robot, type your phone number, choose Send Verification Code, type the code that was sent to you, and then choose Verify.

  7. Under Create your business identity, choose Use a domain name you already own, enter the domain you're using with G Suite, and then choose Verify ownership.

  8. To prove you own the domain, choose Send verification email, copy the code from the email you receive, paste the code, and then choose Verify.

  9. Enter an email address and password to sign in to your account. This person will be the global admin who will manage the Microsoft 365 service for everyone. Choose Sign up.

  10. Under Payment & billing, enter your payment details, and then choose Place order.

  11. On the Review and place order page, review the details, and then choose Accept agreement & place order.

  12. On the Order confirmation page, review your order summary, and then choose Go to setup to start adding users in the admin center.

  13. In the admin center, take the tour if you like, and then choose Go to setup.

  14. On the Add new users page, add the names of the people in your business.

  15. Make sure the Send password for new users to my email check box is selected, and then choose Next.

  16. On the Share sign-in credentials page, share the account details with the people who will be using them by entering their alternative email addresses on the Email tab, and then choose Send email.

  17. On the Migrate email messages page, select Don't migrate email messages, and then choose Next.

  18. On the Connect your domain page, choose Exit and continue later.

The first step in moving your business from G Suite to Microsoft 365 is to sign up for a subscription.

Get started by visiting Office365.com. Choose For business. Select See plans & pricing, and then Small Business. For customers moving from G Suite, we recommend Microsoft 365 Business Standard.

For Number of users, add the total number of people you want to use Microsoft 365. Choose a monthly or annual billing plan. You see your total before tax. And select Next.

Type your contact information. Select Next.

To prove you're not a robot, type your phone number and select Send Verification Code. Type the code that was sent to you and select Verify.

For business identity, choose Use a domain name you already own. Enter the domain you're using with G Suite. Don't worry, it will still work there until you change it later on. Choose Verify ownership.

To prove you own the domain, choose Send verification email. This sends an email to the address associated with the domain name. Open it, and copy the code. Paste the code, and select Verify.

Now create your account. This person will be the global admin and will manage the Microsoft 365 service for everyone. Type a user ID. This is also the email address that you will use to sign in to Microsoft 365.

Type a password, then choose Sign up.

Next, enter your payment details. Select Place order.

Review your total, and choose Accept agreement & place order.

On the Order confirmation page, you see a summary of your order, including the total with tax. Choose Go to setup to start adding users in the admin center.

Go through the tour of the admin center if you want. Choose Go to setup.

Now add the names of the people in your business. When finished, you'll see a notice that you're using all of your Microsoft 365 licenses. Leave the box checked to send yourself a copy of everyone's passwords. Then, select Next.

To share the account details with the people who will be using them, type their alternative email address where they can receive the email. In this case, you can use their Gmail address that is still active with G Suite.

Select Don't migrate mail messages. You'll do this later using Outlook. Select Next, and you'll be asked if you want to connect your domain name to Microsoft 365 so that email starts going there. But you don't want to do this yet if you're still using G Suite for email, until you've finished setting up Microsoft 365. Choose Exit and continue later.

At this point, you're ready to set up software on your devices and migrate data from G Suite. When finished, return to this page in the admin center to connect your domain name and start using Microsoft 365.

Create save and share custom stencils

You can create a new stencil to hold shapes that you use often and want to find quickly. After you have created your new stencil, you can then save it to reuse later or share it with other people.

Create a new custom stencil

  1. In the Shapes window, click More Shapes, and then click New Stencil.

  2. In the Shapes window, right-click the title bar of the new stencil, and then click Save As.

  3. Type a name for your stencil, and then click Save.
    By default, custom stencils are saved in your My Shapes folder.

    To open your new custom stencil in another drawing, in the Shapes window, click More Shapes, point to My Shapes, and click the stencil name.

Add shapes to a custom stencil

If the stencil title bar has the icon A red asterisk indicates that a stencil is editable. (asterisk), you can edit the stencil by adding, deleting, and modifying shapes.

  1. Open the custom stencil that you want to add shapes to.

  2. If the stencil title bar does not show the icon A red asterisk indicates that a stencil is editable. (asterisk), right-click the stencil title bar and click Edit Stencil.

  3. Drag a shape from another stencil or from the drawing page onto the custom stencil. A new master shape will be added to the stencil.

  4. To edit the name of the master shape, right-click the shape and then click Rename Master.

  5. Type a name for the master shape and press ENTER.

Save a custom stencil

  • To save changes to a stencil, right-click the stencil title bar, and then click Save.

  • To save a copy of a stencil with a new name, right-click the stencil title bar, click Save As, type a name for the new stencil, and then click Save.
    By default, custom stencils are saved in your My Shapes folder.

 Create a new stencil based on an existing one

You can't edit any of the built-in stencils that come with Visio, but you can copy the stencils and modify your copy.

  1. Open the stencil that you want to make a copy of.

  2. Right-click the title bar of the stencil, and then click Save As.

  3. Type a name for your new custom stencil, and then click Save. The new custom stencil appears in the Shapes window.

  4. Make any changes that you want to the stencil.

  5. To save your changes, right-click the stencil title bar, and then click Save.

Share a custom stencil

Custom stencils are saved as files with the extension .vssx in your My Shapes folder. People you give a stencil file to can open the stencil in their own Visio diagrams, as long as they have a compatible version of Visio for the stencil format. It's a good idea for them to save the file in their own My Shapes folder. That way they can open the new stencil easily in the Shapes window by clicking More Shapes, pointing to My Shapes, and clicking the stencil name.

Create a new stencil

  1. In the Shapes window, click More Shapes, and then select New Stencil.

  2. In the Shapes window, right-click the new stencil and select Save As.

  3. Type a name for your stencil, and then click Save.
    By default, custom stencils are saved in your My Shapes folder.

    Notes: 

    • To learn about how to add shapes to your custom stencil, see Add shapes to a custom stencil.

    • To open your new custom stencil in another drawing, in the Shapes window, click More Shapes, select Open Stencil, select the stencil that you want, and then click Open.

    • To edit your new stencil, right-click the stencil title and click Edit Stencil. The icon in the stencil title bar changes to A red asterisk indicates that a stencil is editable. (indicating that the stencil is editable).

    • To share your stencil with someone, see Share a custom stencil.

Create a new stencil based on an existing one

  1. Open the stencil that you want to make a copy of.
    To learn about how to open stencils, see Use the Shapes window to organize and find shapes.

  2. Right-click the stencil and select Save As.

  3. Type a name for your new custom stencil, and then click Save. The new custom stencil appears in the Shapes window.

  4. Make any changes that you want to the stencil.
    To learn about how to add shapes to your custom stencil, see Add shapes to a custom stencil.

  5. To save your changes, right-click the stencil title bar, and then click Save.

    Notes: 

    • To learn about how to add shapes to your custom stencil, see Add shapes to a custom stencil.

    • To open your new custom stencil in another drawing, in the Shapes window, click More Shapes, select Open Stencil, select the stencil that you want, and then click Open.

    • To edit your new stencil, right-click the stencil title and click Edit Stencil. The icon in the stencil title bar changes to A red asterisk indicates that a stencil is editable. (indicating that the stencil is editable).

    • To share your stencil with someone, see Share a custom stencil.

Add shapes to a custom stencil

  1. Open the custom stencil that you want to add shapes to.

  2. Drag a shape from another stencil or from the drawing page onto the custom stencil. A new master shape will be added to the stencil.

  3. To edit the name of the master shape, right-click the shape and select Rename Master.

  4. Type a name for the master shape and press ENTER.

    Notes: 

    • To add shapes to a custom stencil, the stencil must be editable. A stencil is editable if the icon in the stencil title bar is A red asterisk indicates that a stencil is editable.. To edit a custom stencil, right-click the stencil title bar and click Edit Stencil.

    • To learn about how to create new shapes, see Create a shape.

Save a custom stencil

  • To save changes to a stencil, right-click the stencil title bar, and then click Save.

  • To save a copy of a stencil with a new name, right-click the stencil title bar, click Save As, type a name for the new stencil, and then click Save.
    By default, custom stencils are saved in your My Shapes folder.

    Notes: 

    • To open your new custom stencil in another drawing, in the Shapes window, click More Shapes, select Open Stencil, select the stencil that you want, and then click Open.

    • To edit your new stencil, right-click the stencil title and click Edit Stencil. The icon in the stencil title bar changes to A red asterisk indicates that a stencil is editable. (indicating that the stencil is editable).

    • To share your stencil with someone, see Share a custom stencil.

Share a custom stencil

You can share a custom stencil with other people who have Visio in the same way that you share other Microsoft Office files. For example, you can save a custom stencil file (.vss) to a removable media (USB device or DVD as examples) and distribute it, or you can send the stencil as an attachment to an email.

More info

Your browser does not support video.

For more information about how to open and use stencils, see Use the Shapes window to organize and find shapes.

Important: 

  • You cannot directly edit any of the built-in stencils that come with Visio. To create a new custom stencil based upon a built-in stencil, see Create a new stencil based on an existing one.

  • The Visio shapes on stencils supplied by Microsoft Corporation are copyrighted. You may copy and reorganize them for your own use, modify them for your own use, and distribute drawings that contain them. You may not sell or distribute original or modified Visio shapes.

Create a new stencil based on an existing one

  1. On the File menu, point to Shapes, and then click Open Stencil.

  2. Open the folder that contains the stencil on which you want to base the new stencil, and then click the stencil name.

  3. Click the arrow on the Open button, and then click Copy.

  4. Make any changes that you want to the stencil.

  5. To save your changes, right-click the stencil title bar, and then click Save on the shortcut menu.

  6. Type a name for your stencil, and then click Save.

  7. Now that your stencil is saved, you can do any of the following:

    • To open your new stencil in another drawing, on the File menu, point to Shapes, and then point to My Shapes.

    • To edit your new stencil, right-click the stencil title bar, and then click Edit Stencil on the shortcut menu. The icon in the stencil title bar changes from Read-only stencil image(indicating that the stencil is read-only) to Editable stencil image(indicating that the stencil is editable).

    • To share your new stencil with someone, copy the stencil (.vss file) to his or her My Shapes folder.

Note: The Visio shapes on stencils supplied by Microsoft Corporation are copyrighted. You may copy and reorganize them for your own use, modify them for your own use, and distribute drawings that contain them. You may not sell or distribute original or modified Visio shapes.

Add a shape from the drawing page to a stencil

  1. Open a new stencil, your Favorites stencil, or another custom stencil that you previously created:

    • To open a new stencil, on the File menu, point to Shapes, and then click New Stencil.

    • To open a custom stencil, on the File menu, point to Shapes, point to My Shapes, and then click the name of the stencil.

  2. If the stencil is not editable, right-click the stencil title bar, and then click Edit Stencil.

    The icon in the stencil title bar changes from Read-only stencil image(indicating that the stencil is read-only) to Editable stencil image(indicating that the stencil is editable).

  3. On the drawing page, select the shape that you want to add to the stencil.

  4. Do one of the following:

    • To move the shape from the drawing to the stencil, drag the shape from the drawing page to the stencil.

    • To copy the shape, press the CTRL key while you drag the shape to the stencil.

      The shape is now on the stencil. The shape appears as an icon, labeled "Master.x," where x is a number.

  5. To rename the shape, right-click the shape icon, point to Edit Master, and then click Master Properties. Type a name in the Name box.

  6. To save your changes, right-click the stencil title bar, and then click Save.

Copy a shape from one stencil to another

  1. Open the stencil that contains the shape you want to add to another stencil:

    • On the File menu, point to Shapes, and then point to My Shapes or another folder that contains the stencil.

  2. In the open stencil that contains the shape you want to copy, right-click the shape, point to Add To My Shapes, and then click Favorites, Add To New Stencil, or Add To Existing Stencil.

  3. To open the stencil that contains the copied shape, on the File menu, point to Shapes, and then point to My Shapes or another folder that contains the stencil.

    Tip: If both stencils are editable, you can copy and paste the shape from one stencil to the other instead of using the Add to My Shapes command.

    Notes: 

    • Shapes in Visio stencils are often referred to as master shapes. When you drag a master shape onto a drawing page, you create a copy (or "instance") of the master. The master itself remains on the stencil so that you can use it repeatedly to create new copies of the master on drawing pages.

    • Visio master shapes supplied by Microsoft Corporation are copyrighted. You may copy and reorganize them for your own use, modify them for your own use, and distribute drawings that contain them. You may not sell or distribute original or modified Visio master shapes.

See Also

Video: Create, save, and share custom stencils

Find more shapes and stencils

Import downloaded stencils

edit link to edit item column in a sharepoint online list doesn t display the edit link

Access 2013 videos and tutorials

Beginner

Design and build tables for a database (Access basics, part 1)

If you're new to Access, start here. This course explains key concepts and terms, the first steps in database design, and how to build tables.

Watch online

Create table relationships (Access basics, part 2)

Learn how to create table relationships, a key part of any database. This course covers the types of relationships and how to build each one.

Watch online

Create your first Access 2013 database

Learn how to create an Access 2013 database in just minutes by using a template. Access gives you templates that run on your computer or in the cloud.

Watch online

Introduction to queries (Access basics, part 3 )

Learn how to create queries in Access 2013. Course covers the types of queries, creating Select queries, criteria, joins, and intermediate tables

Watch online

Webinar: Intro to Access 2013

Watch this 15-minute webinar first. It's a gentle introduction to Access. We'll go over the two kinds of databases you can create: browser-based Access apps and desktop databases.

Watch online

Intermediate

Dealing with read-only queries

Can't change the data returned by a query? This course explains the most common causes and solutions, and provides links to information about other ways to deal with the problem.

Watch online

Stop a query from asking for input

To make a parameter query stop asking for input, you remove all parameters, or fix problems (usually typos in field names) in expressions.

Watch online

Use criteria in your Access 2013 queries

Learn how to use criteria to filter your Access data. This course covers adding criteria to queries, using AND and OR logic, logical operators such as IN and BETWEEN, and how to use wildcards. You need a basic understanding of queries to complete this course.

Watch online

Use parameter queries to filter query results

Learn how to add parameters to your queries so they ask for your input, such as a date or a name, before they run. Parameters are a powerful way to filter your query results.

Watch online

Use Update queries to change data in Access 2013

Learn how to build update queries that change data safely. Update queries can be a fast way to change a lot of existing data in one or more tables.

Watch online

Using date criteria in queries

Learn how to use date criteria in your queries. This course shows the basics, plus how to use calculated fields and filter for part of a date value, as well as how to use the DateDiff and DateAdd functions to subtract and add date values. You need to be familiar with Access queries to complete this course.

Watch online

Check out Office 365 Training Center.