From the left, tap the forth icon, enter the person's phone number, and then tap Call.
To call someone on their work or mobile number, from the left, tap the second icon to get to the Contacts screen. Find the person in your Contacts list or type their name in the search box. When you find the contact, tap their name, and then either their work or mobile number. This will call the person on their work line or mobile phone.
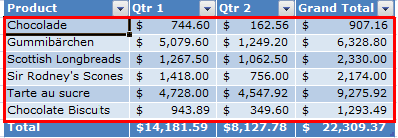
There are two ways to apply shading to alternate rows or columns —you can apply the shading by using a simple conditional formatting formula, or, you can apply a predefined Excel table style to your data.
One way to apply shading to alternate rows or columns in your worksheet is by creating a conditional formatting rule. This rule uses a formula to determine whether a row is even or odd numbered, and then applies the shading accordingly. The formula is shown here:
=MOD(ROW(),2)=0
Note: If you want to apply shading to alternate columns instead of alternate rows, enter =MOD(COLUMN(),2)=0 instead.
On the worksheet, do one of the following:
To apply the shading to a specific range of cells, select the cells you want to format.
To apply the shading to the entire worksheet, click the Select All button.
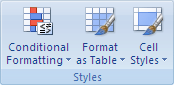
On the Home tab, in the Styles group, click the arrow next to Conditional Formatting, and then click New Rule.
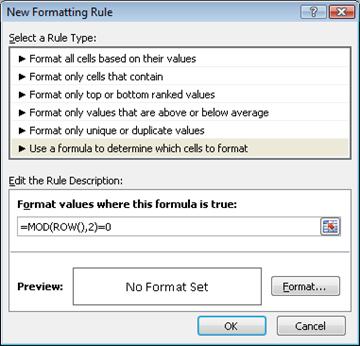
In the New Formatting Rule dialog box, under Select a Rule Type, click Use a formula to determine which cells to format.
In the Format values where this formula is true box, enter =MOD(ROW(),2)=0, as shown in the following illustration.
Click Format.
In the Format Cells dialog box, click the Fill tab.
Select the background or pattern color that you want to use for the shaded rows, and then click OK.
At this point, the color you just selected should appear in the Preview window in the New Formatting Rule dialog box.
To apply the formatting to the cells on your worksheet, click OK
Note: To view or edit the conditional formatting rule, on the Home tab, in the Styles group, click the arrow next to Conditional Formatting, and then click Manage Rules.
Another way to quickly add shading or banding to alternate rows is by applying a predefined Excel table style. This is useful when you want to format a specific range of cells, and you want the additional benefits that you get with a table, such the ability to quickly display total rows or header rows in which filter drop-down lists automatically appear.
By default, banding is applied to the rows in a table to make the data easier to read. The automatic banding continues if you add or delete rows in the table.
If you find you want the table style without the table functionality, you can convert the table to a regular range of data. If you do this, however, you won't get the automatic banding as you add more data to your range.
On the worksheet, select the range of cells that you want to format.
On the Home tab, in the Styles group, click Format as Table.
Under Light, Medium, or Dark, click the table style that you want to use.
Tip: Custom table styles are available under Custom after you create one or more of them. For information about how to create a custom table style, see Format an Excel table.
In the Format as Table dialog box, click OK.
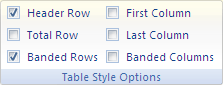
Notice that the Banded Rows check box is selected by default in the Table Style Options group.
If you want to apply shading to alternate columns instead of alternate rows, you can clear this check box and select Banded Columns instead.
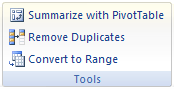
If you want to convert the Excel table back to a regular range of cells, click anywhere in the table to display the tools necessary for converting the table back to a range of data.
On the Design tab, in the Tools group, click Convert to Range.
Tip: You can also right-click the table, click Table, and then click Convert to Range.
Note: You cannot create custom conditional formatting rules to apply shading to alternate rows or columns in Excel for the web.
When you create a table in Excel for the web, by default, every other row in the table is shaded. The automatic banding continues if you add or delete rows in the table. However, you can apply shading to alternate columns. To do that:
Select any cell in the table.
Click the Table Design tab, and under Style Options, select the Banded Columns checkbox.
To remove shading from rows or columns, under Style Options, remove the checkbox next to Banded Rows or Banded Columns.
On the ribbon, select the Insert tab, then click Draw Text Box.
In the document, click where you want to create your text, draw the text box to the size you want, and then release.
Create a bulleted list
On the Home tab, select Bullets to create a bulleted list.
Select the bullet style that you want.
Type the first item in your list, and then do one of the following:
To start a new line with a bullet, press ENTER.
To start a new line without a bullet, press SHIFT+ENTER.
To end a bulleted list, press ENTER twice.
To create sub-bullets, select the bulleted text and then press TAB.
Create a numbered list
On the Home tab, select Numbering to create a numbered list.
Select the numbering format that you want.
Type the first item in your list, and then do one of the following:
To start a new line with a number, press ENTER.
Note: Publisher will automatically number the paragraphs in your list. If you add or delete paragraphs, Publisher will update the numbers.
To start a new line without a number, press SHIFT+ENTER.
To end a numbered list, press ENTER twice.
To create a multilevel numbered list, start a new numbered list, select the numbering style, and then indent the new list.
Note: Office 2007 has reached the end of its support lifecycle, meaning there are no new security updates, non-security updates, free or paid assisted support options, or online technical content updates. Customers who are using Office 2007 products and services should move to Office 365 or upgrade to supported versions of Office products and services, such as Office 2016.
Create a text box
On the Objects toolbar, click the Text Box tool , and then click inside your publication.
Create a bulleted list
On the Format menu, click Bullets and Numbering, and then click the Bullets tab.
Select the options you want, and then click OK.
Type the first item in your list, and then do one of the following:
To start a new line with a bullet, press ENTER.
To start a new line without a bullet, press SHIFT+ENTER.
To create a sub-bullet, select the bulleted text and press TAB.
To end a bulleted list, press ENTER twice.
Create a numbered list
On the Format menu, click Bullets and Numbering, and then click the Numbering tab.
Select the formatting options you want, and then click OK.
Note: Publisher will automatically number the paragraphs in your list. If you add or delete paragraphs, Publisher will update the numbers.
Type the first item in your list, and then do one of the following:
To start a new line with a number, press ENTER.
To start a new line without a number, press SHIFT+ENTER.
If you've received a link to an offensive or illegal file or folder stored in OneDrive, you can report it for us to review.
If you're part of an organization that has its own procedures for reporting abuse, please follow your organization's procedures or start by contacting your Office 365 administrator.
On the OneDrive website, sign in with your Microsoft account, and then check your Shared view.
If you don't want to sign in or you want to report the file anonymously, use the anonymous Report Abuse form.
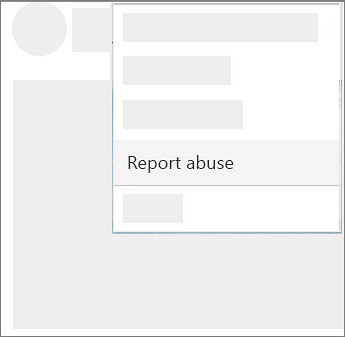
Right-click the offensive or illegal file and select Report abuse.
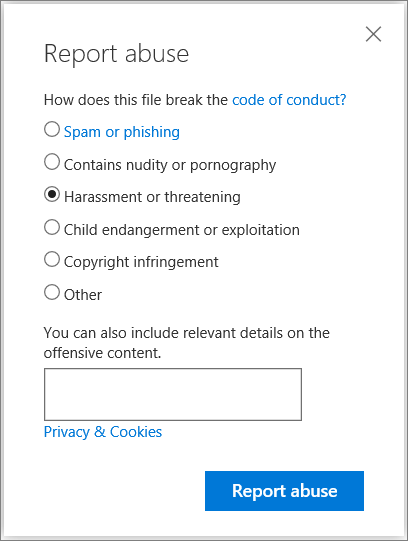
Select the reason you're reporting the content, such as Harassment or threatening, type any details you want to share in the comment box, and then select Report abuse.
Note: If the offensive content was posted on a work or school account associated with a paid Office 365 subscription, you will be directed to contact the organization responsible for the content directly.
Determines whether the value of an expression falls within a specified range of values. You can use this operator within SQL statements.
Syntax
expr [Not] Betweenvalue1Andvalue2
The Between...And operator syntax has these parts:
Part
Description
expr
Expression identifying the field that contains the data you want to evaluate.
value1, value2
Expressions against which you want to evaluate expr.
Remarks
If the value of expr is between value1 and value2 (inclusive), the Between...And operator returns True; otherwise, it returns False. You can include the Not logical operator to evaluate the opposite condition (that is, whether expr lies outside the range defined by value1 and value2).
You might use Between...And to determine whether the value of a field falls within a specified numeric range. The following example determines whether an order was shipped to a location within a range of postal codes. If the postal code is between 98101 and 98199, the IIf function returns "Local". Otherwise, it returns "Nonlocal".
SELECT IIf(PostalCode Between 98101 And 98199, "Local", "Nonlocal") FROM Publishers
If expr, value1, or value2 is Null, Between...And returns a Null value.
Because wildcard characters , such as *, are treated as literals, you cannot use them with the Between...And operator. For example, you cannot use 980* and 989* to find all postal codes that start with 980 to 989. Instead, you have two alternatives for accomplishing this. You can add an expression to the query that takes the left three characters of the text field and use Between...And on those characters. Or you can pad the high and low values with extra characters — in this case, 98000 to 98999, or 98000 to 98999 – 9999 if using extended postal codes. (You must omit the – 0000 from the low values because otherwise 98000 is dropped if some postal codes have extended sections and others do not.)
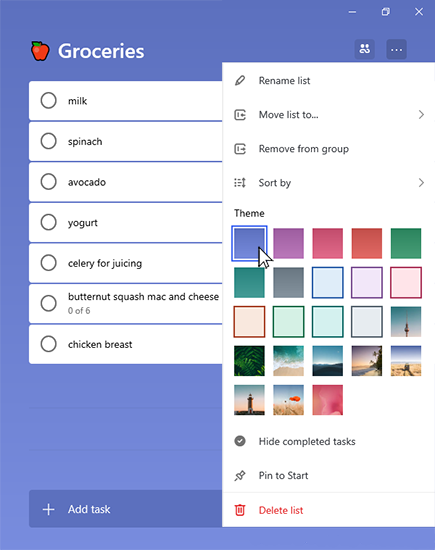
Customize each list by choosing a different background. Just select the three dots in the top right and then select a color or image as your list's background.
You can also add an emoji to the beginning of your list's name and the emoji will be displayed as the list's icon in the sidebar.


 , and then click inside your publication.