Sunday, November 21, 2021

Use keyboard shortcuts to find help for office products

Office 2016 and Microsoft 365 offer a host of keyboard shortcuts that let users create, communicate, and express themselves. Here is a partial list of resources geared toward users who rely on screen readers and other assistive technologies.

Note: This topic assumes that JAWS users have turned off the Virtual Ribbon Menu feature.

In this topic

Tell Me feature

Word, Excel, PowerPoint, OneNote, and Outlook all include Tell Me: a quick, easy way to access features and functions in one or two steps.

  1. Press Alt+Q from any Office product to go to the Tell Me box.

    You'll hear, "Tell me." Focus changes to the text field in the Tell Me box.

  2. Type your question or search string, and then press Enter.

  3. To move through the list of results, use the Up or Down Arrow key. You'll hear each result as focus moves to it.

  4. To select one of the result commands, press Enter. Focus returns to the editing area.

Office support website

The Office support website, https://support.office.com, and the Office Accessibility Center - Resources for people with disabilities are huge repositories of information. This includes step-by-step instructions for using all current Office products.

Search tips for support.office.com

  1. Use quotation marks around a word or phrase to search for that exact phrase, including case and spacing:

    • For example, "Excel for the web" finds documents that contain the exact phrase "Excel for the web," but documents about Excel 2016 or Word for the web will not be listed.

      Excel for the web (without the quotes) searches for documents that contain any of these words:

      • excel, Excel, and Excel for the web

      • excellent

      • Excel or Online somewhere in the document

    • "screen reader" finds documents that contain the exact phrase "screen reader," but documents about Excel 2016 that mention the screen or refer to a "reader," as in "the reader of the document," will not be listed.

  2. Use AND (all capital letters) to find documents that contain all listed words or phrases:

    For example, "Excel for the web" AND "screen reader" finds documents that contain the exact phrase "Excel for the web" and the exact phrase "screen reader." Documents that only contain one of those phrases aren't in the search results.

  3. Use OR (all capital letters) to find documents that contain any one of the listed words or phrases (but not all listed phrases):

    For example, "Excel for the web" OR "screen reader" finds documents that contain the exact phrase "Excel for the web", or the exact phrase "screen reader." Documents that contain both "Excel for the web" and "screen reader" aren't in the search results. .

Technical support for customers with disabilities

Microsoft wants to provide the best possible experience for all our customers. If you have a disability or questions related to accessibility, please contact the Microsoft Disability Answer Desk for technical assistance. The Disability Answer Desk support team is trained in using many popular assistive technologies and can offer assistance in English, Spanish, French, and American Sign Language. Please go to the Microsoft Disability Answer Desk site to find out the contact details for your region.

If you are a government, commercial, or enterprise user, please contact the enterprise Disability Answer Desk.

Dbcs function

This article describes the formula syntax and usage of the DBCS  function in Microsoft Excel.

Description

The function described in this Help topic converts half-width (single-byte) letters within a character string to full-width (double-byte) characters. The name of the function (and the characters that it converts) depends upon your language settings.

For Japanese, this function changes half-width (single-byte) English letters or katakana within a character string to full-width (double-byte) characters.

Syntax

DBCS(text)

The DBCS function syntax has the following argument:

  • Text    Required. The text or a reference to a cell that contains the text you want to change. If text does not contain any half-width English letters or katakana, text is not changed.

Example

=DBCS("EXCEL") equals "EXCEL"

=DBCS(" excel excel excel excel") equals " excel excel excel excel"

Saturday, November 20, 2021

Code resource field

Data Type    Text

Entry Type    Entered

Description    The Code field contains any code, abbreviation, or number you want to enter as part of a resource's information.

Best Uses    Use the Code field in a resource view when you want to display, filter, sort, or edit any special code you might be using to identify resource information.

Example    Your company uses cost center codes for resources in projects. In the Resource Sheet, add the Code field and enter the cost center codes for each of your resources. You can then filter the resources to show only those resources assigned to a certain cost center.

Use building blocks to quickly create a publication in publisher

Building blocks are reusable pieces of content like business information, headings, calendars, borders, and advertisements that are stored in galleries. You can access and reuse the building blocks at any time. You can also create and save your own building blocks, categorize, write a description, and tag them with keywords to make them easy to find. These custom building blocks can be a combination of graphics, text, and even other building blocks.

Building block galleries

Four of the five building block galleries are found on the Insert tab, in the Building Blocks group and the fifth, Business Information, is found in the Text group.

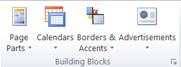
Building Blocks group in Publisher 2010

The five galleries contain:

  • Page Parts: Pre-formatted structural elements for your publication such as headings, sidebars, and stories.

  • Calendars: Pre-formatted monthly calendars. You can select the current or next month from the gallery, or select the month and year from the gallery from the Building Block Library.

  • Borders & Accents: Graphic elements such as borders, emphasis, and frames.

  • Advertisements: This gallery is for pre-formatted advertisement elements, including coupons.

  • Business Information: Business Information sets.

Insert a building block from a gallery

  1. In the Page Navigation pane, select the page in your publication where you want to insert the building block.

  2. Click Insert, and click the building block gallery you'd like to use.

  3. Scroll to find a building block, or click More <gallery name> to open the Building Block Library.

  4. Click to insert the building block and then move and resize it to fit your need.

Create a building block

You can create your own building blocks, such as an image or a border.

  1. Right-click in the element you'd like to save as a building block and select Save as Building Block.

  2. In the Create New Building Block dialog, enter the information about the building block:

    • Title: Create a name for your building block.

    • Description: Add an optional description of the building block's purpose.

    • Gallery: Decide which of the five galleries your building block will live.

    • Show in Gallery: Check this box to make the building block available in the gallery.

    • Category: Select a pre-built category for the gallery, or type in a new category name.

    • Keywords: Enter your own keywords to make searching for building blocks easier.

Tip:  Custom building blocks are saved as a PBB file in \Users\<username>\AppData\Roaming\Microsoft\Publisher Building Blocks. The AppData folder is hidden by default.

Top of Page

Create a quick poll in microsoft teams

Tip:  Learn more about Microsoft Forms or get started right away and create a survey, quiz, or poll. Want more advanced branding, question types, and data analysis? Try Dynamics 365 Customer Voice.

With Microsoft Forms, you can create an instant, real time poll in seconds in Microsoft Teams. Post a poll in your Teams channel or quickly gather feedback in a chat pane.

Note: This feature is not available for GCC, GCC High, and DoD environments.

Add a poll to a Teams channel or chat

  1. Go to the channel or chat in which you want to include a poll. At the bottom of your Teams window, select Forms.

    Forms icon in Microsoft Teams

    Note: If you don't see the Forms icon, click Messaging extensions More options button, and then select Forms.

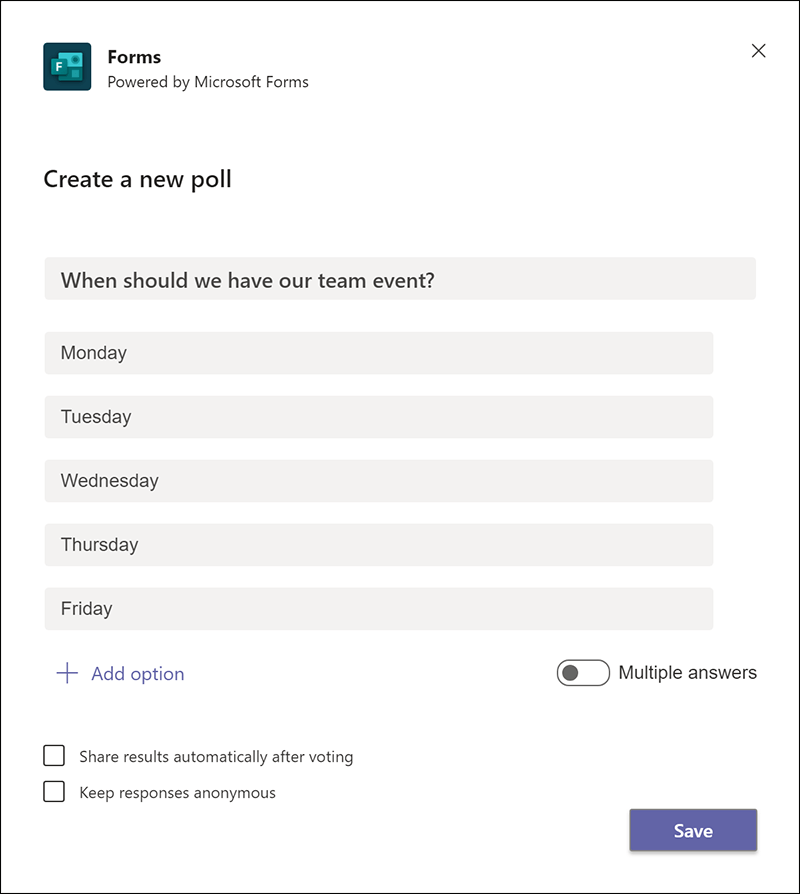
  2. Add your question and answer options.

    Create a new poll in Microsoft Teams.

  3. If you want to allow multiple answers, click or tap the toggle next to Multiple answers. Also select whether you want to Share results automatically after voting and/or Keep responses anonymous.

  4. Select Save.

  5. Preview your poll, and then click Edit if you want to make changes, or click Send if you're ready to post it.

As people in your group take the poll, you'll see real time results in your group conversation.

Feedback for Microsoft Forms

We want to hear from you! To send feedback about Microsoft Forms, go to the upper right corner of your form and select More form settings  More options button > Feedback.

See Also

Delete a group form created in Teams

Survey your team to check in and stay connected

Work with colleagues to create, edit, and review forms in Microsoft Teams

Check for macros that might contain viruses

A macro virus is a type of computer virus that could be stored in macros within an Microsoft Office file (such as a document, presentation, workbook, or template), or within any ActiveX control, COM add-in, or Office add-in. We refer to macros, ActiveX controls, and add-ins as "Active content".

Microsoft Office files that have a macro in them have a different file extension to indicate that they have an embedded macro. For example, a normal modern Word document is a .DOCX file, but if a macro added to the file it's saved as a .DOCM file. Likewise, a modern Excel workbook is a .XLSX file, and a modern PowerPoint presentation is a PPTX file, but if there are macros in them the Excel file becomes a .XLSM file and the PowerPoint presentation becomes a .PPTM file.

For your protection, Office doesn't run active content automatically unless the file has been marked as a trusted document or opened from a trusted location.

Notes: 

For all other files containing a macro or other active content you'll usually see a message that looks like this:

The Message Bar

Do not select Enable Content unless you're certain that you know exactly what that active content does, even if the file appears to come from a person or organization that you trust.

Note: Opening a file with macros disabled might limit the file's expected functionality.

Office can't scan files or locations to find and delete macro viruses, however all modern anti-malware software - like Microsoft Defender Antivirus - should be able to detect, and block, known macro viruses.

See Also

Enable or disable macros in Office files

Change macro security settings in Excel

Block senders or mark email as junk in outlook com

Blocking someone will stop their email coming to your Inbox. 

Block someone in Outlook.com

  1. To block someone in Outlook.com, select the messages or senders you want to block.

  2. From the top toolbar, select Junk > Block (or Spam > Block).

  3. Select OK. The messages you select will be deleted and all future messages will be blocked from your mailbox.

Notes: 

Mark email as junk or spam in Outlook.com

  1. Select the messages you want to mark as junk.

  2. At the top of the screen, select Junk > Junk (or Spam > Spam) to move the message to your Junk or Spam folder.

Notes: 

  • If email is being sent to your Junk folder in error, read Mail goes to the Junk folder by mistake.

  • Messages in your Junk folder are automatically deleted between 10 and 30 days after they arrive.

Other options to help keep junk or spam out of your inbox

Select the arrow to see more.

This will block everyone except those in your Safe senders list. Remember to include everyone you want to hear from.

  1. Open your Safe senders and domains and select Add.

  2. Type the email addresses or domains of your contacts and other people you want to add, and press Enter.

  3. Under Filters, select from:

    • Only trust email from addresses in my Safe senders and domains list and Safe mailing lists

    • Block attachments, pictures, and links from anyone not in my Safe senders and domains list

  4. Select Save.

Use this feature to block individuals or organizations.

  1. Open Blocked senders and domains and select Add.

  2. Type the email address or domain that you want to block, and press Enter.

  3. Select Save.

    Notes: 

    • To remove someone from a list, select Remove next to the email address or domain.

    • You can have up to 1,024 addresses or domains in the Blocked senders and Safe senders lists. If you want to add more than that, try blocking domains instead of individual email addresses.

Rules can help filter out specific words that repeatedly come from different or hidden email addresses.

  1. Open your Outlook.com Rules and select + Add new rule.

  2. Every rule needs at least three things: a name, a condition, and an action.

    Rules can also contain exceptions to conditions. You can add multiple conditions, actions, and exceptions at each step by choosing Add a condition, Add an action, and Add an exception. 

    For example, to create a rule that deletes all email with the word "weather" in the subject:
    Name = "Weather"; Condition = Subject includes "Weather"; Action = Delete

    Tips: 

    • Rules only work on email in your Inbox.

    • If you don't want any more rules to run after this one does, select the Stop processing more rules check box. For more information, see Stop processing more rules in Outlook.com.

  3. Press Save to create your rule.

When you post to a message board, newsgroup, chat room, or other public website, spell out your entire email address, for example, chesterbeane AT outlook DOT com. This way, a person can interpret your address, but the automated programs that spammers use often can't.

Spammers get rich when people buy their "products." Don't reply to spam (even to unsubscribe), buy anything from an unfamiliar business, or agree to hold or transfer money for anyone. Beware of messages that appear to come from Microsoft and that ask for your password or threaten to close your account or expire your password. They're false.

You can greatly reduce your risk from hackers, viruses, and worms if you have a firewall, keep your Windows and Microsoft Office software up to date, and install antivirus and anti-spyware software (and update all routinely).

If you want to stop receiving newsletters or promotions, you can unsubscribe from your inbox.

  1. In your inbox, select a newsletter or promotional email.

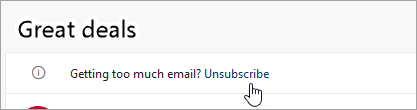
  2. At the top of the reading pane, select Unsubscribe.

    A screenshot of the Unsubscribe button

When you shop online, companies sometimes pre-select check boxes that indicate you agree that it's fine to sell or give your email address to responsible parties. If you don't want to receive email from those companies, make sure you clear the check boxes.

Avoid posting your email address on social networking sites, large Internet directories, or job-posting sites. Don't even post it on your own website, unless you disguise it as described in "Disguise your email address", below.

When you sign up for web-based services such as banking, shopping, or newsletters, carefully read the privacy policy before you reveal your email address so you don't unwittingly agree to share confidential information.

The privacy policy should outline the terms and circumstances regarding if or how the site will share your information. If a website doesn't post a privacy statement, consider taking your business elsewhere.

Still need help?

Note: You will need to sign in first to get support. If you can't sign in, go to Account support.

Community Forum button Contact Support button

Related Topics

Safe Senders in Outlook.com

Receiving email from blocked senders in Outlook.com

How to deal with phishing in Outlook.com