Friday, October 1, 2021

Check and respond to missed instant messages

Everyone needs breaks from sitting in front of their PC after a stretch of time, and you probably take some too. However, your contacts won't know when you're taking a break, and might try to contact you when you've stepped away.

To find out if you missed any IMs, check your lock screen. This is the screen that displays when you lock your PC. If you've set Lync as a lock screen app, the Lync icon with an asterisk will display on this screen to indicate missed conversations.

After you unlock your PC, check the Lync tile on the Windows Start screen. Under Things you missed, the last three interactions─IMs, calls, or voice mail messages that were received since you last used Lync, are displayed. The IMs include new invitations and updates to active conversations.

Screenshot of the windows start screen with status updates displayed on the highlighted lync tile.

After you unlock your screen and open Lync, there will be a number on the History tile indicating how many new IM invitations you missed since you last used Lync. Select the History tile to see these invitations. Each missed IM in the History screen is highlighted until you select it. The History screen also displays the IM conversations, calls and meetings you had in the past, up to a maximum of 50.

To respond to a missed IM, select it, type your response, and press Enter.

Screenshot of the history tile with multiple IMs displayed. The missed IM is highlighted.

New messages in active conversations

A conversation is considered active as long as the delay in the IM exchange is less than 10 minutes. A response that is received 10 minutes or more after the previous IM is considered a new conversation and Lync displays it as an invitation to a new IM conversation.

If the Lync window is hidden when the new message is received in an active conversation, a notification displays for a few seconds. If you don't respond to it then, the new message is considered as missed. The next time you open the Lync window, a highlight is shown on top of the window to indicate a new message.

To see the new message, swipe in from the top or bottom, or right-click the screen if you're using a mouse. The bar on the top displays tiles for all your active conversations and calls. The tile for the conversation with the missed message is white with a yellow highlight. Select it to see the missed message.

Screenshot of the Lync home screen with the app commands displayed and the new message on the top bar highlighted

Turn off new message notifications

You may want to stop getting notifications of new messages from your active conversations during important meetings or presentations. If you do, turn them off from the Lync Options panel. Here's how:

  1. Open the Settings charm. Swipe in from the right edge of the Lync home screen, and then tap Settings.
    If you're using a mouse, point to the upper-right corner of the screen, move the mouse pointer down, and click Settings.

  2. Select Options.

  3. Scroll down the list of options to Notifications of new IMs in active conversations.

  4. Move the slider to the left to turn off the option.

  5. Tap or click outside the Lync Options panel to close it.

Can't see your missed IMs?

If your PC loses its connection to the Exchange server, information about your missed IMs won't get sent to Lync. And, the following error message is displayed at the bottom of the screen:

Lync can't connect to Exchange. You might not have the latest history, voice mail, contacts, and Lync Meetings.

The information eventually gets sent to Lync when your PC re-connects to the Exchange server.

Create table statement

Creates a new table.

Note: The Microsoft Access database engine does not support the use of CREATE TABLE, or any of the DDL statements, with non-Microsoft Access database engine databases. Use the DAO Create methods instead.

Syntax

CREATE [TEMPORARY] TABLE table (field1 type [(size)] [NOT NULL] [WITH COMPRESSION | WITH COMP] [index1] [, field2type [(size)] [NOT NULL] [index2] [, ...]] [, CONSTRAINT multifieldindex [, ...]])

The CREATE TABLE statement has these parts:

Part

Description

table

The name of the table to be created.

field1, field2

The name of field or fields to be created in the new table. You must create at least one field.

type

The data type of field in the new table.

size

The field size in characters (Text and Binary fields only).

index1, index2

A CONSTRAINT clause defining a single-field index.

multifieldindex

A CONSTRAINT clause defining a multiple-field index.


Remarks

Use the CREATE TABLE statement to define a new table and its fields and field constraints. If NOT NULL is specified for a field, then new records are required to have valid data in that field.

A CONSTRAINT clause establishes various restrictions on a field, and can be used to establish the primary key. You can also use the CREATE INDEX statement to create a primary key or additional indexes on existing tables.

You can use NOT NULL on a single field or within a named CONSTRAINT clause that applies to either a single field or to a multiple-field named CONSTRAINT. However, you can apply the NOT NULL restriction only once to a field. Attempting to apply this restriction more than once results in a run-time error.

When a TEMPORARY table is created it is visible only within the session in which it was created. It is automatically deleted when the session is terminated. Temporary tables can be accessed by more than one user.

The WITH COMPRESSION attribute can be used only with the CHARACTER and MEMO (also known as TEXT) data types and their synonyms.

The WITH COMPRESSION attribute was added for CHARACTER columns because of the change to the Unicode character representation format. Unicode characters uniformly require two bytes for each character. For existing Microsoft Access databases that contain predominately character data, this could mean that the database file would nearly double in size when converted to the Microsoft Access format. However, Unicode representation of many character sets, those formerly denoted as Single-Byte Character Sets (SBCS) can easily be compressed to a single byte. If you define a CHARACTER column with this attribute, data will automatically be compressed as it is stored and uncompressed when retrieved from the column.

MEMO columns can also be defined to store data in a compressed format. However, there is a limitation. Only instances of MEMO columns that, when compressed, will fit within 4096 bytes or less, will be compressed. All other instances of MEMO columns will remain uncompressed. This means that within a given table, for a given MEMO column, some data may be compressed and some data may not be compressed.


Sumsq function

Returns the sum of the squares of the arguments.

Syntax

SUMSQ(number1,number2,...)

Number1, number2,...     are 1 to 30 arguments for which you want the sum of the squares.

Example

Formula

Description (Result)

=SUMSQ(3, 4)

Sum of the squares of 3 and 4 (25)

Create pages sections or notebooks in onenote for ipad or iphone

Notebooks in OneNote or iPhone or iPad are made up of sections and pages. Pages contain your actual notes, whereas sections contain collections of related pages. Each notebook can have as many sections as you want, and any section can have as many pages as you want.

Depending on your preference, you use a single notebook and fill it with additional sections and pages over time, or you can choose to create several additional notebooks to keep the information in your life organized separately. For example, you could create separate notebooks for the things you care about at home, at work, and at school. There's no wrong way to stay organized in OneNote — it's up to you!

Create a new page

To create more space in your notebook, you can add as many pages as you want.

  1. Do the following:

    • iPad: At the bottom of the page list, tap + Page.

    • iPhone: At the bottom of the page list, tap + Page. If you're currently editing a page, first tap the Show Notebooks button button the page list.

  2. When you're ready to use one of the new pages, type a page title into its page header area. Meaningful page titles make it easier to find information whenever you search your notebooks.

Note: You cannot currently create a page using a template in OneNote for iPad or iPhone.

Create a new section

Sections in OneNote are like the color tabs in a typical 5-subject paper notebook that hold a separate collection of pages. However, in OneNote, you can have as many sections as you want.

Note: You can't currently create subsections or grouped sections in OneNote for iPhone or iPad.

  1. To create a new section, do the following:

    • iPad: At the bottom of the section list, tap + Section.

    • iPhone: At the top right of the section list, tap the plus ( +) icon . If you're currently editing a page, first tap the Show Notebooks button button in the upper left corner until it displays the section list.

  2. Type a name for the new section, and then tap Done.

New sections always contain one blank new page. You can start taking notes on this page, create your own, or move pages from other sections into the new one.

Create a new notebook

You can create additional notebooks at any time to keep your work and your projects organized separately. Multiple notebooks also make it easier to keep personal notes private while at the same time sharing selected notebooks with others whenever you want to collaborate on a project or plan.

To create a new notebook, do the following:

  1. If necessary, sign into the account where you want to create a new OneNote notebook.

    • iPad: At the bottom of the notebooks list, tap + Notebook.

    • iPhone: At the top of the notebook list, tap the plus ( +) icon . If you're currently editing a page, first tap the Show Notebooks button button in the upper left corner until it displays the section list.

      Tip: To quickly see all notebooks, tap the Notebook button at the bottom (available only when the section or page lists are displayed).

  2. Type a descriptive name into the Name box.

  3. Tap Create.

    Tips: 

    • A new notebook is automatically opened as soon as OneNote creates it. You can find all of your open notebooks and easily switch between them by tapping the Show Notebooks button Show Notebooks button.

    • By default, new notebooks are created on the OneDrive account that you're currently signed in with. If you skipped Step 1 and you want to create a notebook on a different account, you must first sign into the account you want before following the rest of the preceding steps.

Rename pages, sections, or notebooks

Delete pages, sections, or notebooks

Learn more about publisher

Prevent forwarding of a meeting

As a meeting organizer, you can choose whether to allow attendees to forward a meeting invitation to others. When creating a meeting request, you can only use this option if your mailbox is hosted in Microsoft 365 or in Exchange Server 2019.

Notes: 

  • If you don't know if your mailbox is hosted in Microsoft 365, contact your helpdesk.

  • This feature isn't affected by the use of Information Rights Management.

How to prevent forwarding of a meeting

When you create or edit a meeting, you can choose to allow or prevent forwarding of the meeting invitation. The option to allow forwarding is turned on by default.

However, if you turn off this option, attendees included on the meeting invitation won't be able to forward the meeting to others. As the meeting organizer, you'll still be able to add attendees by editing the meeting.

  • Go to your calendar Calendar.

  • Select New Meeting.

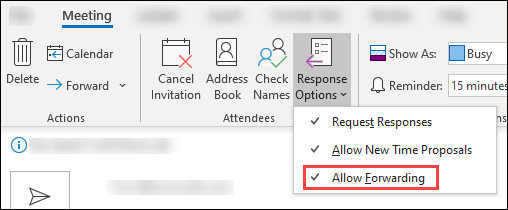
  • Select Response Options from the meeting toolbar.

  • Select Allow Forwarding to remove the checkmark.

    Use meeting toolbar to block forwarding

  • Go to your calendar Calendar.

  • Select New event.

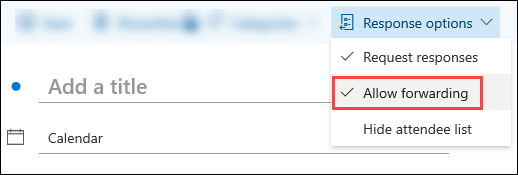
  • Select Response options from the meeting toolbar.

  • Select Allow forwarding to remove the checkmark.

    Use event toolbar to block forwarding

  • Go to your calendar.

  • Select New event.

  • Add attendees.

  • Select Response options Settings icon from Attendees.

  • Select Allow forwarding to remove the checkmark.

    Screenshot of allow forwarding option

You can prevent forwarding when you create or update meetings in the following Outlook clients:

Outlook client

Currently supported

Outlook on the web

For Microsoft 365 and Exchange 2019 users

Outlook for Windows

For Microsoft 365 users
* Available for Current Channel (version 1808 or later)
* Available for Semi-Annual Enterprise Channel (version 1902 and later)

Outlook for Mac

For Microsoft 365 users
* Available for 16.20 (18120801) and later

Outlook for iOS

Not supported yet

Outlook for Android

Not supported yet

Note: To see what version of Outlook for Windows or Outlook for Mac that you're using, in Outlook go to About Outlook by selecting File > Office Account.

If an attendee receives a meeting invitation in an updated Outlook client, they are prevented from forwarding the meeting invitation and the calendar event, regardless of the type of email account they have. 

Updated Outlook clients are:

  • Outlook on the web (Office 365, Exchange Server 2016, Exchange Server 2019)

  • Outlook for Windows (available in Version 1808 of Current Channel, Semi-Annual Enterprise Channel (Preview) and Semi-Annual Enterprise Channel.)

  • Outlook 2013 and Outlook 2016 for Windows (Outlook 2013 build 15.0.5125.1000 and Outlook 2016 build 16.0.4795.1000).

  • Outlook for Mac 2016 (available in Version 16.16 [180812])

  • Outlook for iOS

  • Outlook for Android

See the list below for the experience if an attendee isn't using one of the clients listed above:

Exchange Online, Exchange Server 2016, or Exchange Server 2019: When the attendee receives a meeting on an older client, they will see the options to forward the meeting invitation or calendar event. However, if they try to forward the meeting, Exchange Online and Exchange Server block this action. An email notification is sent to the attendee indicating that the meeting organizer doesn't allow forwarding of the meeting, and as a result, their forward wasn't sent.

Older versions of Exchange or third-party services: When the attendee receives a meeting on an older client, they will see the option to forward the meeting invitation or calendar event. When the forward is sent, it's handled by external servers that don't support this feature, so the meeting forward can't be prevented. As has always happened, when the meeting is forwarded by an attendee using a third-party service, a forward notification isn't sent to the meeting organizer.

Notes: Even if the meeting organizer has prevented the forwarding of a meeting invitation or calendar event, attendees can still take the following actions:

  • Reply or Reply all to the meeting invitation with an email message.

  • Copy the meeting message or calendar event.

Turn sandbox mode on or off to disable macros

This article explains how to use an Access security feature called sandbox mode. In sandbox mode, Access blocks "unsafe" expressions: any expression that uses functions or properties that could be exploited by malicious users to gain access to drives, files, or other resources for which they do not have authorization. For example, functions such as Kill and Shell could be used to damage data and files on a computer, so they are blocked in sandbox mode.

Note: This topic does not apply to Access web apps or Access web databases, and does not cover other Access security features.

In this article

Overview

Sandbox mode is a security feature that prevents Access from running certain expressions that could be unsafe. These unsafe expressions are blocked regardless of whether the database has been 'trusted' – its content enabled.

How sandbox mode is set

You use a registry key to specify whether Access should run in sandbox mode. Sandbox mode is enabled by default – the registry key value is set to enable sandbox mode when Access is installed on a computer. If you want to allow all expressions to run, you can change the registry key value to disable sandbox mode.

Trusted databases

Regardless of whether sandbox mode is enabled in the registry, Access won't allow potentially unsafe expressions to run unless the database file either is located in a trusted location, or bears a valid trust signature. If a database isn't "trusted" Access uses sandbox mode.

The following drawing shows the decision process that Access follows when it encounters an unsafe expression.

The decision process for enabling or disabling sandbox mode

If you are not familiar with the registry, or you are not comfortable with changing registry keys yourself, ask for help from someone who is familiar and comfortable with changing the registry. You must have administrator permissions on the computer to change the registry values.

Top of Page

Disable sandbox mode (run unsafe expressions)

In some installations, you can disable sandbox mode by changing the value of a registry key.

Note: Not all installations of Access will include the SandBoxMode registry key referred to in the procedure below. If you do not find the registry key, we do not recommend adding it, as it could interfere with Office updates.

Caution      Incorrectly editing the registry may severely damage your operating system, requiring you to reinstall it. Microsoft cannot guarantee that problems resulting from editing the registry incorrectly can be resolved. Before editing the registry, back up any valuable data. For the most recent information about using and protecting your computer's registry, see Microsoft Windows Help.

Change the registry key

Important: Following these steps allows unsafe expressions to run in all instances of Access for all users on the computer.

  1. Close all instances of Access that are running on the computer for which you want to disable sandbox mode.

  2. Press the Windows key, type Run, and press ENTER.

  3. In the Open box, type regedit and then press ENTER.

    The Registry Editor starts.

  4. The specific location of the registry key will vary depending upon what version of Access you are running, the bitness (32 bit or 64 bit) of your Windows and Access version, and if you have a click-to-run installation. If you're having trouble finding the right registry key from the possible options displayed below, try searching the registry for Access Connectivity Engine.

    Expand the HKEY_LOCAL_MACHINE folder and navigate to the following registry key:

    If you're using Access 2010 try looking here: \Software\Microsoft\Office\14.0\Access Connectivity Engine\Engines or here: \Software\WOW6432Node\Microsoft\Office\14.0\Access Connectivity Engine\Engines

    If you're using Access 2013, try looking here: \Software\Microsoft\Office\15.0\Access Connectivity Engine\Engines or here: \Software\WOW6432Node\Microsoft\Office\15.0\Access Connectivity Engine\Engines

    If you're using Access 2016 or Access 2019, try looking here: \Software\Microsoft\Office\16.0\Access Connectivity Engine\Engines or here: \Software\WOW6432Node\Microsoft\Office\16.0\Access Connectivity Engine\Engines

    If you're using the 32 bit Microsoft 365 subscription version of Access or a 32 bit click-to run installation of Access try looking here: Software\Microsoft\Office\ClickToRun\Registry\Machine\Software\Microsoft\Office\16.0\Access Connectivity Engine\Engines

    ...or here:

    Software\Microsoft\Office\ClickToRun\Registry\Machine\Software\Microsoft\Office\15.0\Access Connectivity Engine\Engines

    If you're using the 64 bit Microsoft 365 subscription version of Access or a 64 bit click-to run installation of Access try looking here: Software\Microsoft\Office\ClickToRun\Registry\Machine\Software\Wow6432Node\Microsoft\Office\16.0\Access Connectivity Engine\Engines

    ...or here:

    Software\Microsoft\Office\ClickToRun\Registry\Machine\Software\Wow6432Node\Microsoft\Office\15.0\Access Connectivity Engine\Engines

  5. In the right pane of the registry editor, under Name, double-click SandBoxMode if it is present. If you don't find the SandBoxMode registry key, we do not recommend adding it, as it could interfere with Office updates.

    The Edit DWORD Value dialog box appears.

  6. In the Value Data field, change the value from 3 to 2, and then click OK.

  7. Close the Registry Editor.

Important: Remember that if you do not first enable the content in the database, Access disables any unsafe expressions regardless of whether you change this registry setting.

You can set the registry value to the following values, with 0 (zero) being the most permissive and 3 being the least permissive.

Setting

Description

0

Sandbox mode is disabled at all times.

1

Sandbox mode is used for Access, but not for non-Access programs.

2

Sandbox mode is used for non-Access programs, but not for Access.

3

Sandbox mode is used at all times. This is the default value, set when you install Access.

Top of Page