Tuesday, March 2, 2021

Lync q a manager

Lync Q&A Manager (question and answer) provides a structured environment for answering questions during a meeting. This feature is especially helpful in large meetings where a presenter can answer questions, while someone else is presenting meeting content.

Keep in mind that attendees can ask questions, but only presenters can answer.

Start the Q&A Manager

Any of the presenters in a meeting can start the Q&A Manager and reply to questions. If you are attending a meeting see Use the Q&A Manager as a participant.

  1. In your Lync Meeting, point to the presentation (monitor) icon, then click Q&A.

Screen shot of the Q and A manager

If there are no other content presented, the content stage opens and displays the Q&A manager for all participants. If other content is active, the Q&A tab displays as a new tab next to the Presentation tab.

The Meeting IM is automatically turned off until you stop the Q&A Manager.

Screen shot of Q and A manager window

  1. When a question is submitted, any of the presenters can click Answer and type a reply. Then press Enter on the keyboard to post the answer.
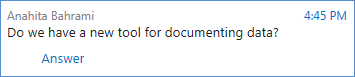
Screen shot of a question

If you're presenting content when a question is submitted, you'll see a notification about the new question. You can click the Q&A tab at any time to answer the question, and then go back to Presentation tab to continue your presentation.

  1. If you start typing an answer and change your mind, click Cancel to answer later, or for another presenter to pick up the question.

  2. Click the Unanswered tab to filter for the questions that haven't been answered yet.

  3. At the end of the session, click Stop Q&A. When Lync asks if you want to enable IM, click Allow All Meeting IM, or click X on the notification if you want to keep the IM off.

Screen shot of Q and A closed notification

  1. If you want a record of the Q&A session, click Save As, type a name and save the file on your computer. Q&A is saved in Notepad and contains the questions, answers, time stamps and the names of attendees and presenters who participated.

Use the Q&A Manager as a participant

When the Q&A session is shared by a presenter, all the meeting attendees can view and ask questions. Keep in mind that you can switch between the Q&A and Presentation tabs at any time during the meeting.

  1. Type a question in the Ask a question box.

  2. When the question is answered, you'll see the response below your question.

  3. If you only want to see your questions, click the My Questions tab.

  4. To have a local copy of the questions and Answers, click Save as…, and select a location on your computer.

Screen shot of Q and A manager

Manage sharing with external users in office 365 small business

If you perform work that involves sharing documents or collaborating directly with vendors, clients, or customers, then you might want to share content on your Team site or OneDrive for work or school with people outside your organization who do not have licenses for your Microsoft 365 Small Business subscription.

There are three ways that you can do this:

If you're looking for more information on sharing a document or site and who is considered an external user, see Share SharePoint files or folders in Microsoft 365.

Note:  These steps apply to Office 365 Small Business, which is no longer available for purchase. If you're using a different Microsoft 365 plan, see External sharing overview.

In this article

How to share without oversharing

Turn external sharing on or off

Remove individual external users

Disable an anonymous guest link

Withdraw invitations

How to share without oversharing

Best practices for sharing sites

If you've shared an entire site with a user, then that user will be able to log in to the site and function like a full member of the site. They will be able to browse, search for, view, and edit content (depending on which permission group you assign them to). They will be able to do things like see the names of other site users in the People Picker or view document metadata. External users will also appear in the People Picker as site users. This means that other people who use your site could grant different permissions to these users than you initially granted when you shared the site with them. Be sure you know the identity of external users before you invite them to your site.

If you invite external users to your Team site, they will be able to view content on the Team site and all subsites. If you want to avoid having external users gain access to important or sensitive content on your Team site, you should create a subsite of your Team site that has unique permissions, and then share only that subsite with external users. To learn more about permissions inheritance, see What is permissions inheritance?

Similarly, if you want to share a subsite that you've created on your OneDrive for work or school site, you will want to ensure that it has unique permissions so that you do not accidentally grant users permission to additional sites or content on your OneDrive for work or school site.

Top of Page

Best practices for sharing documents

If you share documents using anonymous guest links, then it is possible for invitation recipients to share those guest links with others, who could use them to view content. Do not use guest links to share documents that are sensitive. If you want to minimize the risk that someone might share an anonymous link, share a document by requiring sign-in instead.

Deciding how to share

When considering if and how you want to share content externally, think about the following:

  • To whom do you want to grant access to content on your Team site and any subsites, and what do you want them to be able to do?

  • To whom in your organization do you want to grant permission to share content externally?

  • Is there content you want to ensure is never available to be viewed by people external to your organization?

The answers to these questions will help you plan your strategy for content sharing.

Try this:

If you need to:

Share a site

If you want to share a site, but you also want to restrict external users from gaining access to some of your organization's internal content, consider creating a subsite with unique permissions that you use exclusively for the purpose of external sharing.

Provide someone outside your organization with ongoing access to information and content on a site. They need the ability to perform like a full user of your site and create, edit, and view content.

Share a document and require sign-in.

Provide one or several people outside your organization with secure access to a specific document for review or collaboration, but these people do not require ongoing access to other content on your internal site.

Share a document, but don't require sign-in.

Share a link to a non-sensitive or non-confidential document with people outside your organization so that they can either view it or update it with feedback. These people do not require ongoing access to content on your internal site.

Top of Page

Turn external sharing on or off

The ability to invite external users to the Team site is enabled by default, so site owners and site collection administrators can share the Team site or any of its subsites with external users at any time. However, if you are the Microsoft 365 admin, you can choose to disable the feature for all sites so that no future invitations can be sent. When this feature is deactivated, any external user currently invited to sites will no longer be able to access the sites.

Enabling external sharing is not the same thing as enabling anonymous access. When external sharing is enabled, users must be authenticated (by signing in) before they can access internal resources.

  1. Go to Admin > Service Settings > sites and document sharing.

  2. Do one of the following:

    • Turn on external sharing

    • Turn off external sharing

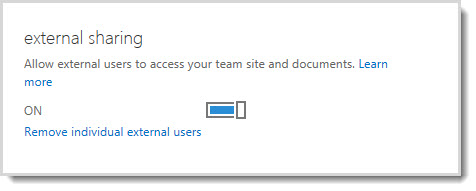
Image showing the on/off control for allowing external users access to your team site and documents.

Security Note: 

  • When you deactivate external sharing, any external users who had access to the site at the time the feature was deactivated are denied access to the site and no future invitations can be sent. If the feature is reactivated with external user names in the SharePoint permissions groups, then those users will automatically be able to access the site again. To permanently prevent a user from accessing the SharePoint site, you can remove them from the list of external users.

  • If external sharing is turned off globally, any shared guest links will also stop working. If the feature is later reactivated, these links will resume working. It is also possible to disable individual links that have been shared if you want to permanently revoke access to a specific document.

Top of Page

Remove individual external users

If you need to remove external users so that they no longer have access to sites that have been shared with them, you can do so by removing them from the list of external users in Microsoft 365 Service Settings.

  1. Go to Admin > Service Settings > sites and document sharing.

  2. Click Remove individual external users.

  3. Select the external users you want to remove, and then click Delete (the trash can icon).

Top of Page

Disable an anonymous guest link

When a document has been shared through a guest link, you can see this information in the properties menu for the document. To learn how documents can be shared through guest links, see Share SharePoint files or folders in Microsoft 365.

Properties dialog box showing that a document has been shared with a guest link.

You can revoke access to a document that has been shared through a guest link by disabling the link.

  1. Go to the library that contains the document for which you want to remove a guest link.

  2. Point to the document, and click Open Menu.

  3. Click a guest link in the sentence Open to anyone with a guest link.

  4. Next to the URL for the guest link, click the Delete button.

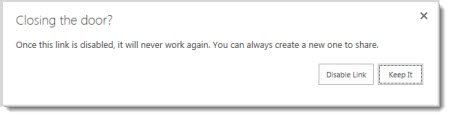
  5. When you are asked if you want the link disabled, click Disable Link.
    Dialog box asking you if you want to disable a guest link for a document that has been shared so that it will not work anymore.

When people outside your organization attempt to access the content using the guest link, they will see a message indicating that they cannot access it.

Top of Page

Withdraw invitations

If you want to withdraw an invitation you have sent to an external user, you can revoke the invitation before it is accepted.

Go to the site on which you want to withdraw an invitation

  1. Go to SettingsOffice 365 Settings button> Site Settings.

  2. Under Users and Permissions, click Access requests and invitations.

  3. Under External User Invitations, find the person you would like to uninvited to the site and click Open Menu.

  4. In the properties window, click Withdraw.

If the external user has already accepted an invitation, and you want to remove their access, you can do so by removing them from the SharePoint permissions group to which you assigned them.

Top of Page

Video add resize and format text boxes

Your browser does not support video.

Try it!

Text boxes let you place text anywhere in a document and can be moved, resized, and formatted just like a picture.

Add a text box

  1. Select Insert > Text Box.

  2. Click and drag to draw the text box the size you want.

  3. Type some text.

Resize a text box

  1. Select the text box.

  2. Select one of the handles and drag until the text box is the size you want.

Move a text box

  1. Select the text box.

  2. Select the border and drag text box where you want it.

Format a text box

  1. On the Drawing Tools Format tab, select Shape Fill and select a color.

  2. Select Shape Outline, select Weight, and select a weight.

Copy a text box

  • Select the text box border.

  • Press Ctrl + C to copy it, and Ctrl + V to paste it.

Delete a text box

  • Select the text box border and press Delete.

Want more?

Add, copy, or delete a text box

Change the colors in a text box or shape

Word training

Excel training

PowerPoint training

Outlook training

Upgrade from teams free to teams

What comes with an upgrade?

  • Users upgrade to a fully featured Microsoft 365 subscription, Microsoft 365 Business Standard ($12.50 user/​month with an annual commitment).

  • The full set of Teams features, including scheduled meetings, calendar, 1 TB of file storage, and advanced administration features.

  • There's no data loss during the upgrade—all your teams, chats, files, and permissions come with you!

  • Get a custom domain free for one year.

    Note: Annual commitment required. Custom domain is $12 per year after the first year. Only new Microsoft 365 for business subscribers are eligible. Limit one free year and one customer domain per organization. Offer not transferrable. Domains subject to availability and GoDaddy's terms.

Things to keep in mind before you upgrade

  • Once you upgrade, your organization can't go back to the free version of Teams.

  • You have to upgrade to a new Microsoft 365 subscription. Merging Teams free into an existing Microsoft 365 paid subscription is not supported.

  • When you upgrade, your entire org comes along for the ride! However, this means that all users in your org must be upgraded—we don't support a mix of paid and free users.

  • During the upgrade, you'll register a domain name for the org. This can either be a custom domain you already own or would like to purchase (such as contoso.com) or a temporary domain provided by Microsoft (such as contoso.onmicrosoft.com).

  • After the upgrade, all sign-in addresses in the org must match the new domain name. You'll need to update any email addresses that don't match the domain name in order for those users to use the full versions of Teams and Microsoft 365.

Upgrade your org

Note: You'll need to upgrade all users within your organization. If there are users you don't want to upgrade, remove them before starting the upgrade.

  1. When you're ready, click here to begin the upgrade process.

  2. Follow the instructions to purchase licenses and claim a domain name for your org.

Finish upgrading your org

After upgrading the org, update each member's credentials to Microsoft 365 credentials so they can use the full version of Teams and all Microsoft 365 services. See For admins upgrading from Teams free to a paid subscription for instructions.

Looking for other plans?

If you want to upgrade your Teams free org to a different plan, such as Business Essentials or Office 365 Enterprise E3, follow this process:

  1. Upgrade to Business Premium using the instructions on this page under Upgrade your org.

  2. Log in to the admin portal after completing the upgrade process and follow the instructions at Switch to a different Microsoft 365 for business plan. 

Use a screen reader to explore and navigate staffhub

This article is for people with visual impairments who use a screen reader program with the Office products and is part of the Office Accessibility content set. For more general help, see Office Support home.

Use Microsoft StaffHub with VoiceOver, the built-in iOS screen reader, to explore and navigate the different views and move between them.

Notes: 

  • New Microsoft 365 features are released gradually to Microsoft 365 subscribers, so your app might not have these features yet. To learn how you can get new features faster, join the Office Insider program.

  • This topic assumes that you are using the built-in iOS screen reader, VoiceOver. To learn more about using VoiceOver, visit Apple accessibility.

Navigate the StaffHub main view

The StaffHub main view contains the following elements:

  • The heading row, which contains the Settings button, the name of the current tab, the Notification button, and the Calendar button.

  • The main content area, which contains the contents of the currently active tab.

    • On the My Shifts tab, an info pane below the heading row contains details about your next shift, and your upcoming shifts are listed in the main content area. Below the list, there's the To-Do pane.

    • On the Requests tab, the Add Request button is located next to the tab name in the heading row. The main content area contains a list of your recent requests. Below the list, there's the Show Past Requests button.

    • On the Messages tab, the Create Message button is located next to the tab name in the heading row.. In the main content area, there's a list of your messages.

    • On the Files tab, the main content area contains the list of shared files.

  • The tab bar, which contains the My Shifts, Requests, Messages, and Files buttons for changing the current tab.

To cycle through the elements on the screen, swipe left or right until you hear the one you want, and then double-tap the screen to select it.

See also

Use a screen reader to sign in to StaffHub

Use a screen reader to send messages in StaffHub

Set up your device to work with accessibility in Microsoft 365

Use Microsoft StaffHub with TalkBack, the built-in Android screen reader, to explore and navigate the different views and move between them.

Notes: 

  • New Microsoft 365 features are released gradually to Microsoft 365 subscribers, so your app might not have these features yet. To learn how you can get new features faster, join the Office Insider program.

  • This topic assumes that you are using the built-in Android screen reader, TalkBack. To learn more about using TalkBack, go to Android accessibility.

Navigate the StaffHub main view

The StaffHub main view contains the following elements:

  • The heading row, which contains the Open Navigation Drawer button, the name of the current tab, the Open Activity Feed button, and the Open Calendar button.

  • The tab bar, which contains the My Shifts, Requests, Messages, and Files buttons for changing the current tab.

  • The main content area, which contains the contents of the currently active tab.

    • On the My Shifts tab, an info pane below the heading row contains details about your next shift, and your upcoming shifts are listed in the main content area. Below the list, there's the Click to Open To-Do List button.

    • On the Requests tab, the main content area contains a list of your recent requests. Below the list, there's the Start a Request button.

    • On the Messages tab, the main content area contains a list of your messages. Below the list, there's the Create Conversation button.

    • On the Files tab, the main content area contains the list of shared files.

To cycle through the elements on the screen, swipe left or right until you hear the one you want, and then double-tap the screen to select it.

See also

Use a screen reader to sign in to StaffHub

Use a screen reader to send messages in StaffHub

Set up your device to work with accessibility in Microsoft 365

Technical support for customers with disabilities

Microsoft wants to provide the best possible experience for all our customers. If you have a disability or questions related to accessibility, please contact the Microsoft Disability Answer Desk for technical assistance. The Disability Answer Desk support team is trained in using many popular assistive technologies and can offer assistance in English, Spanish, French, and American Sign Language. Please go to the Microsoft Disability Answer Desk site to find out the contact details for your region.

If you are a government, commercial, or enterprise user, please contact the enterprise Disability Answer Desk.

Unlock password protected sections in onenote for the web

When you try to access notes in a section in OneNote for the web that has been protected with a password, you may get an error message telling you that the section cannot be opened. It means that whoever owns the shared notebook you're working in (or another author) has locked the section.

If you need to view or work in the protected notes, you might have to check with that person to get the password for that section.

To open a password protected section, do the following:

  1. In OneNote for the web, click the name of the protected section that you're trying to open.

  2. When OneNote tells you that the section is password-protected, press the Enter key on your keyboard (or click the message with your mouse).

  3. When prompted, enter the password to unlock the section.

    Tips: Check the following if you can't unlock a section with a password:

    • Check the spelling of the password. Passwords are case-sensitive. Make sure that the Caps Lock key is off before you enter a password.

    • To keep your notes secure, OneNote automatically locks password-protected sections after a few minutes of inactivity.

    • OneNote uses 128-bit AES encryption to secure password-protected notebook sections. If you forget your password, no one will be able to unlock your notes for you — not even Microsoft Technical Support. Take care when applying or changing passwords. Write down your passwords and keep them in a safe place if you think you may not be able to remember them.

    • Notes on pages in password-protected sections are not included in notebook searches. To include notes within any protected section in a search, first unlock that section.

If you want to change the current password for a protected section or if you want to protect a section that hasn't been locked before, you'll need to open the notebook in one of the OneNote desktop or mobile apps listed below:

Change your display language in microsoft teams

Microsoft Teams automatically detects the language of your browser or operating system where possible. If your preferred language isn't supported, Teams displays either a related language or English as the default language. You can also change your language settings in Teams.

Microsoft Teams for Education is currently available in the following languages:

Arabic

Yes

Bulgarian

Yes

Chinese Traditional

Yes

Chinese Simplified

Yes

Croatian

Yes

Czech

Yes

Danish

Yes

Dutch

Yes

English (UK)

Yes

English (US)

Yes

Estonian

Yes

Finnish

Yes

French

Yes

French (Canada)

Yes

German

Yes

Georgian

Yes

Greek

Yes

Hebrew

Yes

Hungarian

Yes

Icelandic

Yes

Indonesian

Yes

Italian

Yes

Japanese

Yes

Korean

Yes

Latvian

Yes

Lithuanian

Yes

Norwegian (Bokmål)

Yes

Norwegian (Nynorsk)

Yes

Polish

Yes

Portuguese (Portugal)

Yes

Portuguese (Brazil)

Yes

Romanian

Yes

Russian

Yes

Serbian

Yes

Slovak

Yes

Slovenian

Yes

Spanish (Spain)

Yes

Spanish (Mexico)

Yes

Swedish

Yes

Thai

Yes

Turkish

Yes

Ukrainian

Yes

Vietnamese

Yes

Welsh

Yes

Additional resources for educators