Monday, March 1, 2021

Print notes in onenote for mac

You can print single or multiple pages within a section in OneNote for Mac. Keep in mind that you cannot print an entire notebook at one time.

Note: Some page formats are not currently supported while printing, such as printing with custom page margins and printing with landscape orientation.

Do the following:

  1. If necessary, open the notebook and navigate to the section containing the page or pages you want to print.

  2. On the File menu, click Print.

  3. In the Print dialog box that opens, select the printer and the printing options you want.

    Tips: 

    • To print a range of pages, click the arrows next to Pages, and then select Range.

    • To see more print options, such as paper type and print layout, click Show Details at the bottom of the dialog box.

  4. Click Print.

See Also

Insert PDF printouts into notes in OneNote for Mac

Print a calendar in outlook web app

This article is for Outlook Web App, which is used by organizations that manage email servers running Exchange Server 2013 or 2010. If you're using Microsoft 365 or Exchange Server 2016, your email program is Outlook on the web. For help with Outlook on the web, see Get help with Outlook on the web.

  1. On the Outlook Web App toolbar, select Calendar.

  2. In the left pane, under MY CALENDARS, select the calendar you want to print.

  3. Select print Print at the top of the calendar window.

  4. Select the calendar you want to print from the Calendar drop-down menu.

    Note: You can't print multiple calendars at one time. To print more than one calendar, you need to select each one individually.

  5. Select which calendar view you want to print (Day, Week, Work week, or Month) from the View drop-down menu.

  6. Select times from the Print from and Print to drop-down menus to narrow the time period that will display when you print the calendar.

  7. Select print Print.

If you select Print detailed agenda and calendar, the printed calendar will also display any agenda details that are part of the event.

The order in which excel performs operations in formulas

In some cases, the order in which a calculation is performed can affect the return value of the formula, so it's important to understand how the order is determined and how you can change the order to obtain the results you want.

  • Calculation order

    Formulas calculate values in a specific order. A formula in Excel always begins with an equal sign (=). Excel interprets the characters that follow the equal sign as a formula. Following the equal sign are the elements to be calculated (the operands), such as constants or cell references. These are separated by calculation operators. Excel calculates the formula from left to right, according to a specific order for each operator in the formula.

  • Operator precedence in Excel formulas

    If you combine several operators in a single formula, Excel performs the operations in the order shown in the following table. If a formula contains operators with the same precedence—for example, if a formula contains both a multiplication and division operator—Excel evaluates the operators from left to right.

    Operator

    Description

    : (colon)

    (single space)

    , (comma)

    Reference operators

    –

    Negation (as in –1)

    %

    Percent

    ^

    Exponentiation

    * and /

    Multiplication and division

    + and –

    Addition and subtraction

    &

    Connects two strings of text (concatenation)

    =
    < >
    <=
    >=
    <>

    Comparison

  • Using parentheses in Excel formulas

    To change the order of evaluation, enclose in parentheses the part of the formula to be calculated first. For example, the following formula produces 11 because Excel performs multiplication before addition. The formula multiplies 2 by 3 and then adds 5 to the result.

    =5+2*3

    In contrast, if you use parentheses to change the syntax, Excel adds 5 and 2 together and then multiplies the result by 3 to produce 21.

    =(5+2)*3

    In the following example, the parentheses that enclose the first part of the formula force Excel to calculate B4+25 first and then divide the result by the sum of the values in cells D5, E5, and F5.

    =(B4+25)/SUM(D5:F5)

Components of a catchy cover letter

Ready to land your dream job? In almost all cases, you'll need to submit a resume to show how you're qualified for the position you want. But in a sea of resumes, how do you make your accomplishments stand out from the stack?

Your cover letter is a quick introduction that accompanies your resume. It's an opportunity to go beyond the format of a resume, highlight your passions, and include some details that an employer won't find on your resume. Read on for essential items to add to your cover letter.

Include your contact info

Even if you submit your cover letter with your resume, you'll want to treat them as separate documents. Make sure to add your contact info to your cover letter, including your full name and a professional email address. Don't have a good email address? Sign up for a free one at Outlook.com.

Lead with a strong opening

When you're saying hello for the first time, it's a good idea to lead with why you're reaching out. How did you discover this position? Online? Through a friend? If you've been personally referred to this position, say so. Also, be sure to address the hiring manager by name, when possible, for a more personal approach.​

Take a tailored approach

While it can seem tedious, customizing your cover letters will make you stand out from the crowd. Customization also shows you've done your research and you understand the requirements of this job—and how you can bring value in this role. ​

Tailor the following items to this specific job:

  • The reason you're interested in this job

  • The value you can bring to the company

  • Your skills

Showcase your strengths

Imagine a hiring manager was only going to skim your resume. What highlights and achievements would you absoultely want them to see? Take your top picks and draw attention to them on your cover letter. This is a great place to go into more depth about why those achievements made a difference and to show how you can leverage those same skills to do great things in a new role.

Tell something your resume couldn't

A resume is a great place to show achievements and responsibilities, but it's harder to showcase passion. As you write your cover letter, be sure to talk about what you're passionate about—and how it relates to this opportunity. Companies want employees who are going to be happy in their roles, so help employers see how this opportunity aligns to the interests you already have.

Cover letter templates to get you started

Ready to work on your cover letter? Browse Microsoft's Resume and Cover Letters collection to find a cover letter template that's right for you.

Want more tips for finding the perfect job for you? See Land your dream job.

Manage devices enrolled in mobile device management in office 365

Find data by adding a popup form

Finding your data in Access web apps doesn't have to be complicated. Popup views (formerly called popup forms) in Access web apps get you to the information you need in one click.

Note: This article doesn't apply to Access desktop databases. For more information about creating forms in desktop databases, see create an Access form.

If you're viewing employee tasks, for example, and want to know more about a particular employee, you can designate a popup view for the Assigned To control. Access turns the employee name into a link:

An autocomplete control that is linked to a popup form.

Click the name to see and edit employee details:

A partial view of an employee detail view.

You can attach popup views to any controls that display data from related tables or queries. This includes combo boxes, AutoComplete controls, and Related Items controls.

Note:  For the popup view option to be available, the control needs to be bound to a row source (table or query), not just getting its values from a value list you entered manually.

To add a popup view:

  1. Open the web app in Access. If you're viewing it in a browser, click Settings > Customize in Access.

  2. Click the table caption name for the view you want to change in the Table Selector in the left pane, and then click the view name.

    Selecting a view in Access.

  3. Click Edit to open the view in design mode, and then click the control you want to add the popup view to.

  4. Click the Data button that appears next to the control.

    The Data button next to an AutoComplete control.

  5. If the control is bound to a row source (a table or query), you'll see a Popup view drop-down near the bottom of the Data properties. The drop-down shows views that have the same row source as the control. Select the view you want to appear when you click the popup button.

    Selecting a popup view for an AutoComplete control.

    Tip:  If a suitable view isn't available, close the Data settings box and create a new view. Select the table that contains the information you want to see, then click the plus-sign button to the right of the View Selector.

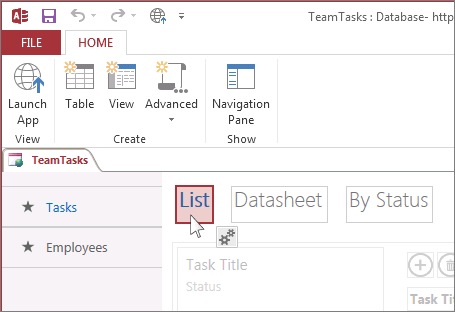
  6. Save the view, then click Home > Launch App to see how it works.

Learn more about finding data in Access web apps.

Video create and manage drop down lists

Your browser does not support video.

Data entry is quicker and more accurate when you use a drop-down list to limit the entries people can make in a cell. When someone selects a cell, the drop-down list's down-arrow appears, and they can click it and make a selection.

Create a drop-down list

You can make a worksheet more efficient by providing drop-down lists. Someone using your worksheet clicks an arrow, and then clicks an entry in the list.

  1. Select the cells that you want to contain the lists.

  2. On the ribbon, click DATA > Data Validation.

  3. In the dialog, set Allow to List.

  4. Click in Source, type the text or numbers (separated by commas, for a comma-delimited list) that you want in your drop-down list, and click OK.

Want more?

Create a drop-down list

Add or remove items from a drop-down list

Remove a drop-down list

Lock cells to protect them

Data entry is quicker and more accurate when you use a drop-down list to limit the entries that people can make in a cell.

When you select a cell, the drop-down list's down-arrow appears, click it, and make a selection.

Here is how to create drop-down lists: Select the cells that you want to contain the lists.

On the ribbon, click the DATA tab, and click Data Validation.

In the dialog, set Allow to List.

Click in Source.

In this example, we are using a comma-delimited list.

The text or numbers we type in the Source field are separated by commas.

And click OK. The cells now have a drop-down list.

Up next, Drop-down list settings.