Saturday, January 2, 2021

Edit blocked sip domain

Use this dialog box to edit the name of a blocked external Session Initiation Protocol (SIP) domain.

SIP domain

The fully qualified domain name (FQDN) of the external SIP domain to be blocked from connecting to this Access Edge Server. This name should be unique and should not already exist in the Allow list for this Access Edge Server. The name may be up to 256 characters in length.

Learn More Online

Click to expand or collapse

Federation is a trust relationship between two or more SIP domains that permits users in separate organizations to communicate in real-time across network boundaries as federated partners. Internal users can communicate with external users of a federated partner by using instant messaging (IM) or conferencing. Users of domains that you have blocked cannot communicate with users in your organization.

For details, see the Operations section of the Office Communications Server Technical Library.

Friday, January 1, 2021

Add or change the fill color of a table cell

Add color to a table cell in any of the following ways:

Add or change a fill color

  1. Select the cells in which you want to add or change the fill color.

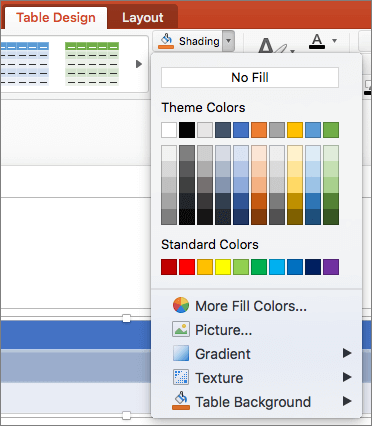
  2. On the Table Design tab, click the arrow next to Shading.

  3. Click the color you want from Theme Colors or Standard Colors, or click More Fill Colors.

    Screenshot shows the Table Design tab where the Shading drop-down arrow is selected to show available options including No Fill, Theme Colors, Standard Colors, More Fill Colors, Picture, Gradient, Texture, and Table Background.

Apply a gradient or texture as the fill color

  1. Select the cells in which you want to apply a fill effect as the fill color.

  2. On the Table Design tab, click the arrow next to Shading.

  3. Click Gradient to select and apply a gradient effect. Click Texture to select and apply a texture effect.

Remove the fill color

  1. Select the cells in which you want to remove the fill color.

  2. On the Table Design tab, click the arrow next to Shading.

  3. On the Shading menu, click No Fill.

Add or change a fill color

  1. Select the cells in which you want to add or change the fill color.

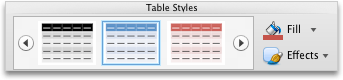
  2. On the Tables tab, under Table Styles, click the arrow next to Fill.

    PowerPoint Tables tab, Table Styles group

  3. On the Fill menu, click the color you want.

Apply a gradient, pattern, or texture as the fill color

  1. Select the cells in which you want to apply a fill effect as the fill color.

  2. On the Tables tab, under Table Styles, click the arrow next to Fill.

    PowerPoint Tables tab, Table Styles group

  3. On the Fill menu, click Fill Effects.

  4. Do any of the following:

    To

    Do this

    Use a solid color as the fill

    Click the Solid tab, and then click the color that you want.

    Change the gradient

    Click the Gradient tab, and then click the options that you want.

    Change the texture

    Click the Picture or Texture tab, and then click the texture that you want.

Remove the fill color

  1. Select the cells in which you want to remove the fill color.

  2. On the Tables tab, under Table Styles, click the arrow next to Fill.

    PowerPoint Tables tab, Table Styles group

  3. On the Fill menu, click No Fill.

Remaining cumulative actual work field

The Remaining Cumulative Actual Work field contains the work that still needs to be completed on a task or by a resource assigned to a task.

There are several categories of Remaining Cumulative Actual Work fields.

Data Type    Duration

Remaining Cumulative Actual Work (task-timephased field)

Entry Type    Calculated

How Calculated    The Work field contains the total amount of time scheduled for a task. When you first create a task, the Remaining Cumulative Actual Work field is equal to the total work. When you enter percent complete, percent work complete, or actual work information for a task, Project sums this up as the cumulative actual work completed for that task. Project calculates this field as follows:

Remaining Cumulative Actual Work = Total Work – Cumulative Actual Work.

Best Uses    Add the Remaining Cumulative Actual Work field to the timephased portion of the Task Usage view to review Remaining Cumulative Actual Work information for tasks. You can use this information to review how much work remains to be completed for a task so far.

Example    The "Write Proposal" task will take 50 hours of total work. Jamie, Sean, and Chris are assigned to the task. Yesterday, they each recorded 8 hours of actual work. Today, they each recorded 2 hours of actual work. The total work required for the task (50 hours) minus the cumulative actual work (30 hours) leaves us with the remaining cumulative actual work of 20 hours. Therefore, the Remaining Cumulative Actual Work for the task is now 20 hours.

Remaining Cumulative Actual Work (resource-timephased field)

Entry Type    Calculated

How Calculated    The Work field contains the total amount of time scheduled for a task. When you first assign resources to a task, the Remaining Cumulative Actual Work field for each resource is equal to the total work. When you enter percent complete, percent work complete, or actual work for a task, Project sums this up as the cumulative actual work completed for that task. To calculate the Remaining Cumulative Actual Work field for a resource, Project subtracts the cumulative actual work from the total work for all tasks that the resource is assigned to. Then, the sum of the remaining cumulative actual work for the tasks is displayed in the Remaining Cumulative Actual Work field for that resource. If two resources are assigned to the task, the remaining cumulative actual work is based on how much work is assigned to the resource.

Best Uses    Add the Remaining Cumulative Actual Work field to the timephased portion of the Resource Usage view to review remaining cumulative actual work information for a resource. This allows you to see how much total actual work remains for a resource at a given point in time.

Example    Jeff is assigned to two tasks: "Create artwork" and "Edit proposal." Each requires 8 hours of total work. Yesterday, he recorded 6 hours of actual work for "Create artwork" and 2 hours for "Edit proposal." Today, he recorded 2 hours of actual work for "Create artwork" task and 2 hours for "Edit Proposal." The total work for Jeff's tasks (16 hours) minus the cumulative actual work (12 hours) leaves us with the remaining cumulative actual work of 4 hours.

Remaining Cumulative Actual Work (assignment-timephased field).

Entry Type    Calculated

How Calculated    The Work field contains the total amount of time scheduled for a task. When you first assign a resource to a task, the Remaining Cumulative Actual Work field for the assignment is equal to the total Work. When you enter percent complete, percent work complete, or actual work for a task, Project sums this up as the cumulative actual work completed for that assignment. Project calculates this field as follows:

Remaining Cumulative Actual Work = Total Work – Cumulative Actual Work

Best Uses    Add the Remaining Cumulative Actual Work field to the timephased portion of the Task Usage view to review information on remaining cumulative actual work for assignments on specific tasks over a period of time. Add this field to the timephased portion of the Resource Usage view to review information on remaining work over a period of time for assignments to specific resources.

Example    Christie is the only resource assigned to the task, "Prepare presentation." This task requires 8 hours of total work. Yesterday, she recorded 5 hours of actual work for the task. Today, she recorded 3 hours of actual work for the task. The remaining cumulative actual work for the assignment is now 0 hours.

Top of Page

Fixes or workarounds for recent issues in powerpoint for windows

Last updated: June 2020

PowerPoint crashes and slow performance

Issues affecting PowerPoint features and add-ins

Last updated: January 11, 2018

ISSUE

If you recently installed an update and have McAfee antivirus installed on your PC, you may experience problems editing chart data in PowerPoint or Word.

STATUS: FIXED

This issue has been addressed in McAfee's WebAdvisor release 4.0.7.148. To fix this issue, please update the McAfee antivirus to the latest version.

Changed functionality, blocked or discontinued features

Need more help?

Call support

Talk to support.
If you have a Microsoft 365 for home subscription, or you purchased a one-time download of Office 2016, click the Contact Uslink at the bottom of this page.

Office 365 community forums

Ask the community
Get help from experts in our forums:
Office on Windows forum for personal, home, or university users
Microsoft 365 community forum for business users

Chat

Provide feedback in Office app
You can send feedback directly to our Office teams:.

In Office 2016 on Windows 10, open an Office app, and click File > Feedback.

Have a feature request?

Lightbulb - Idea

We love reading your suggestions on new features and feedback about how you use our products! Share your thoughts on the PowerPoint UserVoice site. We're listening.

Introduction to the query editor power query

Note: Power Query is known as Get & Transform in Excel 2016. Information provided here applies to both. To learn more, see Get & Transform in Excel 2016.

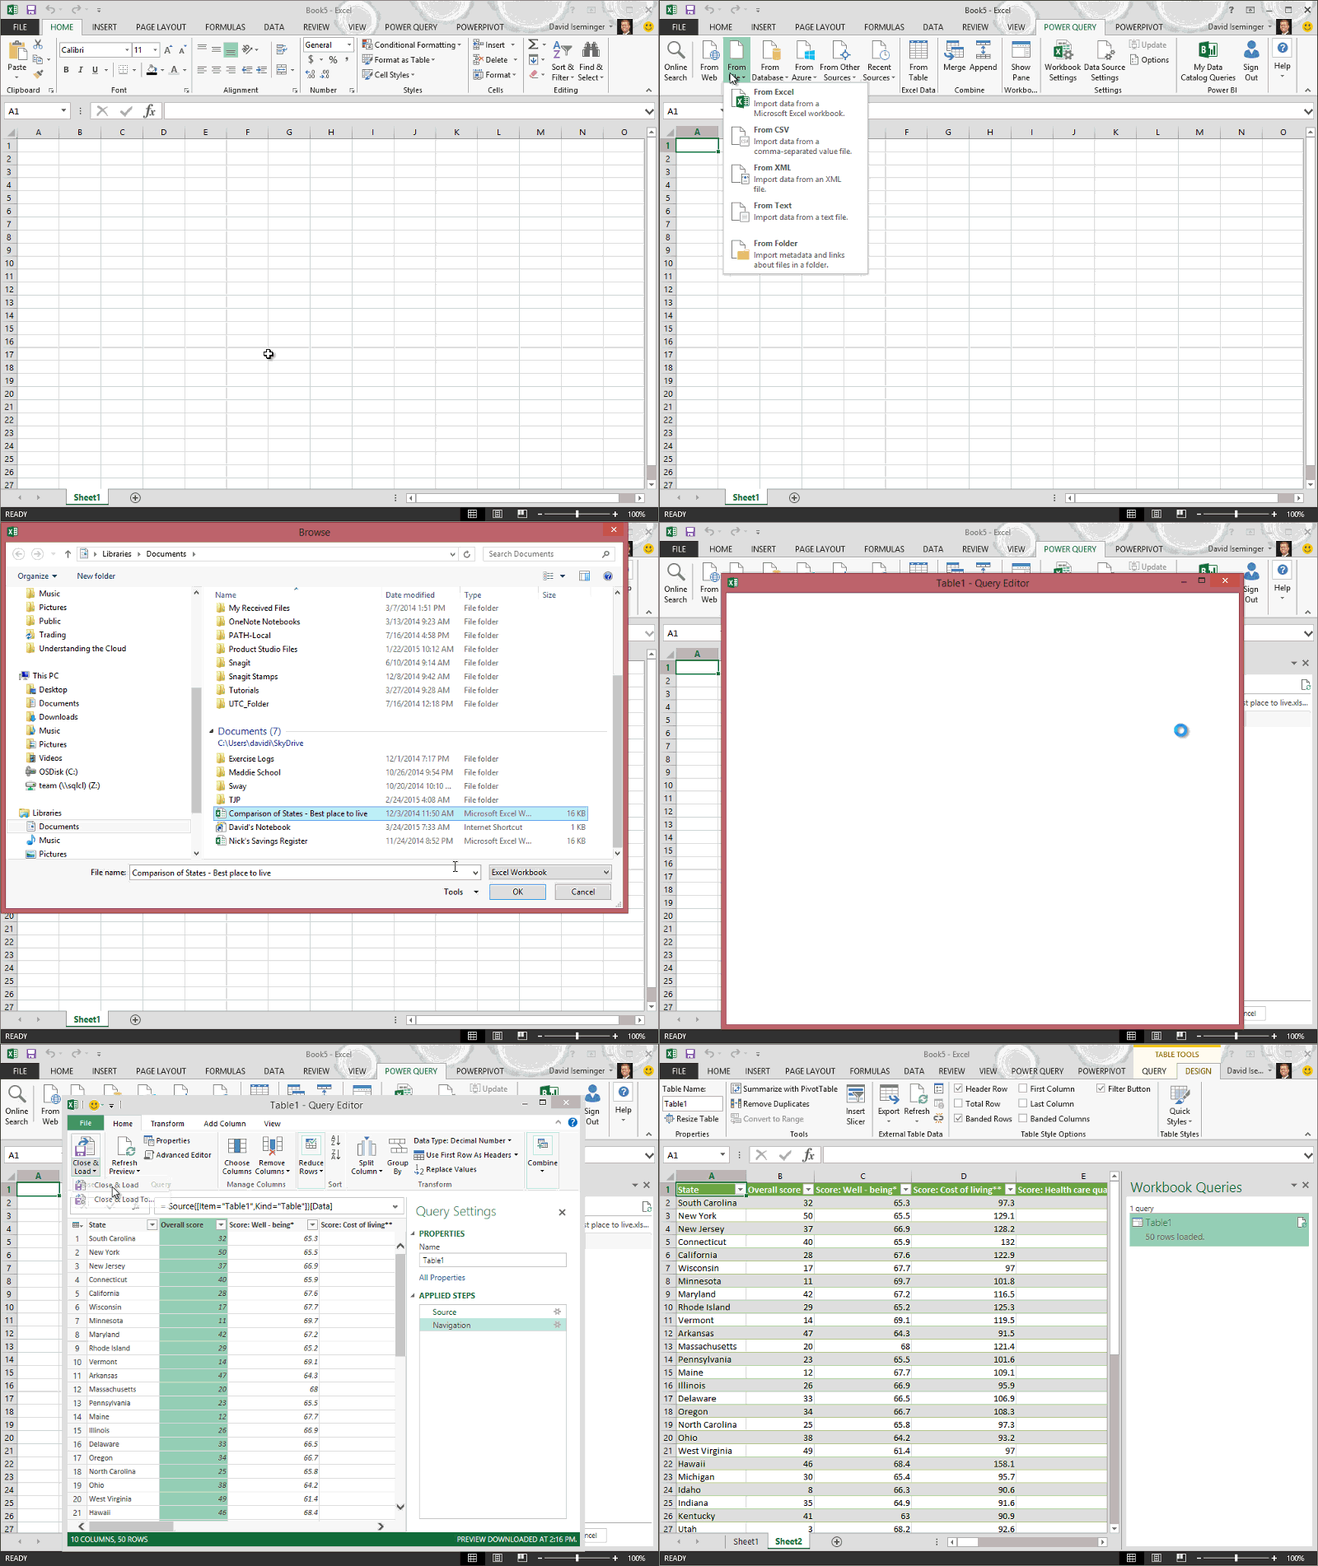
The Query Editor only appears when you load, edit, or create a new query. The following video shows the Query Editor window appearing after editing a query from an Excel workbook.

To view the Query Editor without loading or editing an existing workbook query:

From the Get External Data section in the Power Query ribbon tab, select From Other Sources > Blank Query.

How to see Query Editor in Excel

With Query Editor, you can navigate, define, and perform data transform operations over a data source. To display the Query Editor dialog box, connect to a data source, and click Edit Query in the Navigator pane or double-click a query in the Workbook Queries pane. To connect to a data source, see Import data from external data sources.

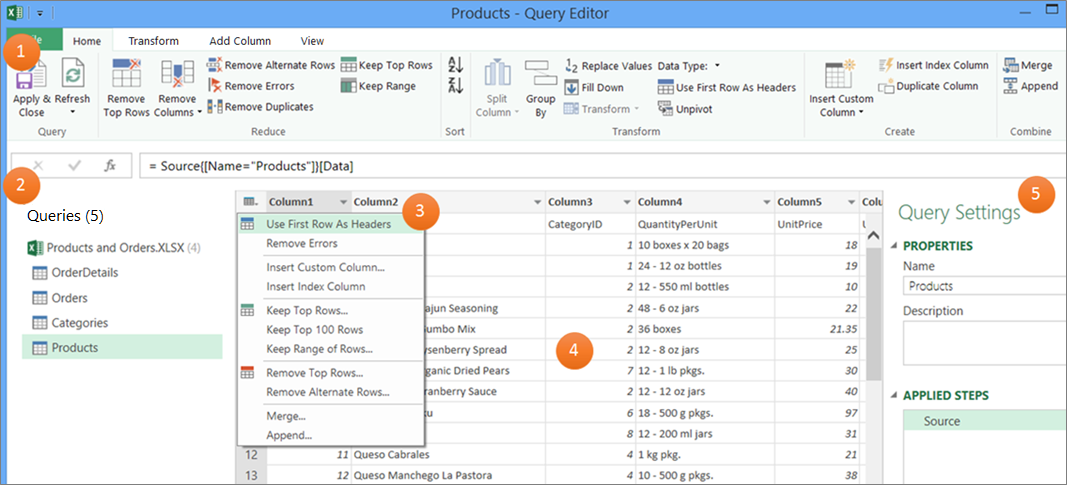
The query editor includes these features:

  1. Query Editor ribbon.

  2. Navigator pane that enables you to browse structured data sources to find the data table that you want to query.

  3. Context menus are specific to an element within the editor preview grid—such as a table column.

  4. Preview grid that displays a preview of data from the results of each query step. You interact within the Preview pane to shape data and rearrange tables into a subject table to match your data analysis requirements. For more information, see Shape data.

  5. The Query Settings panel, which includes each query step. A step corresponds to each of the data acquisition or data transformation tasks that can be applied on a query. For more information about how to edit query steps, see Edit query step properties.

    Query Editor Parts

Need more help?

You can always ask an expert in the Excel Tech Community, get support in the Answers community, or suggest a new feature or improvement on Excel User Voice.

Use live captions in a live event

Live event attendees can view live captions and subtitles in up to six languages in addition to the language being spoken. Event organizers can select the languages from a list of over 50.

In this article

Organizers: set up live captions

Producers: use live captions

Attendees: use live captions

Note: Captions and subtitles aren't yet available for some government clouds. They are available for US Government Cloud Community (GCC) organizations.

Organizers: set up live captions and subtitles

To set up live captions and subtitles for your event, select the Captions box when you're scheduling your event.

Note: Live captions and subtitles are only available for live events produced using Teams.

Use the Translate to menu to add up to six languages attendees can choose for captions and subtitles in addition to the language being spoken. For example, if the spoken language is English, but you know there's an office in the Netherlands tuning in, select Dutch (Netherlands) so they can get captions in Dutch.

Notes: 

  • Supported spoken languages for this feature: Chinese (simplified), Chinese (traditional), Dutch, English, French (Canada), French (France), German, Hindi, Italian, Japanese, Korean, Portuguese (Brazil), Russian, Spanish (Mexico), Spanish (Spain), and Swedish.

  • Supported translation languages include: Arabic, Bosnian, Bulgarian, Catalan, Chinese (Simplified, PRC), Creole, Czech, Danish, Dutch, English, Estonian, Filipino, Finnish, French, German, Greek, Hebrew, Hindi, Hmong, Hungarian, Indonesian, Italian, Japanese, Klingon, Korean, Latvian, Lithuanian, Malagasy, Malay, Maltese, Norwegian, Persian, Polish, Portuguese, Queretaro Otomi, Romanian, Russian, Samoan, Serbian (Latin), Serbian Cyrillic, Slovak, Slovenian, Spanish, Swahili, Swedish, Tahitian, Thai, Tongan, Turkish, Ukrainian, Urdu, Vietnamese, Welsh, and Yucatec Maya.

  • If Captions isn't there, contact your IT admin to turn this feature on.

Get the most out of captions and subtitles

  • Speak clearly, slowly, and directly into the mic.

  • Avoid locations with background noise.

  • Avoid having multiple people speaking at the same time.

  • Use the highest quality Teams-certified equipment available to you.

Note: Curse words will be starred out.

Download transcripts

After the live event has finished, click Calendar Meetings button in Teams and look up the live event. Under Live event resources, you'll find Transcripts. You should see a transcript for each of the languages you selected for captions and subtitles. Select Download Download to download them.

For best results, open the files with Microsoft Word.

Producers: use live captions and subtitles

Producers can control their own live captions and subtitles for the event from Settings Settings button .

To turn your own live captions and subtitles on and off, select My live captions.

To enable or disable attendee live captions and subtitles, select Attendee live captions. Attendees will get a notification when you make a change to this setting.

Attendees: use live captions and subtitles

To turn on live captions and subtitles, select Captions/Subtitles On Closed captions button in your video controls.

To change the caption language, select Settings Settings button > Captions / Subtitles, and choose the language you want.

Note: The available languages are set by the live event organizer.

Want to know more?

Live events overview

Schedule a live event

Produce a live event

Present in a live event

Attend a live event

How sign in works in office 365

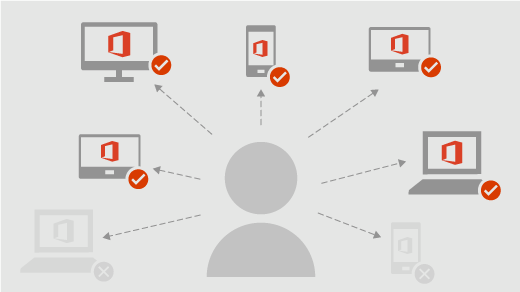
If you subscribe to Microsoft 365, you'll be prompted to sign in to use Office after installation, or after you sign out. Your subscription has a sign-in limit that determines how many Office installs you can sign in to at the same time. Use the tabs below to select your subscription type and learn more about sign-in limits for your subscription.

With Microsoft 365, you can install Office on all your devices and sign in to Office on five devices at the same time. This includes any combination of PCs, Macs, tablets, and phones.

Get help signing in to Office

Illustrates how a user can install Office on all their devices and can be signed in to five at the same time

Here's what you need to know

Here are some tips for using Microsoft 365 on multiple devices:

  • Each person who uses Office on a device must have an account that's associated with Microsoft 365. This can be the account that subscribes to Microsoft 365, or any accounts that share a Microsoft 365 Family subscription.

  • When you install Office on a device, you'll be prompted to sign in the first time you start an Office app.

  • Office remains activated as long as you're signed in. If you sign out, your account's license is removed and the app is deactivated. You can view and print files, but not create or edit files.

    To activate Office after you've signed out, you can sign in again with the account that's associated with your subscription.

  • If you have more than five devices, Office will sign you out of devices automatically to stay within your sign-in limit. To use Office on a device where you've been signed out, just sign back in.

Common questions

I signed in. Should I stay signed in?

We recommend staying signed in to Office so that your apps remain activated.

What happens if I sign out of Office?

If you sign out, your apps will be deactivated. You can view and print files, but not create or edit files, until you sign back in. To learn more, see What happens when you sign out of Office.

If I share Microsoft 365 Family, how does signing in work?

You can share your Microsoft 365 Family subscription with up to five other people. Each person will use their own Microsoft account to install Office on all their devices and be signed in to five at the same time.

Get help sharing your subscription

Can other people sign in to Office on my device?

If a person signs in to Office on your device without a subscription, they will be able to view and print files, but not create or edit files. If you have Microsoft 365 Family, you can share your subscription with five additional people. Each person can sign in to Office using their own Microsoft account on your device to create and edit their own files.

Get help sharing your subscription

With Microsoft 365, you can install and sign in to Office on 5 PCs or Macs, 5 tablets, and 5 phones.

Get help signing in to Office

Here's what you need to know

Here are some tips for using Microsoft 365 on multiple devices:

  • If you sign in to Windows using your work or school account, you'll be signed in to Office automatically. On Macs and mobile devices, sign in using your work or school account to activate Office.

  • Office remains activated as long as you're signed in. If you sign out, your apps will be deactivated. You can view and print files, but not create or edit files, until you sign back in.

  • Office will sign you out of devices automatically to stay within your sign-in limit. To use Office on a device where you've been signed out, just sign back in.

Common questions

I signed in. Should I stay signed in?

We recommend staying signed in to Office so that your apps remain activated.

What happens if I sign out of Office?

If you sign out, your apps will be deactivated. You can view and print files, but not create or edit files, until you sign back in.