Create or delete a custom list for sorting and filling data
Use a custom list to sort or fill in a user-defined order. Excel provides day-of-the-week and month-of-the year built-in lists, but you can also create your own custom list.
Learn more about custom lists
To understand custom lists, it is helpful to see how they work and how they are stored on a computer.
Comparing built-in and custom lists
Excel provides the following built-in, day-of-the-week, and month-of-the year custom lists.
| Built-in lists |
| Sun, Mon, Tue, Wed, Thu, Fri, Sat |
| Sunday, Monday, Tuesday, Wednesday, Thursday, Friday, Saturday |
| Jan, Feb, Mar, Apr, May, Jun, Jul, Aug, Sep, Oct, Nov, Dec |
| January, February, March, April, May, June, July, August, September, October, November, December |
Note: You cannot edit or delete a built-in list.
You can also create your own custom list, and use them to sort or fill. For example, if you want to sort or fill by the following lists, you'll need to create a custom list, since there is no natural order.
| Custom lists |
| High, Medium, Low |
| Large, Medium, and Small |
| North, South, East, and West |
| Senior Sales Manager, Regional Sales Manager, Department Sales Manager, and Sales Representative |
A custom list can correspond to a cell range, or you can enter the list in the Custom Lists dialog box.
Note: A custom list can only contain text or text that is mixed with numbers. For a custom list that contains numbers only, such as 0 through 100, you must first create a list of numbers that is formatted as text.
Create a custom list
There are two ways to create a custom list. If your custom list is short, you can enter the values directly in the popup window. If your custom list is long, you can import it from a range of cells.
Enter values directly
Follow these steps to create a custom list by entering values:
-
For Excel 2010 and later, click File > Options > Advanced > General > Edit Custom Lists.
-
For Excel 2007, click the Microsoft Office Button
 > Excel Options > Popular >Top options for working with Excel > Edit Custom Lists.
 -
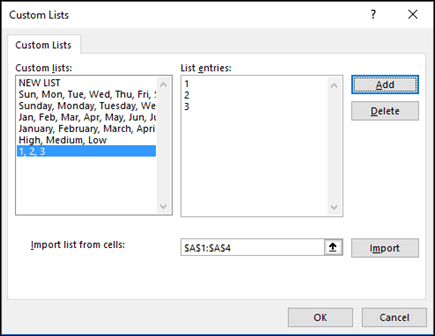
In the Custom Lists box, click NEW LIST, and then type the entries in the List entries box, beginning with the first entry.
Press the Enter key after each entry.
-
When the list is complete, click Add.

The items in the list that you have chosen will appear in the Custom lists panel.
-
Click OK twice.
Create a custom list from a cell range
Follow these steps:
-
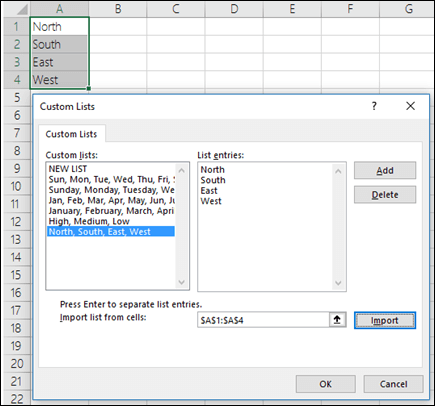
In a range of cells, enter the values that you want to sort or fill by, in the order that you want them, from top to bottom. Select the range of cells you just entered, and follow the previous instructions for displaying the Edit Custom Lists popup window.
-
In the Custom Lists popup window, verify that the cell reference of the list of items that you have chosen appears in the Import list from cells field, and then click Import.
-
The items in the list that you have chosen will appear in the Custom Lists panel.

-
Click OK twice.
Note: You can only create a custom list according to values, such as text, numbers, dates or times. You cannot create a custom list for formats such as cell color, font color, or an icon.
Delete a custom list
Follow these steps:
-
Follow the previous instructions for displaying the Edit Custom Lists dialog.
-
In the Custom Lists box, choose the list that you want to delete, and then click Delete.
How custom lists are stored
Once you create a custom list, it is added to your computer registry, so that it is available for use in other workbooks. If you use a custom list when sorting data, it is also saved with the workbook, so that it can be used on other computers, including servers where your workbook might be published to Excel Services and you want to rely on the custom list for a sort.
However, if you open the workbook on another computer or server, you do not see the custom list that is stored in the workbook file in the Custom Lists popup window that is available from Excel Options, only from the Order column of the Sort dialog box. The custom list that is stored in the workbook file is also not immediately available for the Fill command.
If you prefer, add the custom list that is stored in the workbook file to the registry of the other computer or server and make it available from the Custom Lists popup window in Excel Options. From the Sort popup window, in the Order column, select Custom Lists to display the Custom Lists popup window, then select the custom list, and then click Add.
Need more help?
You can always ask an expert in the Excel Tech Community, get support in the Answers community, or suggest a new feature or improvement on Excel User Voice.
No comments:
Post a Comment