Create and use Call Lists in Business Contact Manager
One of the most important tasks when you have a business is keeping in contact with actual and potential customers. Often, a simple phone call is the best way to do that.
You may want to follow up with Leads who have given you their business cards, or left information on your web page, call customers who wanted to know when out-of-stock items are found, or talk to current Accounts or Business Contacts who are overdue with their payments.
This article describes how to work with and measure the effectiveness of call lists in Business Contact Manager for Outlook, with details on creating targeted recipient lists and call scripts, and how to track your activities and results.
What do you want to do?
Promote your business through phone calls
With Business Contact Manager for Outlook, you can assemble a call list from your Accounts and Business Contacts, create a call script, and track the results of each phone call. You can also create a call list from the names in a report. For information about creating a call list from a report, see Use reports and charts in Business Contact Manager.
A call list is also an essential marketing activity and can be part of a marketing campaign.
To track the results of a call list activity, you must record the name of the activity in the Initiated by field of each Account, Business Contact, Lead, or Opportunity record generated by the activity. Also, record the budgeted and actual cost information on the Details and Track pages of the call list record.
Then, to see the results of your call list, use the Track page of the call list form. If the call list is part of a marketing campaign, the overall results of the campaign can be tracked on the Analysis tab of the Marketing workspace.
Create a call list
A call list in Business Contact Manager for Outlook is more than just a list of names and numbers. It's a system that helps you be poised and ready on the phone, and helps you track the results of each set of calls.
The recipient list for a marketing activity can include only one record type, either Accounts or Business Contacts. Business Contacts and Leads can be in the same list because the Lead record is based on the Business Contact record type.
-
In the Navigation Pane, under Business Contact Manager, click Marketing.
-
On the Ribbon, on the Home tab, in the New group, click the Call List button
 .
. -
On the call list form, under Activity, in the Name field, enter a name for the call list, such as "California Potential Clients".
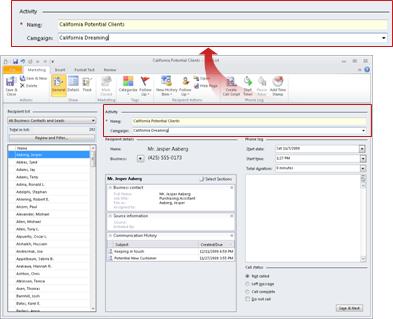
Note: If this call list is part of a marketing campaign, in the Campaign text box, type the name of the campaign, or click the arrow to select the name of an existing campaign. If it is not part of a campaign, the call list will be attached the default Current activities marketing campaign.
-
In the Recipient list section, click the type of record you want to reach with your call list, All Accounts, All Business Contacts and Leads, All Business Contacts, or All Leads.
Or, click one of the following options:
-
Search Folder. Choose a Search Folder that contains a pre-filtered list of recipients, to create a custom list. The field is renamed Custom List after you select a folder.
-
Existing Marketing Activity. Choose the recipient list that you used for a previous marketing activity.
-
New List. Open the Filter Business Contacts dialog box and select criteria to filter the list.
You can also create a list of recipients from a report. For more information, see Use reports and charts in Business Contact Manager.
If you have created new record types based on the Account type, they will appear in the All Accounts list. If you have created new record types based on the Business Contact type, they will appear in the All Business Contacts and Leads list.
-
-
To edit the selected list by filtering it, click Review and Filter.
For more information about filtering a list, see Filter records in Business Contact Manager.
-
On the Ribbon, on the Home tab, in the Show group, click Details to open the Activity details page. If you want to, enter values for Campaign code, Budgeted cost, Start date, End date, and Comments.
To return to the main page of the call list form, on the Ribbon, on the Marketing tab, in the Show group, click General.
-
Information about each recipient appears on the General page, under Recipient details. To change which sections from the record appear, click the Select Sections button
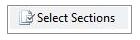 and then select the sections that you want to display.
 -
If you want to, you can create a script to make your calls consistent, and to make sure you cover all the points you want to make. In addition, a script allows you to stay on topic, and to quickly adjust your approach when phone conversations do not go as expected.
Create a call script
-
On the Ribbon, in the Phone Log group, click Call Script
 .
. -
To create a script for your calls, do one of the following :
-
Type the script in the Call Script window.
-
In the Actions group, click Load Content
 , and then navigate to an already saved document.
 -
Copy and paste a script from a different document.
The script will appear in the Phone log for each recipient.
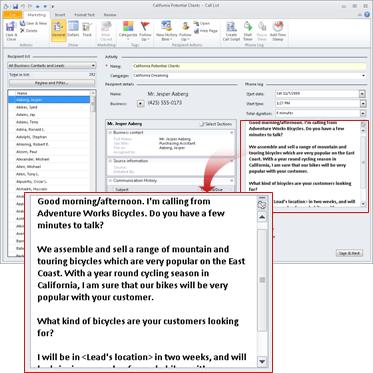
Note: If you edit the script in the Phone log section of the call list record, you will be changing only the version of the script for the selected recipient. To edit the script for all calls, you must click Call Script
on the Ribbon and then edit the script in the Call Script window.
-
-
-
If you want to, you can use the Outlook Categorization feature to add a color category to the call list. On the Ribbon, on the Marketing tab, in the Tags group, click Categorize, and then click a color category.
-
To begin making your calls immediately, you can start with the first name on the list. Otherwise, save the call list.
Before you make cold calls, research the National Do Not Call Registry and FCC regulations at www.fcc.gov/cgb/donotcall/. The Do Not Call rules do not apply to companies with which a consumer has an existing business relationship.
Open a call list
You might need to resume your work on a call list if you weren't able to call everyone in one session, or you might need to make changes to the list of recipients or the script.
-
In the Navigation Pane, under Business Contact Manager, click Marketing.
-
On the Call Lists tab in the List Pane, double-click the call list you want to open.
Modify your call list
Call lists are easy to make and to modify. You can change the type of records that appear in the list, you can refine the list by filtering or selecting the recipients, and you can change the script for all or some of the recipients.
-
Open the call list you want to modify.
-
To make changes to the call list, follow the instructions in Create a call list.
Important: You cannot modify a call list after you change the call status for any record in the list. Instead, right-click the call list, and then click Reach with Call List to create a new call list based on the existing one.
Make and track your calls using a call list
-
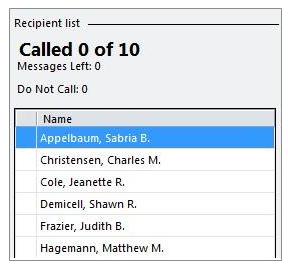
Under Recipient list, the first name in the list is highlighted.
Note: The names displayed are from the File As field in the source record. The name shown under Recipient details is from the Full Name field.
-
Using the phone number under Recipient details, call the contact.
-
Open the script. On the Ribbon, in the Phone Log group, click Call Script. When you reach the contact, read your script in a natural way, or if there's no script, state your message.
Note: If you edit the script in the Phone log section of the call list record, you will change the script only for the selected recipient.
-
Under Phone log, in Total duration, click or enter the length of the phone call. You can also time the call automatically.
To time your call automatically
-
On the Ribbon, in the Phone Log group, click Start Timer
 when you begin your call, or resume it after a pause.
 -
Click Pause Timer
 when there is a break in the call, or when you have finished the call.
The length of the call is recorded under Phone log, in the Total duration box. You can also click or type the length of the call manually.
-
-
To add notes on your conversation, on the Ribbon, in the Phone Log group, click Add Time Stamp, and then type your comments in the box where the script is displayed.
Note: To change the appearance of the text, on the Ribbon, click the Format Text tab to use the formatting commands. To add files, images, or tables, click the Insert tab.
-
During the call or after it has ended, on the Ribbon, on the Marketing tab, in the Recipient Actions group, click one or more of the following options:
-
New History Item to add a communication history item such as a business note, task, file, or e-mail message to the record of the recipient. A new phone log is automatically created for the recipient by the call list.
-
Follow Up to add a follow-up flag to the record, or to mark a follow-up item as completed with the Mark Complete option.
-
Open to display the record of the recipient.
-
Web Page to display the web page associated with the Recipient's record, if available.
-
-
At the end of the call, in the Call status section, update the record. Not called is selected by default. Click one of the following check boxes:
-
Left message
-
Call complete
-
Do not call
Important: You cannot modify a call list after you change the call status for any record in the list. You can, however, create a new call list that is a duplicate of an existing call list. Right-click the call list in the Marketing workspace, and then click Reach with Call List.
-
-
If a recipient asks to be taken off your call list, select the Do not call check box. The Account or Business Contact will be marked as Do not call in both the Recipient list, and on the Details page of the Account or Business Contact record. This recipient can't be included in future call lists.
-
Click Save & Next to make the following changes:
-
Save the changes as a phone log in the communication history of the selected record and move to the next record to call.
-
Stop the timer and record the total duration of the call in the Phone log.
-
Indicate the call status in the Recipient list.
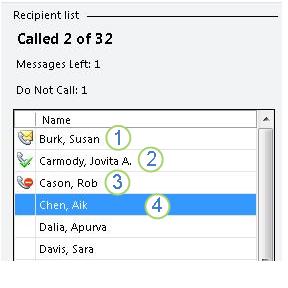
1 - Left a message. 2 – Call complete. 3 – Do not call. 4 – Current recipient.
Note: Although the status is updated in the Recipient list when you save the record, the options displayed in the Call Status section must be changed manually.
-
-
When you've called everyone on the list, close the activity. On the Ribbon, in the Marketing group, click Mark Closed.
Measure the effectiveness of your marketing call lists
You can create call lists and scripts for many purposes. But when you're making marketing calls, you want to know the results of your work. Review the results of a call list on the Track page of the call list.
-
Open a call list.
-
On the Ribbon, on the Home tab, in the Show group, click Track
 .
. -
On the Track page, review the following items:
-
Under Activity results, you can see summary information for Initiated leads, Initiated opportunities, Initiated accounts, Initiated contacts, Initiated Phone logs, and Expected revenue for the activity. Each field also has a Show Report button, which displays a detailed report of the data for that field.
Note: Information on the Track page, including expected revenue, is updated when Account, Business Contact, Lead or Opportunity records include the name of the call list in the Initiated by field.
-
In the Activity information area, you can update the following information:
-
Actual cost Enter the actual cost of the call list, so you can calculate your return on investment.
-
Closed Select this check box to indicate that the call list has been completed and the activity is now closed. Clear the check box to reactivate the call list.
-
-
In the Recipients section, you can review the list of calls you've made, and if you want to, you can create an Opportunity record right from the recipient's record. Simply click the name in the list, and then click Initiate Opportunity.
Note: You can also create an Opportunity record from the Recipient list on the General page of the call list. Select a name from the Recipient list, then on the Ribbon, on the Marketing tab, in the Recipient Actions group, click New History Item
 , and then click Opportunity.
-
-
Click Save and Close
 .
.
No comments:
Post a Comment