Make Visio organization charts from personnel files
| Applies to |
| Microsoft Office Visio® 2003 |
| Microsoft Visio 2002 |
You can automatically generate a chart using the Visio Organization Chart Wizard if you have personnel data stored in an electronic data file, or have accurate employee data in your Microsoft Exchange Server Directory.
This article describes how to:
And provides:
Formats the Organization Chart Wizard can read
The Organization Chart Wizard can read data in a variety of formats, including:
-
Microsoft Office Excel® (.xls).
-
Microsoft Exchange Server Directory (the data in the Microsoft Exchange e-mail Address Book).
-
Tab- or Comma-delimited text (.txt).
-
Org Plus (.txt).
-
The file format for a database created in an Open Database Connectivity (ODBC)-compliant database application, such as Microsoft Office Access®.
Structure your data files
Required data
To generate an organization chart from your personnel data file, the Organization Chart Wizard must be able to identify:
-
Each employee uniquely.
-
Each employee's name. (The way names appear in your data file is the way they'll appear on the organization chart position shapes.)
-
Who each employee reports to.
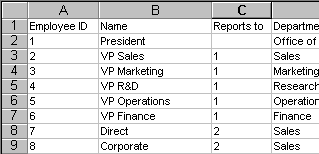
The Employee ID field in this data file contains numbers that uniquely identify each employee. If no employees have the same name, Name can serve as the unique identifier. The Reports To field must contain managers' unique identifiers. Leave the Reports To field blank for the person at the top of the chart.
Note: If you choose to create an organization chart from the Microsoft Exchange Server Directory, the Organization Chart Wizard automatically locates and reads the appropriate file. Remember that the organization chart the wizard generates can only be as accurate as the data in the Directory file.
Optional data
Your data file is likely to include a number of fields in addition to Unique Identifier, Name, and Reports To. For example, you might have fields for position title, phone number, department, and more. The Organization Chart Wizard lets you decide what you want to do with this data. You can choose to:
-
Display the employee name and one additional piece of data on the position shapes in the organization chart.
-
Store some or all of the data in property fields associated with the shapes so others have access to the data through the right-click menu.
-
Leave the data in the data file but ignore it for purposes of the organization chart.
Run the Organization Chart Wizard
After you have structured your data file so the wizard can use the information it contains, you're ready to generate an organization chart.
-
On the File menu, point to New, point to Organization Chart, and then click Organization Chart Wizard.
-
On the first screen, click Information that's already stored in a file or database, and then click Next.
-
Follow the instructions on the wizard pages. Click the question mark for help on a particular page.
Tips on using the Organization Chart Wizard
| Issue | Tip |
| You want to avoid stopping the wizard because of errors in your data file. | Check for these typical data file errors before you run the wizard:
|
| You want to display some of the information from your data file on each of the organization chart shapes. | The information you display on each shape can come from any of the fields in your data file. You still have access to the information that isn't displayed. Select a shape, and then, on the View menu, click Custom Properties Window. |
| Your organization chart is too large for one letter-size printed page. | Choose the wizard option that allows you to specify how much of your organization to display on each page of a multi-page organization chart. You can choose the number of pages, which employee is at the top of each page, and more. |
| You want to view the data associated with the chart shapes in your new chart. | On the View menu, click Custom Properties Window. Select any shape. |
Create a chart from data using the command line or Run method
If you maintain your organizational data in enterprise resource planning software, such as PeopleSoft or SAP/R3, you might want to develop a solution that people can use to quickly generate an organization chart from a data file without having to work through the Organization Chart Wizard pages.
To develop the solution, create a macro or executable file that runs the Organization Chart Wizard from the command line. The macro or executable file must include the statement:
OrgWiz.exe <arguments>
where the arguments specify how to build the organization chart. The possible arguments are listed below. If an argument value includes spaces, put the argument in quotation marks.
Command arguments for organization charts
| Argument | Purpose |
| /USE-LAST-VALUES | Reads values from the registry chosen by the last person who used the Organization Chart Wizard. If this argument is specified, all subsequent arguments are ignored. |
| /FILENAME=<filename> | Required, unless /DATASOURCE or /MICROSOFT-EXCHANGE is specified. Specifies the data file name you want the wizard to read. If the file name includes spaces, put the name in quotation marks. |
| /DATASOURCE=<datasourcename>, TABLE=<tablename>, DBQUALIFIER=<databasequalifier> | Required, unless /FILENAME or /MICROSOFT-EXCHANGE is specified. Specifies the name, table, and qualifier of the ODBC-compliant database you want the wizard to read |
| /MICROSOFT-EXCHANGE | Required, unless /FILENAME or /DATASOURCE is specified. Specifies that you want the wizard to read the Microsoft Exchange Server data. |
| /NAME-FIELD=<fieldname> | Optional. Specifies the field in the data file where the wizard can find employee names. If you don't specifiy this field, the wizard will look for common names, such as Name, Employee, Employee Name, or Employees. If it doesn't find a likely field, the wizard will fail. |
| /MANAGER-FIELD=<fieldname> | Optional. Specifies the field in the data file where the wizard can find Report-To information. If you don't specify this field, the wizard will look for common names, such as Manager, Reports To, or Reports-To. If it doesn't find a likely field, the wizard will fail. |
| /FIRSTNAME-FIELD=<fieldname> | Optional. Specifies a field in the data file where the wizard can find employees' first names. If you don't specify this field, the wizard will look for common names, such as First Name or First-Name. If it doesn't find a likely field, the wizard will continue building the organization chart. |
| /UNIQUEID-FIELD | Optional. Specifies the field containing the unique identifier. If this argument is not specified, the wizard will look for a field containing the same data values that are in the MANAGER-FIELD field. If it doesn't find a likely field, the wizard will fail. |
| /SHAPE-FIELD=<fieldname> | Optional. Specifies a field in the data file where the wizard can find the name of the organization chart master in Microsoft Office Visio that you want it to use. If you don't specify this field the wizard will look for common names, such as Master Shape or Master-Shape. If it doesn't find a likely field, the wizard will continue building the organization chart using shapes it chooses based on the reporting structure. |
| /HYPERLINK-FIELD=<fieldname> | Optional. Specifies a field in the data file where the wizard can find the text used for a shape's hyperlink. The wizard will search the data file for a column named HYPERLINK or URL. If it doesn't find a likely field, the wizard will continue building the organization chart. The wizard will read the contents of the column and store that text in the shapes as hyperlink addresses. The hyperlink destination is accessible by right-clicking the shape and then clicking a hyperlink. |
| /PAGES=<top employee> <num levels> PAGENAME=<pagename>, <top employee> <num levels> PAGENAME=<pagename>... | Optional. Specifies how you want the wizard to break the organization chart into pages. If you specify this argument, you must identify the top employee on each page (required). Optionally, you can include the number of reporting levels to include on a page, and the page name. If you don't specify the number of levels, the wizard includes all levels on a page. Names with spaces must be in quotation marks. Always include a space between <top employee> and <num levels> and PAGENAME=<pagename>. If you don't specify the pages, the wizard defines the pages, and places an appropriate number of shapes on each page. |
| /DISPLAY-FIELDS=<fieldname>, <fieldname>, ... | Optional. Specifies the fields from the data file that you want to display in each box in the organization chart. If you don't specify fields, the wizard displays the employee name. The order of this list is the order displayed on the shapes. |
| /CUSTOM-PROPERTY-FIELDS=<fieldname> HIDDEN, <fieldname> HIDDEN, ... | Optional. Specifies the fields from the data file that you want to add to the organization chart shapes as custom property fields. Optionally, insert the HIDDEN modifier after custom properties you want to be invisible to the user. |
| /SHOW-DIVIDER-LINE | Optional. Specifies a divider line on organization chart shapes that separates the first line of display text (such as employee name) from the second (such as title). |
| /SYNC-ACROSS-PAGES | Optional. Specifies that all shapes representing the same employee that appear on different pages of the drawing will be synchronized, so that changes made to one of the shape's text or custom properties will be made to all the shapes. |
| /HYPERLINK-ACROSS-PAGES | Optional. Specifies that all shapes representing the same employee that appear on different pages of the drawing will contain hyperlinks to each other. The hyperlink destination is accessible by right-clicking the shape and then clicking the hyperlink. |
| /LAUNCHGUI | Optional. Specifies that the drawing-definition organization chart wizard pages will be displayed to the user, so that the user can interactively modify the command-line arguments. The user will not be able to change the data source specified in /FILENAME, /DATASOURCE, or /MICROSOFT-EXCHANGE. |
Really well information. Thanks a lot. Here, I got the special deals for Microsoft Visio Professional 2016 and many more .Our specialty is quick email delivery. You will get 24/7 support. So let’s check it out.
ReplyDelete