Embed your Excel workbook on your web page or blog from SharePoint or OneDrive for Business
Sharing from OneDrive? Go here.
Because embedded Excel Online workbooks are now enabled on SharePoint Online, you can use them in your web page or blog, where other people can view and interact with them without having to log into SharePoint Online. You can get a URL for Office 365-hosted workbooks, and use it to embed them directly in your web page or blog by setting the SRC attribute of an <iframe> element on the web page.
Follow the instructions below to embed your SharePoint Online-hosted Excel Online BI Workbooks in your web page or blog.
Set workbook permissions
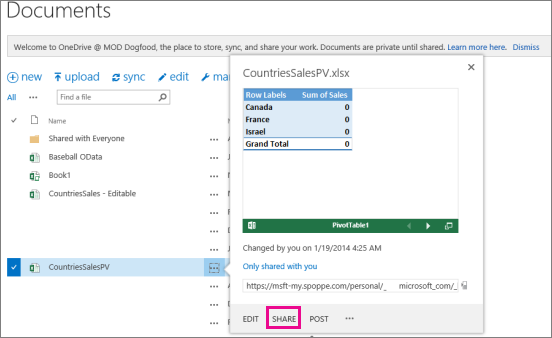
Before you embed a workbook in your web page or blog, make sure it's shared with all relevant people. For example, if you run a public blog, you'll want to share the workbook with everyone, including people who aren't part of your organization. Here's how you share a workbook:
-
In SharePoint Online, select the More menu (...) next to the workbook you want to share, and click Share.

-
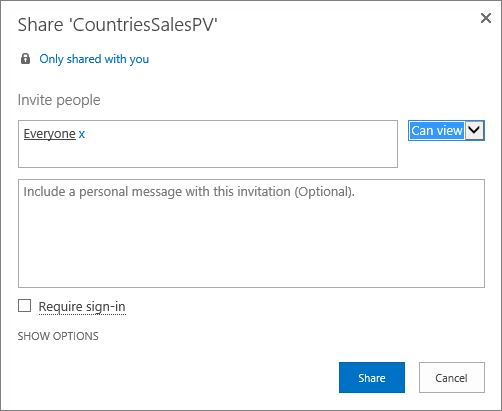
In the Invite people box, select Everyone, and pick Can view.

Notes:
-
It's possible that a SharePoint admin will block the option to invite Everyone to view a workbook. In that case, select Everyone except external users instead or consult with your admin.
The Require Sign-in box should be unchecked regardless of the above selection for public anonymous access.
-
It's possible that a SharePoint admin will block anonymous access by removing the Require Sign-in box and defaulting it to True. In that case, please consult with your admin.
-
You can't edit an embedded Excel Online workbook, but people with the right permission may be able to open the embedded workbook in Excel, where they can edit the data.
-
-
To enable sharing the workbook with guests, uncheck the Require sign-in box and click Share.
Get the URL to the public workbook
-
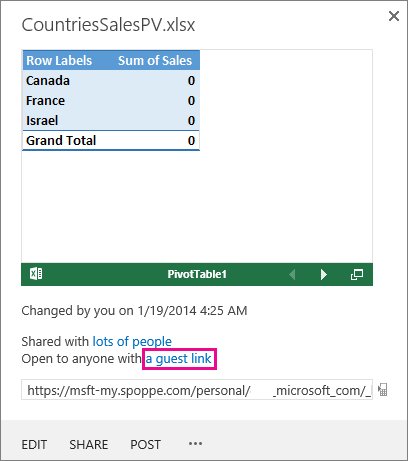
Select the More menu (...) next to the workbook again and click a guest link.

-
Select the guest link URL, copy it, and then paste it into Notepad.
-
To enable the embedded workbook, change the URL as follows:
-
To present the workbook as an embedded workbook, add the URL parameter action=embedview at the end of the URL string.
-
To allow interactivity with filters and Pivot tables in the workbook, add the URL parameter wdAllowInteractivity=True.
-
To have BI features such as Power View visualizations, PivotTables, and Data Model-based slicers work in the embedded workbook, add the string &wdbipreview=True.
-
Tips:
-
The final URL should be similar to this one:
-
https://host/personal/user/_layouts/15/guestaccess.aspx?guestaccesstoken=2UdAHGlFpWVaJjkI32xuisKCQsULG6M6b%2fIjG1LYpRM%3d&docid=166d02b42f5a1443781a1de428d9518ee&action=embedview&wdbipreview=true
Specify additional parameters
Additional URL parameters can change the way the embedded workbook is presented.
Here's an example of a URL with additional parameters:
<iframe width="500" height="200" frameborder="0" scrolling="no" src=" https://host/personal/user/_layouts/15/guestaccess.aspx?guestaccesstoken=2UdAHGlFpWVaJjkI32xuisKCQsULG6M6b%2fIjG1LYpRM%3d&docid=166d02b42f5a1443781a1de428d9518ee&action=embedview&wdbipreview=true&wdHideSheetTabs=true&wdAllowInteractivity=True& Item=PivotTable1& ActiveCell=B4&wdHideGridlines=True &wdHideHeaders=True& wdDownloadButton=True">
The following table shows the parameters we used in this example URL and briefly describes their effect on the presentation of the workbook. And here's a list of the default parameter settings:
| URL Parameter | Effect | Default |
|---|---|---|
| wdHideSheetTabs=True | Hides the sheet tabs that are displayed at the bottom of all sheets in a workbook. | False |
| wdAllowInteractivity=True | Lets you interact with the data if your workbook has a table or PivotTable that can be sorted and filtered. | True |
| Item=itemName | Displays a specific item. If your workbook includes a chart, table, PivotTable, or named range, and you want to display only one of the items in your web page, use the Item parameter to specify that item. For information about named ranges and named items in Excel workbooks see Define and use names in formulas. | Not set |
| ActiveCell=CellName | Specifies the active (selected) cell in the embedded workbook when the web page opens. You can specify the active cell by cell reference (such as A1) or by name. You can also use this parameter to define the active sheet by selecting a cell in that sheet. If you want to select a Power View sheet as active, set this parameter to A1, even though there is no grid on a Power View sheet. If you don't specify the active cell, the last saved view will be shown. | The last saved view will be shown. |
| wdHideGridlines=True | Hides worksheet gridlines for a cleaner look. | False |
| wdHideHeaders=True | Hides the column and row headers. | False |
| wdDownloadButton=True | Includes the Download button so viewers can download their own copy of the workbook. | False |
Set the frame size
You can resize the frame that displays the workbook on your web page by using standard HTML iframe properties. Look for width and height values (in pixels) inside the iframe tag, and change the values to get the frame size you want.
<iframe width="201" height="173" frameborder="0" scrolling="no"
Test the published workbook
As a blogger, you'll want to test that the embedded workbook you published is accessible to anonymous people. Here are some considerations to think about:
-
Power View full support requires Silverlight. HTML5 might limit some of Power View features.
-
A license plan that gives the iframe creator or file owner privileged access that other people might not have. To make sure that public viewers can view the embedded workbook, run an unauthenticated test by opening the browser in a private mode and accessing the embedded workbook. Here's how:
-
Open a browser in a private mode. For example, click Start in private browsing in IE or New incognito window in Chrome.
-
Navigate to the published blog.
-
View and interact with the embedded workbook.
-
Embedded workbook limits
| Feature | Maximum Limit |
|---|---|
| Workbook size | 10 Mbytes |
| Number of concurrent viewers | 1000 Notes:
|

Microsoft Office Tutorials: Embed Your Excel Workbook On Your Web Page Or Blog From Sharepoint Or Onedrive For Business >>>>> Download Now
ReplyDelete>>>>> Download Full
Microsoft Office Tutorials: Embed Your Excel Workbook On Your Web Page Or Blog From Sharepoint Or Onedrive For Business >>>>> Download LINK
>>>>> Download Now
Microsoft Office Tutorials: Embed Your Excel Workbook On Your Web Page Or Blog From Sharepoint Or Onedrive For Business >>>>> Download Full
>>>>> Download LINK u9