Add a contact
You can capture and organize information about people by saving new contacts in your address book. Contacts are like electronic cards that save a person's contact information. A contact can be as basic as a name and email address, or include more information like a street address, multiple phone numbers, and a profile picture.
You're in control of what information is added—and updated and removed—to a Contact card.
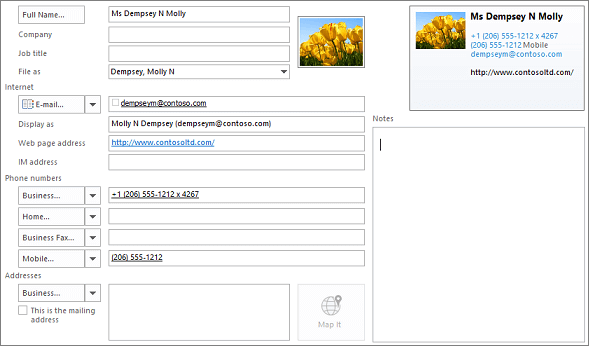
Once you've saved someone as a contact, you can type the first few letters of their name into an email, and Outlook will fill in their email address for you. Or with a few clicks, you can call that person without ever having to look up their phone number.
Add a contact from an email message
-
Open the message so that the person's name is shown in one of these lines: From:, To:, Cc:, or Bcc:.
-
Right-click the appropriate name, choose Add to Outlook Contacts. A new window opens, in which you can fill in the details you want.
-
In the window that opens, fill in the details you want.
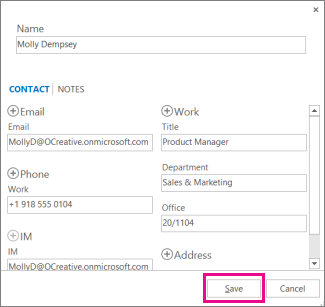
Note: Outlook inserts the contact's email address in the Email box, and any other information about the contact that's available in the message in the appropriate boxes. If a contact is in your organization, that probably includes their title, department, phone number, and office.
-
Choose Save.
Add a contact from scratch
-
Click People at the bottom of the screen.

-
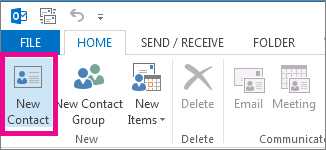
In the New group, choose New Contact or press Ctrl+N.
Tip: To create a contact from anywhere in Outlook, press Ctrl+Shift+C.
-
Enter a name and any other information that you want to include for the contact.
-
If you want to immediately create another contact, choose Save & New (this way, you don't have to start over for each contact).
Tips:
-
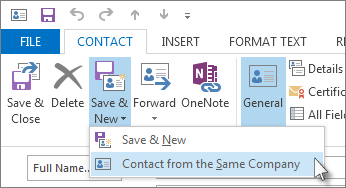
To add another contact from the same company, choosethedown arrow next to Save & New, and then choose Contact from the Same Company.
-
-
-
When you're done entering new contacts,, choose Save & Close.
Save more than one email address or phone number
You can save more than one phone number, email address, or mailing address for someone.
-
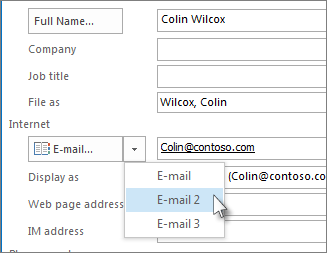
On the new Contact card, and type your contact's first email address in the E-mail box.
-
Click the down arrow next to E-mail, and then click E-mail 2. The first email address will be saved and you can type a second one in the field.
Add a photo of your contact
If you have a picture of the person saved on your computer (or in some other location), you can use it in their contact information.
-
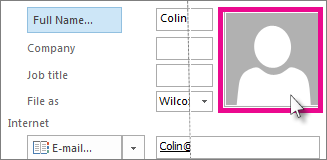
Click the image icon in the new contact box.
-
Locate the picture you want to use in the Add Contact Picture box, and then click OK.
Other ways to add contacts
-
Import contacts from a .csv or .pst file A .csv file contains contacts you've exported into a text file, where each part of the contact's information is separated by a comma (.csv means "comma separated value").
A .pst file is a file exported from Outlook into a format that another computer running Outlook can read.
See Import contacts to Outlook for Windows to learn more.
-
Get contacts from Excel You can use the Import and Export Wizard to bring in contact information saved in an Excel file, such as .xlsx or .xls.
See Import contacts to Outlook for Windows to learn more.
Other actions you can take with a Contact card
You're in control of what information is added to a contact card. You can update and delete information as you choose.

To change how names are presented in the contact card
-
On the File tab, choose Options > People .
-
Under Names and filing, do the following:
-
In the Default "Full Name" order list, choose an option.

Option
Example
First (Middle) Last
Molly N Dempsey
Last First
Dempsey Molly
First Last1 Last2
Molly Jones Dempsey
-
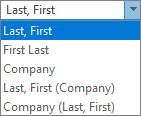
In the Default "File As" order list, choose an option.
Option
Example
Last, First
Dempsey, Molly N
First List
Molly N Dempsey
Company
Contoso Ltd.
Last, First (Company)
Dempsey, Molly (Contoso Ltd.)
Company (First Last)
Contoso Ltd. (Dempsey, Molly N)
-
-
Choose OK when done.
To update information on an existing Contact card
-
On the Home tab, in the Find group, choose Address Book.

-
In the Address Book: Contacts dialog box, in the Address Book list, choose the address book where information for the contact is stored.
-
Select the contact you want to change, right-click, and on the contact card, modify or update information as desired.
-
Choose Save & Close > File > Close.
To add an extension number
-
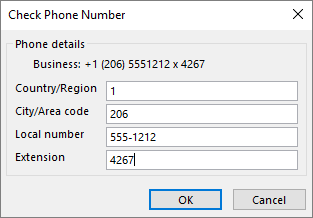
On the Contact Card, under Phone numbers, choose Business.
Note: Don't choose the drop-down arrow adjacent to a Business, Business Fax, or Mobile box. Choose the actual box.
-
In the Check Phone Number dialog box, fill in the Phone details, including the Extension Number box.
To forward a Contact card to a colleague or business associate
-
Open a Contact card.
-
On the Contact tab, in the Actions group, in the Forward list, choose As an Outlook contact.
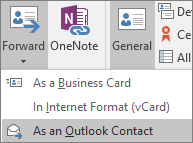
Note: The Contact card will be forwarded as an attachment in an email message.
Create a contact from within Contacts
-
On the File menu, point to New, and then click Contact.
Keyboard shortcut To create a contact, press Ctrl+Shift+C.
-
Type a name for the contact.
-
Enter the information that you want to include for the contact.
Notes:
-
To specify how you want the contact's name to appear in the To line of a message, type a name in the Display As box.
-
To enter multiple entries for a field, such as more than one phone number or e-mail address, click the down arrow next to the field.
-
If you have more than one mailing address for a contact, select the This is the mailing address check box to establish which address is to be used during a mail merge.
Tip: You can quickly create another contact with the same company information. In the current contact, on the Actions menu, click New Contact from Same Company.
-
Create a contact from another contact
You can create a new contact from an existing contact by using the existing contact as a template, and then changing any of the information, as necessary.
-
In Contacts, in Business Cards view, click the contact that you want to use as a template.
Note: You can also complete this procedure in the Address Cards and Detailed Address Cards views.
-
Press CTRL+C, and then press CTRL+V.
-
In the Duplicate Contact Detected box, select the Add new contact option.
When you save a contact or an Electronic Business Card with the same name or e-mail name as one that already exists in your Contacts folder, Microsoft Outlook displays a dialog box with options to either add the duplicate contact as a new contact or update the existing contact with the new information from the duplicate contact. To find out more, see Resolve or delete duplicate contacts.
-
Click Add.
The new contact will appear in Business Cards view next to the contact you copied.
-
Double-click the new contact to open it, and then edit the information, as needed.
-
Click Save and Close.
Create a contact from an e-mail message that you receive
-
Open or preview the e-mail message that contains the name that you want to add to your contact list.
-
Right-click the name of the sender who you want to make into a contact, and then click Add to Contacts on the shortcut menu.
Note: In Outlook, there is no option to add contact information automatically to Contacts or Address Book when you reply to a contact.
Create a contact from an Electronic Business Card that you receive
When you save an Electronic Business Card received in an e-mail message, you create a new contact. If you already have a contact by the same name, you can save the duplicate as a new contact or update the original.
-
In an open message, right-click the card, and then click Add to Contacts on the shortcut menu. The new contact opens in the contact form.
-
On the Contact tab, in the Save group, click Save & Close.
-
If you already have a contact with the same name, Outlook detects the duplicate. Do one of the following:
-
Select Add the new contact. This creates a duplicate contact, including a contact form and Electronic Business Card.
-
Select Update the information. Existing duplicate contacts are listed. Double-click the contact to update it, and then update the information on the contact form and save it.
-
The new contact information is now saved in Contacts and is available as an Electronic Business Card as well as in other views. You can make changes to the contact information both before and after you save it. To make changes to the card after you save it, see the instructions in Create Electronic Business Cards.
Notes:
-
You can also right-click the attached .vcf file in the message header to open the shortcut menu and add the contact or choose other options.
-
If you click the Save & New option in the contact form, the open contact is saved, and a new, blank contact form opens.
Create a contact in a public folder
This feature requires you to use a Microsoft Exchange Server 2000, Exchange Server 2003, or Exchange Server 2007 account. Most home and personal accounts do not use Microsoft Exchange.
-
Open the public folder in which you want to create a contact.
How?
-
If the Folder List is not visible, click the Go menu, and then click Folder List.
-
Click Public Folders, and then click the folder that you want to open.
If the folder that you want to open is located within another folder, click the plus sign (+) next to each subfolder until you find the folder that you want.
-
-
On the File menu, point to New, and then click Contact.
-
Type a name for the new contact.
-
Enter the information that you want to include for the contact.
Notes:
-
To specify how you want the contact's name to appear in the To line of a message, type a name in the Display As box.
-
To enter multiple entries for a field, such as more than one type of phone number or address, click the down arrow next to the field.
-
If you have more than one mailing address for a contact, select the This is the mailing address check box to establish which address is to be used during a mail merge.
-
-
Click Save and Close .
You can create a new contact only in a Contacts folder. For example, you cannot create a new contact in a mail folder.
Create a contact
-
In Contacts, on the Home tab, in the New group, click New Contact.

Keyboard shortcut To create a contact from any folder in Outlook, press CTRL+SHIFT+C.
-
Enter a name and any other information that you want to include for the contact.
-
Do one of the following:
-
To finish entering contacts On the Contact tab, in the Actions group, click Save & Close.
-
To save this contact and start another Click Save & New.
-
To save and enter another contact from the same company or address Click the down arrow next to Save & New, and then click Contact from the Same Company.
Notes:
-
To enter multiple entries for a field, such as more than one phone number or email address, click the down arrow next to the field.
-
To add a photo of your contact, click the photo icon, or on the Contact tab, in the Options group, click Picture, and then click Add Picture.
-
-
Create a contact based on an existing contact
When you want to create multiple contacts that share common information, such a company name and address, you can copy an existing contact, and then change the contact copy to include the unique information for the additional contact.
-
In Contacts, right-click the contact that you want to duplicate, and then click Copy.
Keyboard shortcut To duplicate a contact, press CTRL+C to copy, and then press CTRL+V to create the duplicate contact.
-
Double-click the new contact to open it, and then edit the information.
Create a contact based on the sender of an email message that you receive
You can quickly create a Outlook contact for someone who has sent you an email message.
-
Open or preview the email message that contains the name that you want to add to your contact list.
Right-click the name of the person that you want, then click Add to Contacts.
Create a contact from an Electronic Business Card
Other Outlook users might include an Electronic Business Card in an email message. When you save an Electronic Business Card, the information that is contained in the card is used to create a Outlook contact.
-
In an open message, right-click the Electronic Business Card or the attached .vcf file in the message header, and then click Add to Contacts.
-
Edit the information as needed.
-
On the Contact tab, in the Actions group, click Save & Close.
If you already have a contact who has the same name, do one of the following:
-
Click Add the new contact. This results in two contacts for the same name.
Click Update the information. In the list of duplicate contacts, double-click the contact that you want to update with the Electronic Business Card information.
Create a contact in a public folder
This feature requires a Microsoft Exchange Server account and that your Exchange Server administrator has set up public folders.
-
Open the public folder in which you want to create a contact.
How do I find public folders?
If you don't see public folders in the Navigation Pane, do one of the following:
-
In the Navigation Pane, click Folder List
 and find the Public Folders – username folder.
 -
Click in the Search Contacts box, and then on the Search tab, in the Options group, click Search Tools, and then click Find Public Folder.
-
-
On the Home tab, in the New group, click New Items, and then click Contact.
-
Enter the information that you want to include for the contact.
Notes: If you have more than one mailing address for a contact, select the This is the mailing address check box to establish which address should be used during a mail merge.
-
To enter multiple entries for a field, such as more than one type of phone number or address, click the down arrow next to the field.
-
-
On the Contact tab, in the Actions group, click Save and Close.
Creating a group of contacts
You can use contact folders to organize groups of contacts. Create a new folder in Contacts, name it, and move or copy specific contacts. Your contact folders will be listed in the Navigation Pane under My Contacts.
You can also create distribution lists to group contacts. A message sent to a distribution list goes to all recipients included in the distribution list. For more information, see Create and edit a contact croup or distribution list.
In Office Outlook 2007, each of your contacts is also displayed as an Electronic Business Card. Any information that you add to a contact is automatically made to the corresponding Electronic Business Card, and vice versa.
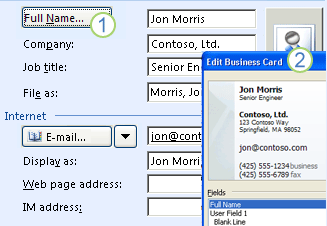
1. A contact form that contains Jon Morris's information.
2. A view of the Edit Business Card dialog box, with the corresponding fields filled in for Jon Morris's Electronic Business Card.
No comments:
Post a Comment