Create or delete a site collection
This article shows how to create or delete site collections in SharePoint Online,
Overview of site collections
A Microsoft SharePoint Online site collection is a top-level (or root) site that contains subsites. The subsites share administration settings, navigation, and permissions. You can change each of these for individual subsites as needed. You can create multiple site collections in many Office 365 business plans. But Office 365 Business, Office 365 Small Business, and Office 365 Small Business Premium plans cannot have more than one site collection.
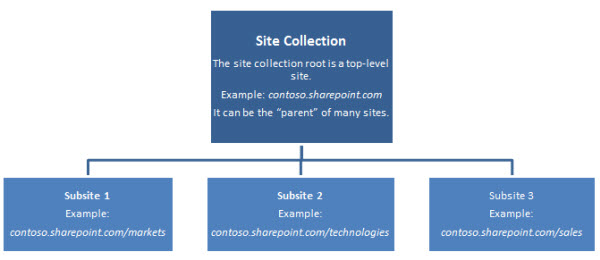
Create a site collection
As a SharePoint Online admin, you can create organization-wide site collections. You can also assign site collection administrators to set up and maintain the sites, features, and settings for their collections.
To create a site collection
-
Sign in to Office 365 as a Global or SharePoint Online admin.
-
Select the app launcher icon
 in the upper-left and choose Admin.
 -
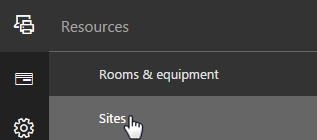
Choose Resources in the left navigation and then Sites.
-
Choose Add a site.

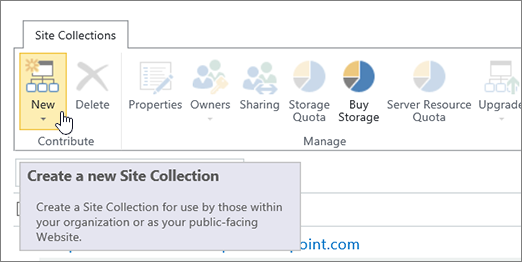
Note: If you do not see the options above, choose Admin centers > SharePoint and then choose New > Private Site Collection.
-
Fill out the new site collection properties:

-
In the Title box, type a name for the site collection.
-
In the Web Site Address drop-down lists, select a domain name and a URL path—either /sites/ or /teams/—and then type a URL name for the site collection.
-
In the Template Selection section, in the Select a language drop-down list, choose a language for the site collection. You can enable the SharePoint multiple language interface on your sites, but the primary language for the site collection will remain the one you select here.
Note: It's important to select the appropriate language for the site collection, because once it's set, it cannot be changed. After creating a site collection, verify the locale and regional settings are accurate. (For example, a site created for Chinese will have its locale set to China.)
-
In the Template Selection section, under Select a template, choose the template that most closely describes the purpose of your site collection. For example, if your site collection will be used for a team collaboration, choose Team Site.
Tip: For more information on templates, see Using templates to create different kinds of SharePoint Online sites.
-
In the Time Zone box, select the time zone that's appropriate for the location of the site collection.
-
In the Administrator box, type the user name of your site collection administrator. You can also use the Check Names or Browse button to find a user to make site collection administrator.
-
In the Storage Quota box, type the number of megabytes (MB) you want to allocate to this site collection. Do not exceed the available amount that is displayed next to the box.
-
In the Server Resource Quota box, accept the resource quota default. This setting no longer effects the resource amounts available for the site collection.
-
-
Click OK.
The new site collection will appear in the URL list. The URL is the site collection location at which the administrator can start to create and manage sites.
Tip: To learn about creating sites, see Create a site.
Delete a site collection
If you don't need a site collection you can delete it to save space. Deleted site collections move to the site collection Recycle Bin and are retained for 90 days by default.
Important: Before you delete a site collection, you should read the "Data backup" section in SharePoint Online Service Description for your plan. This section explains the data backup schedule maintained by Microsoft for Office 365 SharePoint Online sites.
When you delete a site collection, you're also deleting the hierarchy of sites in the collection. This includes all content and user information, in the following list:
-
Documents and document libraries.
-
Lists and list data, including surveys, discussions, announcements, and events.
-
Site configuration settings.
-
Role and security information that is related to the site or its subsites.
-
Subsites of the top-level website, their contents, and user information.
You should notify the site collection owners and subsite owners before you delete a site collection so they can move their data to another location, and also tell users when the sites will be deleted.
If you accidentally delete a site collection, it can be restored from the site collection Recycle Bin by a site collection administrator within 90 days.
When ready, use the following procedure to delete a site collection.
To delete a site collection
-
Sign in to Office 365 as a Global or SharePoint Online admin.
-
Select the app launcher icon
 in the upper-left and choose Admin.
 -
Choose Admin centers > SharePoint.
-
Select the check box next to the site collection that you want to delete. You can bulk delete by selecting multiple site collections.
-
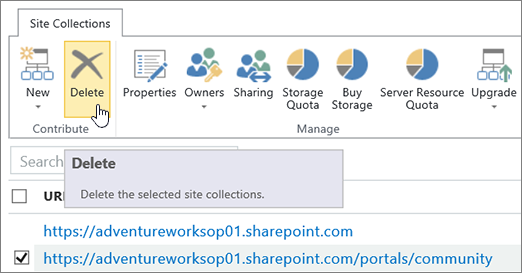
On the Site Collections tab, select Delete.
-
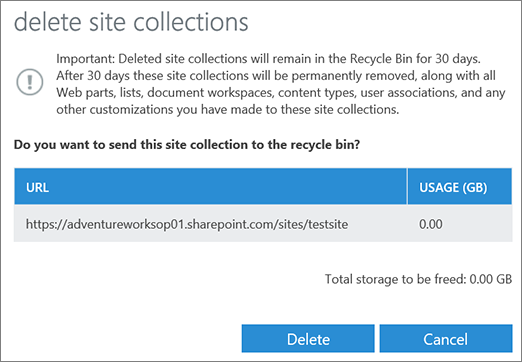
Confirm the information in the Delete Site Collections dialog box, and then select Delete.
No comments:
Post a Comment