Thursday, November 30, 2017

Total the data in an Excel table

Total the data in an Excel table

You can quickly total data in an Excel table by enabling the Total Row option, and then use one of several functions that are provided in a drop-down list for each table column. The Total Row default selections use SUBTOTAL functions, which allow you to include or ignore hidden table rows, however you can also use other functions.

  1. Click anywhere inside the table.

  2. Goto Table Tools > Design, and select the check box for Total Row. On a Mac go to Table > Total Row.

    Total Row option in Design tab
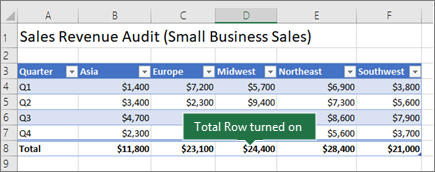
  3. The Total Row is inserted at the bottom of your table.

    Excel table with the Total Row turned on

    Note: If you apply formulas to a total row, then toggle the total row off and on, Excel will remember your formulas. In the previous example we had already applied the SUM function to the total row. When you apply a total row for the first time, the cells will be empty.

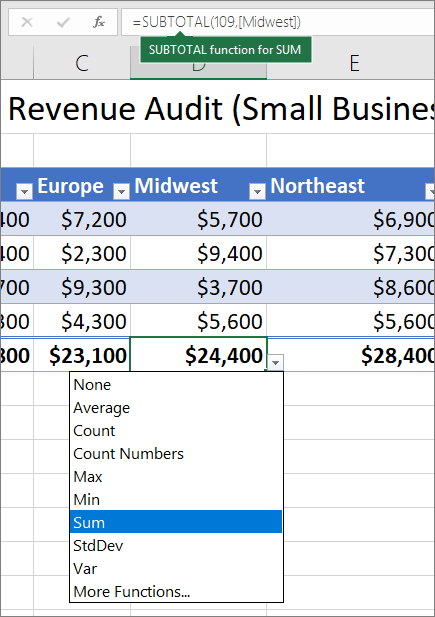
  4. Select the column you want to total, then select an option from the drop-down list. In this case, we applied the SUM function to each column:

    Example of selecting a Total Row formula from the Total Row formula drop-down list

    You'll see that Excel created the following formula: =SUBTOTAL(109,[Qtr 2]). This is a SUBTOTAL function for SUM, and it is also a Structured Reference formula, which is exclusive to Excel tables. Learn more about Using structured references with Excel tables.

    You can also apply a different function to the total value, by selecting the More Functions option, or writing your own.

    Note: If you want to copy a total row formula to an adjacent cell in the total row, drag the formula across using the fill handle. This will update the column references accordingly and display the correct value. If you copy and paste a formula in the total row, it will not update the column references as you copy across, and will result in inaccurate values.

Need more help?

You can always ask an expert in the Excel Tech Community, get support in the Answers community, or suggest a new feature or improvement on Excel User Voice.

See Also

Overview of Excel tables

Video: Create an Excel table

Create or delete an Excel table

Format an Excel table

Resize a table by adding or removing rows and columns

Filter data in a range or table

Convert a table to a range

Using structured references with Excel tables

Subtotal and total fields in a PivotTable report

Add subtotals in a PivotTable

Excel table compatibility issues

Export an Excel table to SharePoint

Name an array constant

Name an array constant

When you use an array constant in an array formula, you can give it a name, and then you can reuse it easily.

  1. Click Formulas > Define Name.

  2. In the Name box, enter a name for your constant.

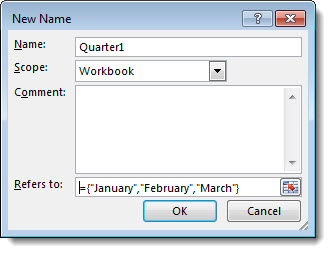
  3. In the Refers to box, enter your constant. For example, you can use ={"January","February","March"}.

    The dialog box should look something like this:

    The New Name dialog box

  4. Click OK.

  5. In your worksheet, select the cells that will contain your constant.

  6. In the formula bar, enter an equal sign and the name of the constant, such as =Quarter1.

  7. Press Ctrl+Shift+Enter.

Here's how the example looks when you're done:

A named constant used in an array formula

Notes: 

  • When you use a named constant as an array formula, remember to enter the equal sign. If you don't, Excel interprets the array as a string of text and you see an error message.

  • You can use numbers, text, logical values (such as TRUE and FALSE), and error values (such as #N/A) in your constants. You can also use numbers in the integer, decimal, and scientific formats. If you include text, you surround it with double quotes ("").

  • Array constants can't contain other arrays, formulas, or functions. In other words, they can contain only text, numbers, or characters separated by commas or semicolons. Excel displays a warning message when you enter a constant such as {1,2,A1:D4} or {1,2,SUM(Q2:Z8)}. Also, numbers can't contain percent signs, dollar signs, commas, or parentheses.

More about array formulas

Top of Page

Open and save Office documents with OneDrive for Windows Mobile

Open and save Office documents with OneDrive for Windows Mobile

With Microsoft OneDrive, you can get to your documents from virtually anywhere. Start working on a document on your computer, and then continue on your phone. Or you can do it the other way around. To get started on your phone, sign in with your Microsoft account, and then go to the Office Hub.

To sync documents from OneDrive to your phone

  1. On your phone, sign in with a Microsoft account.

  2. In the App list, tap Office Office icon .

    You'll see that your OneDrive has been added to Places. Flick to Recent to see documents on OneDrive that you've recently opened from somewhere else. Other documents you've recently opened on your phone will appear there too.

  3. To open a document, do either of the following:

    • Flick to Places, tap OneDrive, tap a folder, and then tap a document or notebook to open it.

    • Flick to Recent, and then tap a document.

  4. If you don't see the file you're looking for on OneDrive, you can do any of the following in the Office Hub to search for it:

    • To search for a document, flick to Places or Recent, tap Search Search icon , and then start typing the file name. Tap the one you're interested in to open and edit it.

    • To search for a particular note, flick to Places, tap OneDrive, and then tap a notebook to open it in Microsoft OneNote Mobile. In OneNote, tap Search Search icon , and then type a notebook name, section name, page title, or a word or two that might appear in a note. Tap Enter Enter icon , and then tap a notebook, section, or page to open it.

      Notes: 

      • On OneDrive, you can access both your own Office files and those that other people have shared with you.

      • When you save changes to a file that's on OneDrive, the changes are saved to OneDrive.

      • A OneNote notebook that's larger than 50 megabytes (MB) can't be synced to OneDrive.

To save an existing document to OneDrive

If you already have a document on your phone, opened from email on your phone, or on a Microsoft SharePoint or SharePoint Online site, you can save it to OneDrive from your phone.

  1. In the Office Hub, flick to Places, and then tap the place that the document is in.

  2. Tap and hold the document, tap Save to > OneDrive.

To save a new document to OneDrive

  1. In the Office Hub, flick to Recent, tap New New document icon > Word or Excel.

  2. Add the content you want, then tap More More icon > Save.

  3. Type a name in the File name box, and then tap the Save to list > OneDrive > Save.

Help for Management Reporter (PerformancePoint Server 2007)

Help for Management Reporter (PerformancePoint Server 2007)

Are you looking for help for PerformancePoint Management Reporter?

Microsoft Office PerformancePoint 2007 Management Reporter, which was originally part of Microsoft Office PerformancePoint Server 2007, is now part of the Microsoft Dynamics ERP product family.

To view Help content about Management Reporter, see Management Reporter for Microsoft Dynamics ERP.

PerformancePoint Dashboard Designer Help

PerformancePoint Dashboard Designer Help

We have detailed information available on TechNet about how to create, edit, and publish dashboards by using Dashboard Designer. Please see Create Dashboards by using PerformancePoint Services (SharePoint Server 2013) on TechNet.

Add lead or lag time to a task

Add lead or lag time to a task

When you add lead time to a task, work on that task overlaps work on its predecessor. When you add lag time, you delay the start time of the successor task. Before you can start adding lead or lag time, you need to create a dependency between the two tasks.

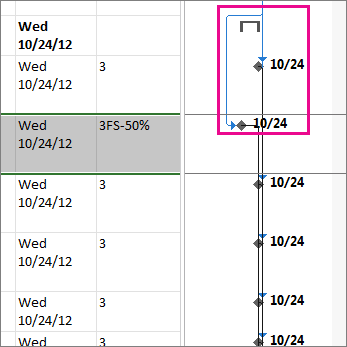
Here's how lead time looks in a Gantt chart:

Example of lead time in a project.

These instructions are specific to Microsoft Project 2016, 2013, and 2010.

Add lead or lag time

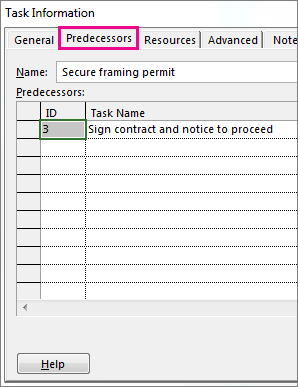
  1. Double-click a task name, and then click the Predecessors tab in the Task Information box.

    The Task Information box, showing the Predecessors tab. ©

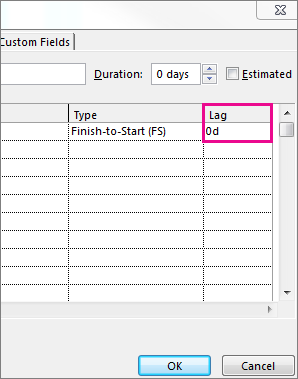
  2. In the Lag column, type the lead time or lag time you want.

    The Lag column in the Task Information box.

    • To add lead time, type a negative number or a negative percentage (for example, -50%).

      Lead time is an overlap between two tasks, where those two tasks share a dependency (a relationship between tasks). For example, if you want the second task to start even though the first task is only half complete, create a finish-to-start dependency between the two tasks, and then add a lead time of 50 percent for the second task.

    • To add lag time, type a positive number or percentage (for example, 2d).

      Lag time creates a delay between two tasks that share a dependency. For example, if you want a 2 day delay between the end of the first task and the start of the second, create a finish-to-start dependency between the two tasks, and then add 2 days of lag time before the start of the second task.

These instructions are specific to Microsoft Project 2007.

Add lead or lag time

Lead time and lag time can be entered either as a duration (for example, two days after the completion of the task) or as a percentage of the duration of the predecessor task (for example, begin the task when the predecessor's duration is 50% complete).

  1. On the View menu, click Gantt Chart.

  2. In the Task Name field, select the task for which you want to set lead time or lag time, and then click Task Information Button image .

  3. Click the Predecessors tab.

  4. In the Lag field, type the lead time or lag time that you want, either as a duration or as a percentage of the duration of the predecessor task:

    • To enter lead time, type either a negative number or a negative percentage (such as -2d for two days of lead time).

    • To enter lag time, type either a positive number or a positive percentage (such as 50% for half of the predecessor task's duration in lag time).

Notes: 

  • You can set lead time or lag time between a maximum of two tasks, and the lead or lag time must be set after a dependency is created between those tasks.

  • You can quickly add lead time or lag time to a successor task by double-clicking the link line on the Gantt Chart view and then typing the amount or percentage of lead time or lag time in the Lag field.

PerformancePoint Dashboard Designer Help

PerformancePoint Dashboard Designer Help

We have detailed information available on TechNet about how to create, edit, and publish dashboards by using Dashboard Designer. Please see Create Dashboards by using PerformancePoint Services (SharePoint Server 2013) on TechNet.

View your Contacts list

View your Contacts list

You can view your Contacts list from the Contacts tab.

  • At the top, tap Lync to view just your Lync contacts, or tap iPhone to view all your contacts including all your Lync and phone contacts.

The Contacts list in Lync 2013 on the desktop is the same list as in the Lync app. If you have to make changes to your Contacts list, you'll need to do it from Lync running on your desktop. You can only view your Contacts list from the Lync for iPhone app, but you can't make changes to it from the app.

Change the background format of your slides in PowerPoint Online

Change the background format of your slides in PowerPoint Online

In PowerPoint Online, you can do basic background formatting of one or more slides with a solid color or a picture. To do more advanced formatting, such as adding a color gradient or making a picture transparent, use the desktop PowerPoint app.

Format the slide background with color

  1. On the Design tab, tap or click Format Background.

    Format Background

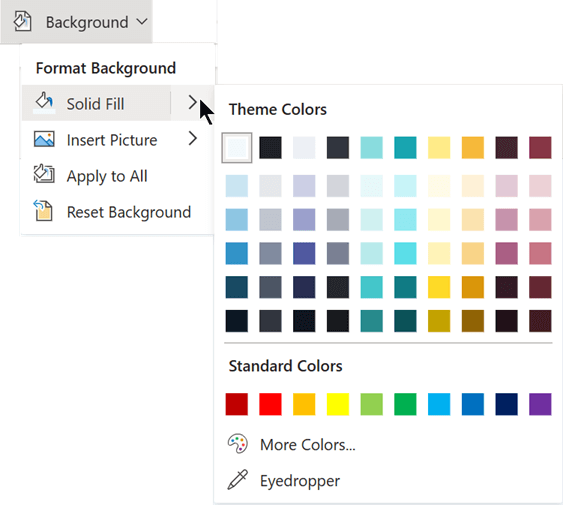
  2. Tap or click Solid Fill, and pick a color from the list.

    Note: To reset the background to its previous state, on the Home tab, tap or click Undo Undo your last action .

    Format the background with color
  3. To apply the background color of this slide to all other slides in your presentation, on the Design tab, tap or click Format Background, and tap or click Apply to All.

    Apply this format to all slides in my presentation

Format the slide background with a picture

  1. On the Design tab, tap or click Format Background.

    Format Background

  2. Tap or click Picture From File.

    Note: To reset the background to its previous state, on the Home tab, tap or click Undo Undo your last action .

  3. To apply the background picture of this slide to all other slides in your presentation, on the Design tab, tap or click Format Background, and tap or click Apply to All.

    Apply this format to all slides in my presentation

Note: PowerPoint Online supports .jpg, .jpeg, .png, .gif, .bmp, .wmf, .emf, .tif, and .tiff file formats.

PowerPoint Online doesn't have the ability to make a picture transparent. Use the desktop PowerPoint app if you want to make a background picture transparent.

Remove a background

If you have just added a background picture or color and decided not to use it, you can remove it by using Undo Undo your last action on the Home tab of the ribbon.

If the Undo command doesn't work, you can remove whatever slide background you currently have by resetting to a solid white background:

  1. On the Design tab, tap or click Format Background.

  2. Tap or click Solid Fill, and pick White, Background 1 at the top left corner of the color picker.

    Format the background with color

Video: About domains and DNS

Video: About domains and DNS

Your browser does not support video. Install Microsoft Silverlight, Adobe Flash Player, or Internet Explorer 9.

Tip: Want to learn how to set up your domain with Office 365 services? See the steps in this topic or watch the video. Or learn more about using domains and setting up DNS in Office 365.

If you just want to download and use Office on your laptop or desktop, you don't need to add your domain. Just follow these steps.

Just trying to set up your MX record or other records with Office 365? Get step-by-step guidance for setting up DNS records in Office 365 at a variety of domain registrars. Find your registrar on the Create DNS for Office 365 page, and choose Help for detailed steps with screenshots. (Some registrars also have a video option that shows the steps.)

Important: If you're using Office 365 operated by 21Vianet in China, see What is a domain and how do I use it in Office 365?. You can also see the article Create DNS records for Office 365 when you manage your DNS records.

Migrate from Office 365 ProPlus to Office 365 Personal for Windows 10

Migrate from Office 365 ProPlus to Office 365 Personal for Windows 10

These steps show you how to migrate your files, emails, contacts, and calendar items from your school sponsored Office 365 ProPlus account to your new Office 365 Personal account for Windows 10.

Pre-requisites and migration procedures

These steps assume that you have the following:

  • An Office 365 ProPlus account

  • An Office 365 Personal account

  • A Windows 10 device with enough free storage space to hold all the files, emails, contacts and calendar items that you are moving.

Before you start the migration process, you stop the existing OneDrive for Business sync client and uninstall it. These steps are a subset of Removing the existing OneDrive for Business sync client

Before beginning, users should first confirm that the existing OneDrive for Business sync client is not actively syncing files. If it is, we recommend that users wait for those updates to finish syncing before proceeding, to give those changes time to propagate to the cloud.

Users should do the following in order to stop syncing any OneDrive sites, and prepare to set up the new sync client:

  1. Confirm that any active file uploads or edits are finished and fully reflected on the website.

  2. In the taskbar notification area, right-click the blue OneDrive for Business cloud icon.

    OneDrive for Business old desktop client

    (You might need to click the Show hidden icons arrow next to the notification area to see the OneDrive for Business icon.)

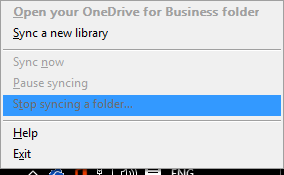
  3. If Stop syncing a folder is greyed out, skip to step 5.

    Screenshot of Stop syncing a folder command when right-clicking the OneDrive for Business sync client

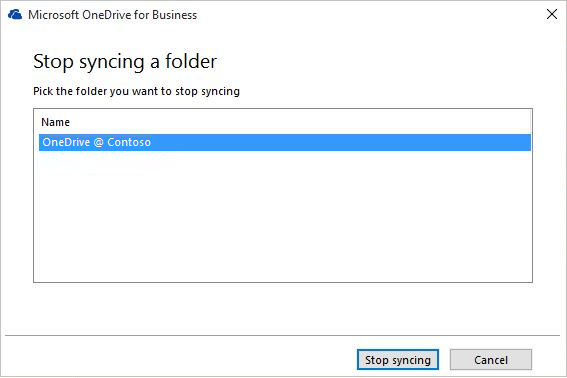
  4. If Stop syncing a folder is available, click it and make sure that your OneDrive – [OrganizationName] folder doesn't appear in that list. If it does appear, select it and click the Stop syncing button. You are done when the folder for your OneDrive for Business no longer appears in this list.

    Screenshot of stop syncing a folder dialog box

  5. To exit groove.exe, right-click its blue cloud icon in the taskbar notification area and select Exit.

  6. Open Windows Explorer and rename the local folder previously used by the existing OneDrive for Business sync client (for example, OneDrive - Contoso.old).

Note: Besides preserving the local files, the last step has the added benefit of intentionally invalidating any links to the documents in this folder in any of the Recent lists in the Office apps. Otherwise, users run the risk of updating these files and expecting them to sync, not remembering that they've disconnected sync for that folder.

In this portion of your migration you export email information to a file on your device. Be sure that you have enough room on your device to hold all the emails, contacts and calendar items in your mailbox.

This is what the ribbon looks like in Outlook 2016.
  • If your ribbon has a File option in the top left corner, then you're using a desktop version of Outlook and you're in the right place!

  • If your ribbon doesn't have a "File" option in the top left corner, see What version of Outlook do I have? to determine your version of Outlook and to get to the right export instructions.

  1. Open your Office 365 ProPlus school mailbox in Outlook and export your email, contacts, and calendar by following the Outlook 2013 and 2016: Export Outlook items to a .pst file steps found in Export or backup email, contacts, and calendar to an Outlook .pst file. Be sure to select the top most level folder to export from.

After you finish the migration and are using your Office 365 Personal mailbox , your school mailbox will still be able to receive mail. To make sure that you get all email sent to your school mailbox after you migrate , you need to create a forwarding rule. The forwarding rule will send all the email to your new Office 365 Personal mailbox and then delete it from your school mailbox.

Configure the rule like this:

  • Apply this rule after the message arrives

  • where my name is in the To or Cc box

  • forward it to <Office 365 Personal email address>

  • and delete it

  1. In Outlook click the File tab.

  2. In the right pane, click Manage Rules & Alerts.

  3. In the Rules and Alerts box, on the E-mail Rules tab, click New Rule.

  4. Under Step 1: Select a template, select the Apply rule on messages I receive template from the Start from a blank rulelist of templates. Click Next.

  5. Under Step 1: Select conditions(s), select the where my name is in the To or Cc box and click Next.

  6. In the Step 1: Select actions(s) select forward it to people or public group and delete it..

  7. Under Step 2: Edit the rule description (click an underlined value), click the people or public group link and type in your Office 365 Personal email address in the To -> box. Click Ok and Next.

  8. Give the rule a name, for example, Forward all mail to personal account. and select Turn on this rule

  9. Click Finish, then Apply, and OK .

The easiest way to let people who send you email know that you have a new email address is to use Automatic Replies (Out of Office) message. Be sure to select these options:

  • Send automatic replies

  • Place the message that you want all senders to receive in both the Inside My Organization and Outside My Organization tabs.

  • On the Outside My Organization tab, select the Auto-reply to people outside my organization and Anyone outside my organization options to make sure the everyone gets your new email address if you want.

  1. Set up an Automatic Replies (Out of Office) rule on your school email account to notify all senders of your new email address by following the steps in Send automatic "Out-of-Office" replies from Outlook for Windows.

  2. In Outlook, sign out of Office 365 ProPlus by clicking File, Office Account, and Sign out.

  3. Close Outlook and all other Office applications.

Now that you have all your email, contacts and calendar items in an Outlook .pst file and a backup folder of your school OneDrive for Business folders, you can prepare your computer for the new Office 365 Personal applications and services.

  1. Remove allOffice 365 ProPlus apps from your computer by following the steps in Uninstall Office 2013, Office 2016, or Office 365 from a PC

  2. Restart your computer.

The new OneDrive sync client replaces theOneDrive and OneDrive for Business clients and lets you add a personal account and a business account. In this step, you will install the new OneDrive sync client and connect it to your Office 365 Personal account. If you have shared folders in your school Office 365 ProPlusOneDrive and there is the possibility that they have been updated by someone after you synchronized and renamed your school Office 365 ProPlusOneDrive folder in Step 2: Clean up the local folder from the existing OneDrive_for_Business client and uninstall OneDrive_for_Business, you can connect to both accounts and synchronize current versions of your files.

  1. Install the new OneDrive for Business Next Generation Sync Client on your PC by following the installation steps in Get started with the OneDrive for Business Next Generation Sync Client in Windows through Method 1: If you have no accounts signed in to OneDrive. Login with your new Office 365 Personal account.

  2. In File Explorer copy and paste the contents of your school Office 365 ProPlus folder into your Office 365 PersonalOneDrivefolder structure.

You need to re-install the Microsoft Office applications that come with your Office 365 Personal subscription.

  1. Install Office 2016 on your Windows 10computer by following the steps in: Install Office on your PC or Mac.

The last step in your migration from your school provided Office 365 ProPlus account to your own Office 365 Personal is to configure an Outlook 2016 profile and then import your email, contacts and calendar items from the .pst file you created in

  1. In Control Panel, click or double-click Mail.

    Mail appears in different Control Panel locations depending on the version of the Microsoft Windows operating system, Control Panel view selected, and whether a 32- or 64-bit operating system or version of Microsoft Outlook is installed.

    The easiest way to locate Mail is to open Control Panel in Windows, and then in the Search box at the top of window, type Mail. In Control Panel for Windows XP, type Mail in the Address box.

    Note:  The Mail icon appears after Outlook starts for the first time.

    The title bar of the Mail Setup dialog box contains the name of the current profile. To select a different existing profile, click Show Profiles, select the profile name, and then click Properties.

  2. Your old school email profile is still listed there, select it and click Remove.

  3. Click Add.

  4. Type a name for the profile, and then click OK.

  5. Type a name for the profile (for example O365 Personal), click OK

  6. Type in your name.

  7. Type in your Office 365 Personal email address, click Next

  8. Enter your password, if prompted.

  9. click Finish and Apply and OK.

  10. Follow the steps in the Outlook 2013 and 2016: Import Outlook items from a .pst file section of Import email, contacts, and calendar from an Outlook .pst file article. Import the .pst file that you saved in Step 2: Export your school mailbox.

PerformancePoint Dashboard Designer Help

PerformancePoint Dashboard Designer Help

We have detailed information available on TechNet about how to create, edit, and publish dashboards by using Dashboard Designer. Please see Create Dashboards by using PerformancePoint Services (SharePoint Server 2013) on TechNet.

Insert a linked Excel chart in PowerPoint 2010

Insert a linked Excel chart in PowerPoint 2010

You can insert and link a chart from an Excel workbook into your PowerPoint presentation. When you edit the data in the spreadsheet, the chart on the PowerPoint slide can be easily updated.

To insert a linked Excel chart in PowerPoint 2010, do the following:

  1. Open the Excel workbook that has the chart that you want.

    Notes: 

    • The workbook must be saved before the chart data can be linked in the PowerPoint file.

    • If you move the Excel file to another folder, the link between the chart in the PowerPoint presentation and the data in the Excel spreadsheet breaks.

  2. Select the chart.

  3. On the Home tab, in the Clipboard group, click Copy The Copy button .

  4. Open the PowerPoint presentation that you want and select the slide that you want to insert the chart into.

  5. On the Home tab, in the Clipboard group, click the arrow below Paste, and then do one of the following:

    • If you want the chart to keep its look and appearance from the Excel file, select Keep Source Formatting & Link Data The Keep Source Formating and Link Data button .

    • If you want the chart to use the look and appearance of the PowerPoint presentation, select Use Destination Theme & Link Data The Use Destination Theme and Link Data button .

Tip:  When you want to update the data in the PowerPoint file, select the chart, and then under Chart Tools, on the Design tab, in the Data group, click Refresh Data. For more information about how to edit chart data, see Edit data in a chart.

Top of Page

Count Function

Count Function

Calculates the number of records returned by a query.

Syntax

Count( expr )

The expr placeholder represents a string expression identifying the field that contains the data you want to count or an expression that performs a calculation using the data in the field. Operands in expr can include the name of a table field or function (which can be either intrinsic or user-defined but not other SQL aggregate functions ). You can count any kind of data, including text.

Remarks

Tip: In Access 2010, the Expression Builder has IntelliSense, so you can see what arguments your expression requires. 

You can use Count to count the number of records in an underlying query. For example, you could use Count to count the number of orders shipped to a particular country.

Although expr can perform a calculation on a field, Count simply tallies the number of records. It does not matter what values are stored in the records.

The Count function does not count records that have Null fields unless expr is the asterisk (*) wildcard character. If you use an asterisk, Count calculates the total number of records, including those that contain Null fields. Count(*) is considerably faster than Count([Column Name]). Do not enclose the asterisk in quotation marks (' '). The following example calculates the number of records in the Orders table:

SELECT Count(*) AS TotalOrders FROM Orders;

If expr identifies multiple fields, the Count function counts a record only if at least one of the fields is not Null. If all of the specified fields are Null, the record is not counted. Separate the field names with an ampersand (&). The following example shows how you can limit the count to records in which either ShippedDate or Freight is not Null:

SELECT Count('ShippedDate & Freight') AS [Not Null] FROM Orders;

You can use Count in a query expression. You can also use this expression in the SQL property of a QueryDef object or when creating a Recordset object based on an SQL query.


Compatibility changes between versions

Compatibility changes between versions

The Compatibility Checker lists elements in your Word 2013 or 2016 document that aren't supported or that behave differently in earlier versions of Word. Some of these features will be permanently changed if you convert the document to Word 2016 or 2013 format.

To run the Compatibility Checker, click File > Info, click Check for Issues > Check Compatibility, and then review any compatibility issues liste under Summary.

Feature availability in each mode

Feature

97-2003

2007

2010

2013 and 2016

Web Video

Red X

Red X

Red X

Green check

Apps for Office

Red X

Red X

Red X

Green check

Repeating Section Content Controls

Red X

Red X

Red X

Green check

Customized Footnote Columns

Red X

Red X

Red X

Green check

Collapsed by Default headings

Red X

Red X

Red X

Green check

Marking comments as done

Red X

Red X

Red X

Green check

New numbering formats

Red X

Red X

Green check

Green check

New shapes and text boxes

Red X

Red X

Green check

Green check

Text effects

Red X

Red X

Green check

Green check

Alternative text on tables

Red X

Red X

Green check

Green check

OpenType features

Red X

Red X

Green check

Green check

Blocking authors

Red X

Red X

Green check

Green check

New WordArt effects

Red X

Red X

Green check

Green check

New content controls

Red X

Red X

Green check

Green check

Word 2007 Content controls

Red X

Green check

Green check

Green check

Themes

Red X

Green check

Green check

Green check

Major/minor fonts

Red X

Green check

Green check

Green check

Tracked moves

Red X

Green check

Green check

Green check

Margin tabs

Red X

Green check

Green check

Green check

SmartArt graphics

Red X

Green check

Green check

Green check

Office 2007 charts

Red X

Green check

Green check

Green check

Open XML Embedded objects

Red X

Green check

Green check

Green check

Building blocks

Red X

Green check

Green check

Green check

Bibliography and citations

Red X

Green check

Green check

Green check

Equations

Red X

Green check

Green check

Green check

Relative text boxes

Red X

Green check

Green check

Green check

Previous-version WordArt

Green check

Green check

Red X

Red X

Previous-version diagrams

Green check

Red X

Red X

Red X

Previous-version charts

Green check

Red X

Red X

Red X


Top of Page

Feature behavior changes

Marking comments as done

Marking comments as done is only possible in Word 2013 and 2016 file formats. As long as the comment or reply isn't edited in an earlier version of Word, the comment or reply will appear the same when the file is opened again in Word 2013 or 2016.

Comment replies do not look like replies in earlier versions of Word.

Building Blocks

Building Blocks and AutoText entries may lose some information.

Templates provide content that shows up in Building Block galleries in Word 2016, 2013, 2010, and 2007. When you save a template in Word 97-2003 format, the content from the Building Block galleries will be permanently converted to static AutoText entries. You won't be able to convert the AutoText back to Building Blocks even if you later convert the document to Word 2013 or 2016 format.

Content from the following Building Block galleries will be converted to AutoText:

  • Tables

  • Headers

  • Footers

  • Page Numbers

  • Text Boxes

  • Equations

  • Table of Contents

  • Bibliographies

  • Watermarks

  • Custom galleries

Bibliographies and citations

Citations and bibliographies will be converted to static text and will no longer be updated automatically.

In Word 2016 and 2013, citations and bibliographies update automatically when you modify their sources or apply a new document style.

When you save a Word 2016 or 2013 document in Word 97-2003 format, citations and bibliographies are converted to static text that won't automatically update and their sources won't be available.

If you later convert the document to Word 2016 or 2013, citations and bibliographies won't automatically update. For citations and bibliographies to automatically update, you must recreate the sources in the document or copy them to the Current List in the Source Manager box, and then replace the static citations and bibliographies with the newly created ones.

For more information about citations and bibliographies, see Create a bibliography.

Content controls

Content controls will be converted to static content.

If you save a document in Word 97–2003 format, all the content controls will be converted to plain text and associated properties will be permanently lost even if you later convert the document to Word 2016 or 2013 file format.

For example, in Word 97–2003, users will no longer see items in a drop-down list. Additionally, any regions that cannot be edited or deleted) will no longer be enforced and users will be able to delete and change the contents of the controls.

Embedded objects

An embedded object in this document was created in a newer version of Office. You cannot edit it in an earlier version of Word.

You can convert Open XML embedded objects so that people using earlier versions of Word will be able to edit them.

Convert embedded Excel 2013 or 2016 objects

  1. Right click the embedded object.

  2. Point to Worksheet Object, and then click Convert.

  3. In the Convert dialog box, click Convert to.

  4. Select Microsoft Excel 97-2003 Worksheet in the Object type list.

Convert embedded PowerPoint 2013 or 2016 slide objects

  1. Right click the embedded object.

  2. Point to Slide Object, and then click Convert.

  3. In the Convert dialog box, click Convert to.

  4. Select Microsoft PowerPoint 97-2003 Slide in the Object type list.

Convert embedded PowerPoint 2013 or 2016 presentation objects

  1. Right click the embedded object.

  2. Point to Presentation Object, and then click Convert.

  3. In the Convert dialog box, click Convert to.

  4. Select Microsoft PowerPoint 97-2003 Presentation in the Object type list:

Convert embedded Word 2013 or 2016 objects

You can convert embedded objects so that people using earlier versions of Word will be able to edit them.

  1. Right click the embedded object.

  2. Point to Document Object, and then click Convert.

  3. In the Convert dialog box, click to select Convert to.

  4. In the Object type list, select Microsoft Word 97-2003 Document.

Equations

Equations will be converted to images. You will not be able to edit the equations until the document is converted to a new file format. Any comments, endnotes, or footnotes present in the equations will be permanently lost on save.

If you save the document in Word 97-2003 format, equations will be converted to images that you can't edit. However, if you later convert the document to Word 2016 or 2013 file format and no changes have been made to the equation images in a previous version, the equations will become text and you will be able to edit them.

SmartArt graphics

SmartArt graphics will be converted into a single object that can't be edited in previous versions of Word.

When you save a document that contains SmartArt graphics in Word 97-2003 format, they will be converted to static images. You will not be able to edit text inside a graphic, change its layout, or change its general appearance.

If you later convert the document to Word 2016 or 2013 format and no changes have been made to the images in an earlier version, the graphic will be changed back to a SmartArt object.

Margin tabs

Alignment tabs will be converted to traditional tabs.

In Word 2016 and 2013, alignment tabs are used to position text relative to the margins of your document or a region within the document and adjust their position if you change the margins.

If you save the document in Word 97-2003 format, alignment tabs will be permanently replaced with traditional tabs and will no longer automatically adjust their position if you change the margins. If you have used alignment tabs to create a complex layout, the tabs may shift position and change the appearance of your document.

Text boxes

Some text box positioning will change.

In text boxes, text that is centered vertically or aligned to the bottom will be permanently aligned to the top even if you later convert the document to Word 2016 or 2013 format.

Tracked moves

Tracked moves will be converted to deletions and insertions.

If you save the document in Word 97-2003 format, tracked moves will become tracked deletions and insertions. If you later convert the document to Word 2016 or 2013 format, the tracked insertions and deletions will not be converted back to tracked moves.

New numbering formats

New numbering formats will be converted to Arabic numerals (1, 2, 3, 4, ...).

Lists that are formatted with the new numbering formats (0001, 0002, 0003, 0004, ...) will be converted to standard Arabic-numeral formats (1, 2, 3, 4, ...).

New shapes and text boxes

Shapes and text boxes will be converted to effects available in this format.

Shapes and text boxes that are created in Word 2016 or 2013 can be formatted with a variety of new effects, such as Bevel and 3-D Rotation, that aren't available in previous versions of Word. In previous versions of Word, these effects will be converted to effects that are available in those versions.

Text effects

Effects on text will be removed

Effects on text are permanently removed unless the effects are applied by using a custom style.

If the text effects are applied by using a custom style, they will appear again when the document is reopened in Word 2016 or 2013.

Alternative text on tables

Tables will lose alternative-text information.

Alternative text is displayed when a document is on the Web. In Word 97-2003 format, alternative text on tables is permanently removed.

Blocking authors

All information on where other authors are editing in this document will be permanently removed.

Author blocks are removed from any regions to which they were applied, and the entire document is available for editing.

WordArt

Effects on text will be removed.

WordArt is converted to static text.

Charts and diagrams

A chart in this document may contain data in cells outside of the row and column limit of the selected file format. Data beyond 256 (IV) columns by 65,536 rows will not be saves.

Some charts and diagrams will be converted to images that cannot be changed. If the chart or diagram is based on data beyond the rows and columns supported by Word 97-2003, that data will be lost.

Top of Page