Use Outlook contacts as a data source for a mail merge
When you have bulk mail to send to people on your Outlook contact list, you can use mail merge in Word. An Outlook contact list can be used as a data source for mail merge. The contact list is an address book that is used to capture and organize information about people.
Perform a mail merge using an Outlook contact list
The most important step in the mail merge process is to setup and prepare your data for mail merge. An Outlook contact card can contain basic information—a name, an email address, and additional information such as a street address, phone number, and photo. To add more contacts to your Outlook address book, see Add a contact.
Once your Outlook contact list is ready, follow the steps below to perform a mail mergewithWord.
-
In the Outlook Contacts folder, on the Home tab of the Ribbon, choose Mail Merge.

-
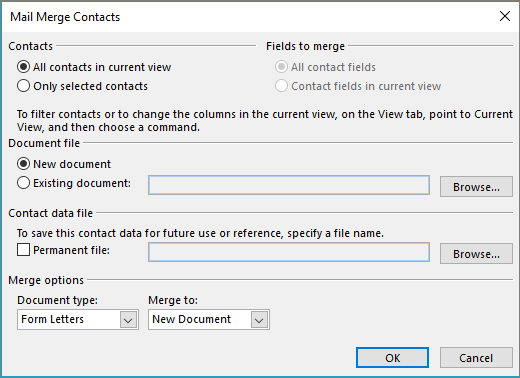
In the Mail Merge Contacts dialog box select the options you want. then choose the Document type you want to create. Click OK.

Notes:
-
If you only want to mail merge to selected contacts, choose the Only selected contacts radio button. You'll have to have selected those contacts before you got to this point though, so if you didn't then choose Cancel, go back to the Contacts folder, select them and start again at step 1.
-
If you've already got a Word merge document created and saved, change the radio button to Existing document and specify it. Otherwise leave the New document radio button checked and Word will prompt you to create one when you get to step 3.
-
If you plan to use this list again in the future, check the Permanent file box and give your contacts file a name to save it. This is especially handy if you have selected a specific set of contacts to merge and will want to reuse that set without having to manually select them each time.
-
-
Microsoft Word will open. Depending upon the options you chose in step 2 you will either have your pre-created merge document or a new, blank, one. Type any text that you would like to have appear on every one of your merged documents.
Note: If you want more help with the mail merge process, on the Mailings tab, in the Start Mail Merge group, chooseStart Mail Merge>Step by Step Mail Merge Wizard. You can refer to the information in this article when you reach Step 3 in the Mail Merge Wizard, Select recipients.
-
Insert mail merge fields that pull information from the Outlook contacts list into your document.
Notes: Examples of mail merge fields include:
-
Address Block. Use to add a recipient's full name and address from your Outlook contact list to a letter or an email.
On the Mailings tab, in the Write & Insert group, choose Address Block.
-
Greeting line. Use to add a greeting (such as Dear Ms. Mills) to a letter or an email.
On the Mailings tab, in the Write & Insert group, choose Greeting Line.

For more information about adding merge fields from your Outlook contacts, see Insert mail merge fields.
-
-
When your documentis ready, choosePreview Results, and then choose the Next
 or Previous
  record button to see each specific copy of the document.
 -
To complete the merge process, in the Finish group, choose Finish & Merge, and then choose Print Documents or Send E-mail Messages.
Save your mail merge
When you save the mail merge document, it stays connected to your datasource.
To reuse your mail merge document
-
Open the mail merge document and choose Yes when Word prompts you to keep the connection.
To edit your mailing list
-
Open the mail merge document and choose Edit Recipient List to sort, filter, and choose specific addresses.
Do you have a question about merging to Word documents that we didn't answer here?
Help us improve Outlook
Do you have suggestions about how we can improve mail merge (or any other feature) of Outlook? If so, please visit Outlook User Voice and let us know!
Related Topics
Mail Merge - A free, 10 minute, video tutorial
Mail merge with envelopes
No comments:
Post a Comment