Create view filters in a Lists tool design in SharePoint Workspace 2010
Note: This article has done its job, and will be retiring soon. To prevent "Page not found" woes, we're removing links we know about. If you've created links to this page, please remove them, and together we'll keep the web connected.
You can use view filters to include items in or exclude items from a view based on specified conditions. For example, you can display items created only with specific forms, or display items only if field values match specific criteria.
In this article
Overview: creating a view filter
To create a view filter:
-
Open the List tool Designer.
-
Click the view in which you want to apply a view filter.
-
Click the Filter tab.
-
Check or uncheck forms, as needed.
The view will only show items created with the form templates you have checked.
-
Add filter expressions, as needed, to include or exclude records.
-
Save and publish your design changes.
Adding filter expressions
Filter expressions tests field values, and displays items in the data view when the condition(s) stated in the expression are met.
Adding a filter expression with a single condition
To add a basic expression, do the following:
-
Select the field for which you want to test values from the pop-up list.
Note: Rich-text fields are available only if their Searchable property is enabled.
-
Select an a condition option from the pop-up list list.
The condition options you see differ depending on the field type. Text-related fields include options that work with text strings, such as "contains", and "begins-with"; date-related fields include date-specific options such as [IsToday] to indicate today's date.
-
Enter the value you want to test for in the text box.
-
Click
 to add the expression.
In the example below, the filter expression displays all items in which the value in the "departmentName" field is "Sales".

Adding a filter expression with multiple conditions
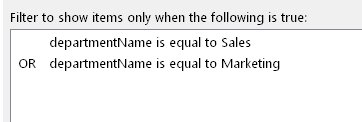
You may sometimes need to test for more than one condition. To do so, you can add an expression that contains logical operators. You can create an expression that selects records only if ALL conditions are met (logical AND operator), or if ANY conditions are met (logical OR operator).
In the example below, two conditions are added with the "Logical OR" option selected. The resulting filter expression will display all records in which the value in the "DepartmentName" field is either "Sales" or "Marketing".

Updating a condition in an filter expression
To update a condition, do the following:
-
Select the condition in the expression display box.
The parts of the expression display in the pop-up lists and value text box.
-
Change any part of the condition.
-
Click

Removing a condition in a filter expression
To remove a condition:
-
Select the condition in the expression display box.
-
Click

No comments:
Post a Comment