Customize the Outlook window
You spend lots of time in Outlook. So, you want to set it up to support the way that you work. For example, to create more space to see your mail and calendar items, you can hide some elements. Within each view, you can also move, add, remove, or resize columns so that information is presented in the way that you want to see it.
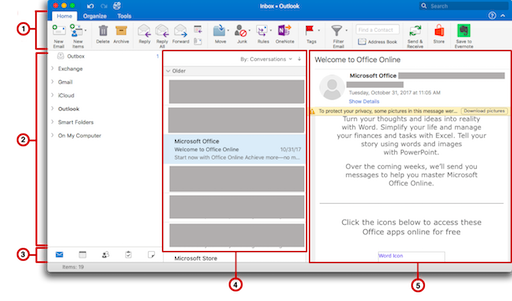
This illustration shows the main elements of the Outlook window.

 Ribbon
 Sidebar
 View switcher
 Item list
 Reading pane
Customize the ribbon
Minimize or expand the ribbon
You can minimize the ribbon so that only tabs appear.
-
On the right side of the ribbon, click
 .
.
Tip: You can also minimize the ribbon by clicking the active tab.
Customize the sidebar
Hide the sidebar
-
On the View menu, choose Sidebar.
Turn off the unified inbox
By default, the Outlook folder list groups similar folders, such as inboxes, from all your mail and Microsoft Exchange accounts. This feature can make it easier to read all your messages at one time, without having to move around between mail folders. If you want, you can turn off this feature so that each account and all its folders are separated in the folder list.
-
On the Outlook menu, choose Preferences.
-
Under Personal Settings, select General
 .
. -
Under Sidebar, clear the Show all account folders check box.
Customize the item list
In the main Outlook window, the item list is the list of messages, contacts, tasks, or notes. By default, the item list is displayed vertically between the navigation pane and the reading pane.
Note: The item list is not available for Calendar view.
Change the text size for the item list
-
On the Outlook menu, choose Preferences.
-
Under Personal Settings, choose Fonts
 .
. -
Under Text display size, slide the selector to the desired font size.
Change the sort order in the item list
-
On the Organize tab, select Arrange By, and then choose an option.

Choose columns for the item list
If the reading pane is hidden or positioned below the item list, you can choose the columns you want for the item list. The available columns vary, depending on the type of items in the list.
-
On the Organize tab, click Reading Pane, and then make sure that Below or Hidden is selected.

-
On the View menu, select to Columns, and then choose a column name. Columns in the current view are identified with a check mark.
Tips:
-
In the item list, you can click on a column heading to sort by that column.
-
To rearrange the columns, click a column heading, and then drag it to a new position.
-
To resize a column, rest the pointer on the right edge of the column header until the pointer changes, and then drag the edge.
-
Customize the reading pane
The reading pane, sometimes called the preview pane, lets you read items without opening them. You can customize the reading pane according to your preferences.
Reposition or hide the reading pane
The reading pane can be positioned on the right of the Outlook window, below the item list, or hidden.
-
On the Organize tab, click Reading Pane, and then choose an option.

Notes:
-
To change the size of the reading pane, rest the pointer on the border between the reading pane and the item list, and then drag the border.
-
The reading pane is not available for Calendar view.
Change the size of text for messages in the reading pane.
-
At the bottom of the sidebar, chose Mail.
-
Select a message, and then on the Format menu, choose Increase Font Size or Decrease Font Size.
I am thankful to this blog for assisting me. I added some specified clues which are really important for me to use them in my writing skill. Really helpful stuff made by this blog. Windows 10 product key 64 bit
ReplyDelete