Customizing your Microsoft Access database with a meaningful title or icon can help make it easier for users to identify the database.
What do you want to do?
Add a custom title
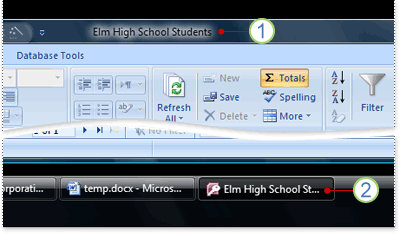
The application title is the text that appears in the title bar of the Access window and on the Windows taskbar button for the database.

1. Title bar
2. Taskbar button.
Note: In Windows 10, you can't display a custom title and icon for the Windows taskbar.
If you do not enter a custom title for your database, Access displays a default title that is based on the file name and version of the database. For example, for an Access 2016 database file called Students.accdb, the default, title bar text is Students : Database (Access 2007- 2016 file format) - Access. The file format text displayed differs depending upon what version of Access you're using. The default taskbar button text, as well as the text that displays when you press ALT+TAB to switch between windows, is Microsoft Access - Students : Database (Access 2007 - 2016). Specifying a custom title enables you to replace that text with more meaningful text, such as Elm High School Students.
Note: Adding a custom title does not change the file name of the database.
-
Click File > Options.
-
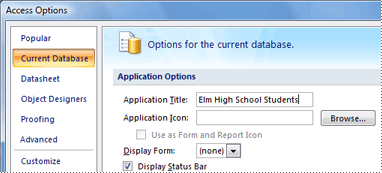
Click Current Database.
-
Under Application Options, in the Application Title box, type the title that you want to be displayed.

-
Click OK to save your changes. Note, you might need to close and then re-open your database to see all the changes.
Add a custom icon
An application icon is the small graphic that appears next to the title in the Windows taskbar button for the database. This icon also appears when you press ALT+TAB to switch between windows. By default, Access displays the Access program icon. Access does not provide any other icons, but you can replace the default icon with one that you created, or one that you obtained from another source.
-
Click File > Options.
-
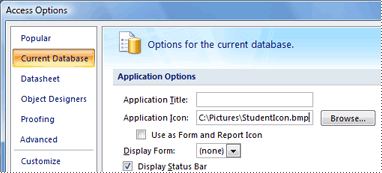
Click Current Database.
-
Under Application Options, in the Application Icon box, do one of the following:
-
Type the full path of the icon that you want to be displayed.
-
To browse to the file location of your icon, click Browse.

Note: Valid file types include icon (*.ico), cursor (*.cur), and bitmap (*.bmp).
-
-
To display the icon on the document tab of each form or report, or in the title bar of the form or report if overlapping windows are used, select the Use as Form and Report Icon check box.
-
Click OK to save your changes. Note, you might need to close and then re-open your database to see all the changes.
No comments:
Post a Comment