Step 1: Set up your mailing list
The mailing list is your data source. For more info, see Data sources you can use for a mail merge.
Tips
-
If you don't have a mailing list, you can create one during mail merge. Collect all of your address lists, and add them to your data source.
-
If you're using an Excel spreadsheet, format the ZIP Codes or postal codes column as text to preserve any zeros. For more info see Format mail merge numbers, dates, and other values in Excel.
-
If you want to use your Outlook contacts, make sure Outlook is your default email program.
Step 2: Test your envelope layout
If necessary, run a test on a small test batch of envelopes before you do a real mail merge.
-
Go to File > New > Blank document.
-
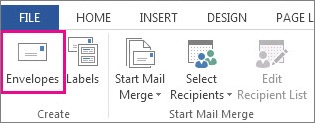
Go to Mailings > Envelopes.
-
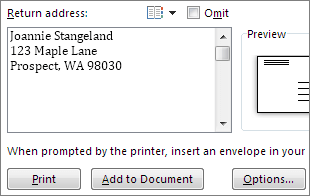
In the Delivery address box, type a sample address to test how an envelope looks when printed.
-
Type your address in the Return address box.
-
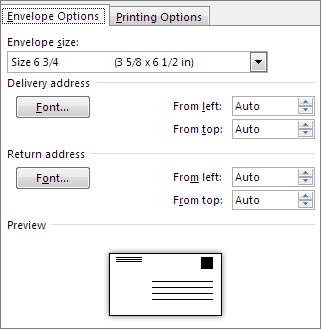
Select Options > Envelope Options and do the following:
-
Choose the size that matches your envelope or choose Custom size to set size.
-
If needed, choose a font and the left and top offset position for Delivery address and Return address.
-
-
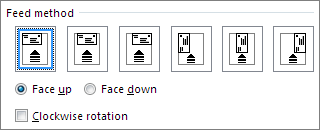
On the Printing Options tab, confirm the correct Feed method is selected, load the envelope to match the illustration, and then choose OK.
-
Choose Print, and then choose Yes to save the return address as the default address.
Step 3: Start the mail merge
-
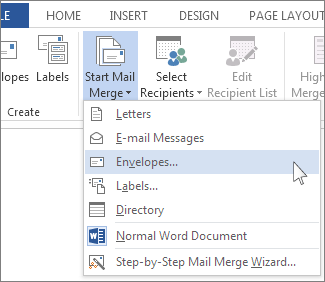
Go to Mailings > Start Mail Merge > Envelopes.
-
In the Envelope Options dialog box, check your options, and then choose OK.
-
If you'd like to add a return address, or logo, to your envelope now is a good time to add that.
-
Choose File > Save.
Step 4: Link your mailing list to your main document
-
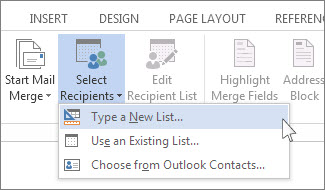
Go to Mailings > Select Recipients.
-
Choose a data source. For more info, see Data sources you can use for a mail merge.
-
Choose File > Save.
If you need to edit your mailing list, see Mail merge: Edit recipients.
Step 5: Add the address block to the envelope
The address block is a mail merge field that you place where you want addresses to appear on the envelope. To better see where, press CTRL+SHIFT+8 to turn on paragraph marks (¶).
-
Place your cursor were you want the address block to go.
-
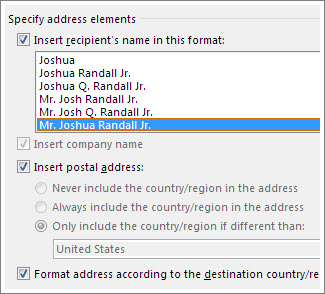
Go to Mailings > Address Block and choose a format. For more info, see Insert Address Block.
-
Choose a format in the Insert Address Block dialog box, for the recipient's name as it will appear on the envelope.
-
If you want, choose Next
 or Previous
  to move through a few records in your data source to see how they look.
 -
Choose OK.
-
Go to File > Save to save your merge document.
If any part of your address is missing, see Mail merge: Match Fields to fix.
Step 6: Preview and print the envelopes
Do a final check before you print the envelopes.
-
Choose Next
 or Previous
  to move through a few records in your data source to see how they look.
 -
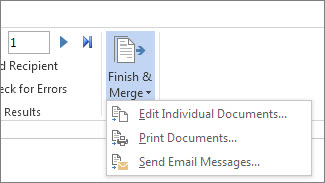
Choose Finish & Merge > Print Documents.
Step 7: Save your mail merge envelope document
When you save the mail merge envelope document, it stays connected to your mailing list for future use.
To reuse your envelope mail merge document, open the document and choose Yes when Word prompts you to keep the connection. To change addresses in the envelope mail merge document, open the document and choose Edit Recipient List to sort, filter, and choose specific addresses.
Step 1: Set up your mailing list
The mailing list is your data source. For more info, see Data sources you can use for a mail merge.
Tips:
-
If you don't have a mailing list, you can create one during mail merge. Collect all of your address lists, and add them to your data source.
-
If you're using an Excel spreadsheet, format the ZIP Codes or postal codes column as text to preserve any zeros. For more info see Format mail merge numbers, dates, and other values in Excel.
-
If you want to use your Outlook contacts, make sure Outlook is your default email program.
Tip: To make Outlook your default email program, open Apple Mail, and go to Mail > Preferences. Go to General and choose Microsoft Outlook.
Step 2: Prepare the main document to match your envelopes
-
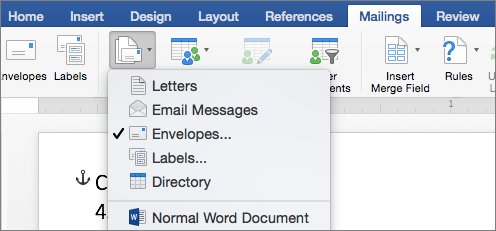
Go to Mailings > Start Mail Merge > Envelopes.
-
In the Envelope dialog box, under Return Address, choose an option.
-
In the Envelope dialog box, under Printing Options, choose Page Setup.
-
In the Page Setup dialog box, in the Paper Size list, choose the option that matches the size of your envelope.
If none of the options match your envelope's size do the following:
-
In the Page Setup dialog box, choose Landscape > OK.
-
Choose OK to close the Envelope dialog box.
-
Go to File > Save.
Step 3: Link your mailing list to your main document
-
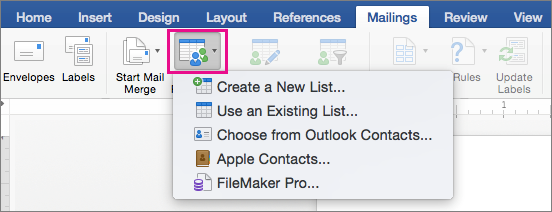
On the Mailings tab, choose Select Recipients.
-
Choose a data source. For more info, see Data sources you can use for a mail merge.
-
If needed, edit your recipient list. For more info, see Mail merge: Edit recipients.
-
Choose File > Save.
Step 4: Add and format merge fields
-
In your document, choose the Drag fields into this box or type text box, and then click or tap the text to remove it.
-
Go to Mailings > Insert Merge Field, and choose the field you want to add.

-
Add and format the fields you want to be included on the envelope, and choose OK.
Step 5: Preview and print the envelopes
-
Go to Mailings > Preview Results to see how the envelopes will look.

Note: Use the left and right arrows on the Mailings tab, to scroll through each envelope.
-
To make additional formatting changes, select Preview Results again to edit merge fields.
-
When done, go to Mailings tab, choose Finish & Merge > Print Documents to complete the mail merge.

Tip: To review and update each envelope individually before printing, go to Mailings > Finish & Merge > Edit Individual Documents. When done, go to File > Print to print the envelopes.
Step 1: Prepare your main document
The mailing list is your data source. For more info, see Data sources you can use for a mail merge.
-
Go to File > New Blank Document.
-
Go to View > Print Layout.
-
Go to Tools > Mail Merge Manager.
-
Under 1. Select Document Type, choose Create New > Envelopes.
-
In the Return address box, type your address.
-
Under Printing Options, confirm the correct print settings for your envelopes are selected.
-
Choose OK when finished.
Step 2: Select the mailing list
-
Go to Tools > Mail Merge Manager.
-
Under 2. Select Recipients List, choose Get List, and then select the source for the mailing list.
-
Under 3. Insert Placeholders, choose Contacts.
-
Drag a field name from the Contacts list to the envelope's address box.
-
Repeat Step 4 for all the fields that you want to appear on your envelopes.
-
In your main document, edit the envelope's address box to add spaces and carriage returns where you want them.
-
To finish creating your envelopes, do one of the following:
-
To print immediately, in Mail Merge Manager, under 6. Complete Merge, choose Merge to Printer
 .
. -
To create a document to save, in Mail Merge Manager, under 6. Complete Merge, choose Merge to New Document
 .
.
-
No comments:
Post a Comment