Share sites or documents with people outside your organization
If your organization performs work that involves sharing documents or collaborating directly with vendors, clients, or customers, then you might want to use the external sharing features of SharePoint Online to share content with people outside your organization who do not have licenses for your Microsoft Office 365 subscription.
There are three ways that you can do this:
-
You can share an entire site by inviting external users to sign in to your site using a Microsoft account or a work or school account.
-
You can share individual documents by inviting external users to sign in to your site using a Microsoft account or a work or school account.
-
You can post or send users a guest link that they can use to view individual documents on your site anonymously.
Note: Only one person may log in to access your site or document using an invitation you send. However, the person who gets your invitation may decide to not use it, and instead forward the invitation to someone else who can then log in using their Microsoft account or work account to access the site or document.
Note: Your global administrator must enable external sharing and set the appropriate permissions before you can share sites or documents. See Manage external sharing for your SharePoint online environment for more information.
What is an external user?
An external user is someone outside your organization who can access your SharePoint Online sites and documents but does not have a license for your SharePoint Online or Microsoft Office 365 subscription. External users are not employees, contractors, or onsite agents for either you or your affiliates.
Note: If your organization has separate Office 365 tenants, a licensed user from one tenant can use external sharing with a licensed user from the other tenant.
External users inherit the use rights of the SharePoint Online customer who is inviting them to collaborate. That is, if an organization purchases an E3 Enterprise plan, and builds a site that uses enterprise features, the external user is granted rights to use and/or view the enterprise features within the site they are invited to. While external users can be invited as extended project members to perform a full range of actions on a site, they will not have the exact same capabilities as a full, paid, licensed member within your organization. See Manage external sharing for your SharePoint online environment for more information.
Share a site
When you share a site with external users, you send them an invitation that they can use to log in to your site. You can send this invitation to any email address. When the recipient accepts the invitation, they log in using either a Microsoft account or a work or school account. When you share a site, you can select the type of permissions you want that person to have on the site.
You need to be a Site Owner or have full control permissions to share a site with external users.
-
Sign in to Office 365 with your work or school account.
-
In the top left corner of the page, select the app launcher icon
 and then select the SharePoint tile (formerly Sites tile) or click SharePoint (formerly Sites) at the top of the page.
 -
Go to the site you want to share with external users.
-
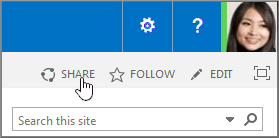
In the upper right corner of the screen, click Share.

-
In the Share dialog box, type the names of the external users you want to invite. For example: someone@outlook.com or someone@contoso.com.
Note: You can also use the Share command to grant internal licensed users access to a site. If you want to do this, just type the names of the people you want to invite.
-
Click Share.
Note: If you get an unmatched user error message when you enter a name and email address, your site might not be enabled to allow external users. Check with your administrator to enable it.
-
Type a message to include with the invitation.
-
By default, an email invitation is sent automatically. To turn off the email invitation, click Show Options, and uncheck send an email invitation
By default, any invitations you send to external users will expire in 90 days. If an invitee does not accept the invitation within 90 days, and you still want that person to have access to your site, you'll need to send a new invitation.
When the external users receive their invitations, they select a button that takes them to a page where they sign into your SharePoint Online site by using a Microsoft account or a work or school account. If users don't have at least a Microsoft account, they can sign up for a free Microsoft account.
Share a document by sending or posting an anonymous guest link
You can create an anonymous guest link, and then share the link using whatever media suits you. For example, post it on a social media page, or paste it into an email. You can create a guest link that provides editing permission or only viewing permission.
You must be a Site Owner or have full control permissions to share a document with external users. Additionally, the external sharing feature must be turned on in either the Office 365 Service Settings or the SharePoint Online admin center (depending on which plan you have). External sharing must also be turned on for your site collection (enterprise plans only).
-
Sign in to Office 365 with your work or school account.
-
In the top left corner of the page, select the app launcher icon
 and then select the SharePoint tile (formerly Sites tile) or click SharePoint (formerly Sites) at the top of the page.
 -
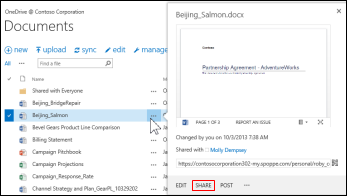
Click the ellipses ... next to the document, and then click Share.

-
In the Share dialog box, click Get a link.
-
Select the type of permission you want to grant: Restricted link, View link, or Edit link.
A guest link URL is created. -
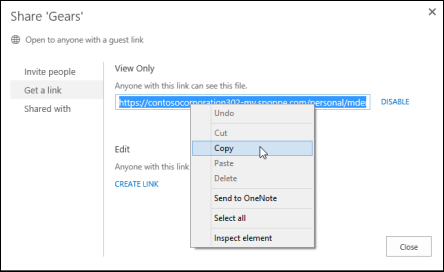
Select the guest link URL and copy it.

You can now paste the guest link URL into the media of your choice.
-
If a document is in a team site library, other site members can find the guest links in the Share dialog box and send them to others.
-
If the file you are attempting to share is located in a library that is using Information Rights Management, you will not be able to share it externally.
-
Anonymous guest links could potentially be forwarded or shared with other people, who might also be able to view or edit the content without signing in. Avoid using anonymous guest links for sensitive content.
-
People who are invited to access documents using anonymous guest links will only be able to view or read files in the relevant Office Online. They will not be able to open files in a corresponding desktop version of the Office program.
-
If external sharing is turned off globally in the Office 365 Service Settings or the SharePoint Online Admin center, any shared links will stop working. If the feature is later reactivated, these links will resume working. It is also possible to disable individual links that have been shared if you want to revoke access to a specific document. See Disable an anonymous guest link.
-
If you share Excel workbooks that include Power View sheets with people outside your organization, they won't be able to see the Power View sheets in those workbooks.
-
If you share a folder, the only type of permission you can grant is Restricted link.
Allow people to create guest links with documents you've shared with them
You may be happy to share some documents widely, and in fact you may want to encourage people to reshare them. For such documents you can allow people to create anonymous guest links with documents you share with them.
To allow this capability, you must have full control permission.
-
Sign in to Office 365 with your work or school account.
-
In the top left corner of the page, select the app launcher icon
 and then select the SharePoint tile (formerly Sites tile) or click SharePoint (formerly Sites) at the top of the page.
 -
Go to the library where you want to allow people to create guest links.
-
Click Settings
 and then click Site settings.
 -
Click Site permissions under the Users and Permissions section.
-
Click Access Request Settings.
Note: If you don't see Access Request Settings, click Managing Parent under the Permissions tab, and then click Access Request Settings.

-
In the Access Requests Settings dialog box, check Allow members to share the site and individual files and folders.
-
Optionally, check Allow access requests and add an email address that will receive access requests.
-
Click OK.
Now when people select documents you've shared with them and open the Share dialog box, they can create a guest link. Note, however, that they can only create guest links that allow guests to edit the document if you gave them edit permission when you first shared the document. If they only have view permission, they can only create guest links that allow view permission.
Note: If you uncheck Allow members to share the site and individual files and folders to disable this ability, the Share menu will still be available to users, but an error message will be shown when a team member attempts to share.
For an overview of Access Request Settings, see Video: Share a site without access request.
Share a document requiring sign in to your site
You must be a Site Owner or have full control permissions to share a document with external users. Additionally, the external sharing feature must be turned on in either the Office 365 Service Settings or the SharePoint Online admin center (depending on which plan you have). External sharing must also be turned on for your site collection (enterprise plans only).
-
Sign in to Office 365 with your work or school account.
-
In the top left corner of the page, select the app launcher icon
 and then select the SharePoint tile (formerly Sites tile) or click SharePoint (formerly Sites) at the top of the page.
 -
Navigate to the site and document you want to share.
-
Click the ellipses (...) next to the document, and then click Share.

-
Click Invite people if it's not already selected, and then type the email addresses of people you're inviting to share the document. For example: someone@outlook.com, or somebody@gmail.com, or externaluser@contoso.com.
-
In the drop-down list, select the permission level you'd like to grant these users: Can edit or Can view.
-
If you want, type a message to be included with the email. The message might include information or instructions about the document you've shared.
-
Click Show Options.
-
Check Require sign-in.
Some sites are customized and may not display Require sign-in. If you need this option, contact your site administrator.
Note: If you don't select the Require sign-in check box, the email will contain an anonymous guest link to the document. Anonymous guest links could potentially be forwarded or shared with other people, who might also be able to view or edit the content without signing in.
-
Click Send an email invitation.
-
Click Share.
Note: Learn about changes to the SharePoint notification email address to prevent emails going to the recipient's Junk Email folder.
See who has access to a specific site or document
You can also use the Share command to quickly see the list of people a document has been shared with.
Do one of the following:
-
To see who has access to a site, click Share at the top right of the page. Click the link after Shared with in the Share dialog box to view a list of people who have access to the site.
-
To see who has access to a document, folder, or Document Set, click the ellipses ... next to the document, click Share. and then click Shared With.
Revoke user access to a site
If a site has been shared with an external user, and you want to revoke that user's access to the site, you can do so by removing that individual's permissions for the site.
-
Sign in to Office 365 with your work or school account.
-
In the top left corner of the page, select the app launcher icon
 and then select the SharePoint tile (formerly Sites tile) or click SharePoint (formerly Sites) at the top of the page.
 -
Go to the site on which you want to withdraw an invitation.
-
click Settings
 and then click Site Settings.
 -
Click People and groups under Users and Permissions.
-
Select the group from the Quick Launch bar on the left which you want to remove users.
-
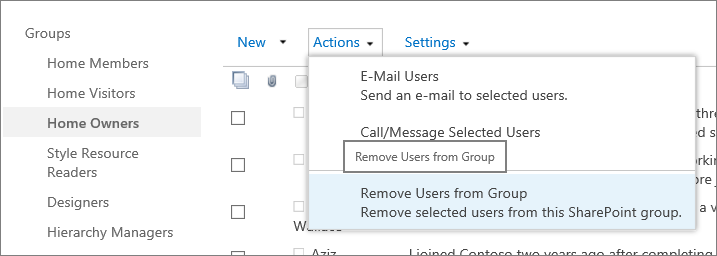
Select the users you want to remove, click Actions and then click Remove Users from Group.

-
Click OK.
Disable an anonymous guest link
You can see whether a document has been shared via guest link by checking the properties menu for the document.
-
Sign in to Office 365 with your work or school account.
-
In the top left corner of the page, select the app launcher icon
 and then select the SharePoint tile (formerly Sites tile) or click SharePoint (formerly Sites) at the top of the page.
 -
Go to the library that contains the document for which you want to remove a guest link.
-
Click the ellipses ... next to the document, and then click Share.

-
In the Share dialog box, click Get a link.
-
Click Remove. (If Remove is disabled, your document is probably set up to allow only users with a username and password.)
-
When asked if you want the link disabled, click Disable Link.

-
Click Close.
When people outside your organization attempt to access the content using the guest link, they will get a message that says they can't access it.
Microsoft Office Tutorials: Share Sites Or Documents With People Outside Your Organization >>>>> Download Now
ReplyDelete>>>>> Download Full
Microsoft Office Tutorials: Share Sites Or Documents With People Outside Your Organization >>>>> Download LINK
>>>>> Download Now
Microsoft Office Tutorials: Share Sites Or Documents With People Outside Your Organization >>>>> Download Full
>>>>> Download LINK Cr