Change the size of a picture, shape, text box, or WordArt
You can easily resize pictures, text boxes, shapes, and WordArt in your Office file. You can also remove unwanted portions of a picture by cropping it.

If you want to stretch, shrink, or just change the size of a picture (or shape), use the sizing handles or for more precise control, the Size options on the Picture Tools Format tab or the Drawing Tools Format tab.
What do you want to do?
Resize a picture, shape, WordArt, or other object
-
Click the picture, shape, WordArt, or other object (such as a chart) that you want to resize.
-
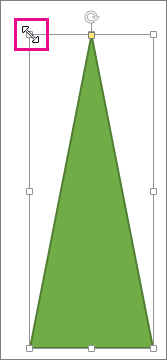
To increase or decrease the size in one or more directions, drag a sizing handle away from or toward the center, while doing one of the following:
-
To keep the center in the same place, press and hold Ctrl while you drag the sizing handle.
-
To maintain the proportions, press and hold Shift while you drag the sizing handle.
-
To both maintain the proportions and keep the center in the same place, press and hold both Ctrl and Shift while you drag the sizing handle.
-
Resize to an exact height and width
-
Click to select the picture, shape, WordArt, or other object that you want to precisely resize.
To resize multiple objects at the same time, press and hold Ctrl while selecting each object.
-
Depending on the type of object you've selected, do one of the following:
-
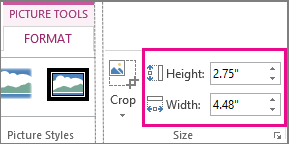
To resize a picture, on the Picture Tools Format tab, in the Size group, enter the new measurements into the Height and Width boxes.
-
To resize a shape or other object, on the Drawing Tools Format tab, in the Size group, enter the measurements you want into the Height and Width boxes.
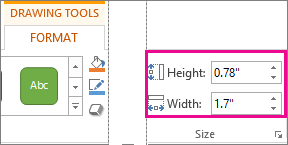
Note: If your screen size is smaller, you might need to click the down arrow in the Size group to see the Height and Width boxes.

-
If you're not able to change the height and width independently, you'll need to unlock the aspect ratio:
-
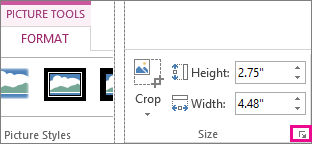
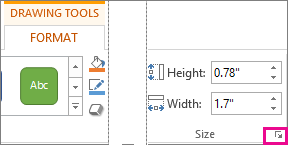
Click the dialog box launcher
 in the bottom right corner of the Size group.
 -
In the format pane or dialog box that appears, clear the Lock aspect ratio check box.
Resize to an exact proportion
-
Click the picture, shape, WordArt, or other object that you want to resize.
To resize multiple objects at the same time, press and hold Ctrl while selecting each object.
-
Do one of the following:
-
To resize a picture, on the Picture Tools Format tab, in the Size group, click the dialog box launcher
 .
.
-
To resize a shape or other object, on the Drawing Tools Format tab, in the Size group, click the dialog box launcher
 .
.
Note: If your screen size is smaller, you might need to click the down arrow in the Size group to see the dialog box launcher.

-
-
In the format pane or dialog box that appears, do one of the following:
-
To maintain the original proportion, select the Lock aspect ration check box and enter a Scale percentage for Height or Width.
-
To resize to a different proportion, clear the Lock aspect ratio check box and enter Scale percentages for Height and Width.
-
See Also
Move or resize a table in PowerPoint
Resize or edit pictures in Outlook
What do you want to do?
Resize a picture, shape, text box, or WordArt
Resizing stretches or shrinks the dimensions of an object.

Resize manually
-
Click the picture, shape, text box, or WordArt that you want to resize.
-
To increase or decrease the size in one or more directions, drag a sizing handle away from or toward the center, while doing one of the following:
-
To keep the center of an object in the same place, press and hold CTRL while you drag the sizing handle.
-
To maintain the object's proportions, press and hold SHIFT while you drag the sizing handle.
-
To both maintain the object's proportions and keep its center in the same place, press and hold both CTRL and SHIFT while you drag the sizing handle.
-
Resize to an exact height and width
-
Click the picture, shape, text box, or WordArt that you want to resize.
-
Do one of the following:
-
To resize a picture, under Picture Tools, on the Format tab, in the Size group, enter the measurements that you want into the Height and Width boxes.
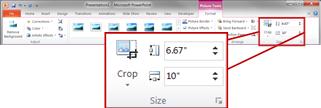
Note: If you do not see the Picture Tools and Format tabs, make sure that you selected a picture. You might have to double-click the picture to open the Format tab.
-
To resize a shape, text box, or WordArt, under Drawing Tools, on the Format tab, in the Size group, enter the measurements that you want into the Height and Width boxes.
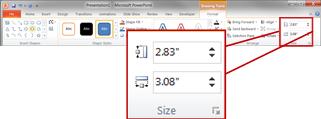
Note: If you do not see the Drawing Tools and Format tabs, make sure that you selected a picture, shape, text box, or WordArt. You might have to double-click the picture to open the Format tab.
-
-
In the Size group, click the Size and Position dialog box launcher
 .
. -
On the Size tab, under Size and rotate, clear the Lock aspect ratio check box.
Resize to an exact proportion
-
Click the picture, shape, text box, or WordArt that you want to resize.
-
Do one of the following:
-
To resize a picture, under Picture Tools, on the Format tab, in the Size group, click the Size and Position dialog box launcher
 .
.
Note: If you do not see the Picture Tools and Format tabs, make sure that you selected a picture. You might have to double-click the picture to open the Format tab.
-
To resize a shape, text box, or WordArt, under Drawing Tools, on the Format tab, in the Size group, click the Size and Position dialog box launcher
 .
.
Note: If you do not see the Drawing Tools and Format tabs, make sure that you selected a picture, shape, text box, or WordArt.
-
-
On the Size tab, under Scale, enter the percentages of the current height and width that you want to resize to, in the Height and Width boxes.
-
Clear the Lock aspect ratio check box.
Tip: To apply the same height and width to different objects, select all objects that you want to have the same dimensions, and then in Size group, enter the dimensions that you want in the Height and Width boxes. To select multiple objects, click the first object, and the press and hold CTRL while you click the other objects.
Return a picture to its original size
Warning: You cannot return a picture to its original size if you previously cropped and saved it, or if you selected the following options from the Compression Settings dialog box (to open the Compression Settings dialog box, under Picture Tools, on the Format tab, in the Adjust group, click Compress Pictures, and then click Options): the Delete cropped areas of pictures check box, and either Print (220 ppi): excellent quality on most printers and screens or Screen (150 ppi): good for Web pages and projectors.
-
Select the picture that you want to return to its original size.
-
Under Picture Tools, on the Format tab, in the Size group, click the Size and Position dialog box launcher
 .
.
Note: If you do not see the Picture Tools and Format tabs, make sure that you selected a picture. You might have to double-click the picture to open the Format tab.
-
In the Format Picture dialog box, click the Size tab, under Original size, clear the Lock aspect ratio check box, and then click Reset.
Save the original version of an edited picture
When you modify an image with the Graphics Interchange Format (.gif), Joint Photographic Experts Group File Interchange Format (.jpg), or Portable Network Graphics (PNG) file format, you can save the original version of the edited picture.
-
Right-click the edited picture, and then click Save as Picture on the shortcut menu.
-
In the Save As Picture dialog box, click the arrow next to Save, and then click Save Original Picture.
See Also
What do you want to do?
Resize a picture, shape, text box, or WordArt
Resizing stretches or shrinks the dimensions of an object.

Resize manually
-
Click the picture, shape, text box, or WordArt that you want to resize.
Note: If you have trouble selecting the object because it is behind another object or objects, click the top object, and then press TAB until your object is selected.
-
To increase or decrease the size in one or more directions, drag a sizing handle away from or toward the center, while doing one of the following:
-
To keep the center of an object in the same place, press and hold CTRL while you drag the sizing handle.
-
To maintain the object's proportions, press and hold SHIFT while you drag the sizing handle.
-
To both maintain the object's proportions and keep its center in the same place, press and hold both CTRL and SHIFT while you drag the sizing handle.
-
Resize to an exact height and width
-
Click the picture, shape, text box, or WordArt that you want to resize.
Note: If you have trouble selecting the object because it is behind another object or objects, click the top object, and then press TAB until your object is selected.
-
Do one of the following:
-
To resize a picture, under Picture Tools, on the Format tab, in the Size group, enter the measurements that you want into the Height and Width boxes.

Note: If you do not see the Picture Tools and Format tabs, make sure that you selected a picture, shape, text box, or WordArt.
-
To resize a shape, text box, or WordArt; under Drawing Tools, on the Format tab, in the Size group, enter the measurements that you want into the Height and Width boxes.

Note: If you do not see the Drawing Tools and Format tabs, make sure that you selected a picture, shape, text box, or WordArt.
-
-
In the Size group, click the Dialog Box Launcher
 .
. -
On the Size tab, under Scale, clear the Lock aspect ratio check box.
Resize to an exact proportion
-
Click the picture, shape, text box, or WordArt that you want to resize.
Note: If you have trouble selecting the object because it is behind another object or objects, click the top object, and then press TAB until your object is selected.
-
Do one of the following:
-
To resize a picture, under Picture Tools, on the Format tab, in the Size group, click the Dialog Box Launcher
 .
.
Note: If you do not see the Picture Tools and Format tabs, make sure that you selected a picture, shape, text box, or WordArt.
-
To resize a shape, text box, or WordArt, under Drawing Tools, on the Format tab, in the Size group, click the Dialog Box Launcher
 .
.
Note: If you do not see the Drawing Tools and Format tabs, make sure that you selected a picture, shape, text box, or WordArt.
-
-
On the Size tab, under Scale, enter the percentages of the current height and width that you want to resize to, in the Height and Width boxes.
-
Clear the Lock aspect ratio check box.
To apply the same height and width to different objects, select all objects that you want to have the same dimensions, and then in Size group, enter the dimensions that you want in the Height and Width boxes. To select multiple objects, click the first object, and the press and hold CTRL while you click the other objects.
Return a picture to its original size
Note: You cannot return a picture to its original size if you previously cropped and saved it, or if you selected the following options from the Compression Settings dialog box (to open the Compression Settings dialog box, under Picture Tools, on the Format tab, in the Adjust group, click Compress Pictures, and then click Options): the Delete cropped areas of pictures check box, and either Print (220 ppi): excellent quality on most printers and screens or Screen (150 ppi): good for Web pages and projectors.
-
Select the picture that you want to return to its original size.
Note: If you have trouble selecting the object because it is behind another object or objects, click the top object, and then press TAB until your object is selected.
-
Under Picture Tools, on the Format tab, in the Size group, click the Dialog Box Launcher
 .
.
Note: If you do not see the Picture Tools and Format tabs, make sure that you selected a picture.
-
Click the Size tab, clear the Lock aspect ratio check box, and then click Reset.
Save the original version of an edited picture
When you modify an image with the Graphics Interchange Format (.gif), Joint Photographic Experts Group File Interchange Format (.jpg), or Portable Network Graphics (PNG) file format, you can save the original version of the edited picture.
-
Right-click the edited picture, and then click Save as Picture on the shortcut menu.
-
In the Save As Picture dialog box, click the arrow next to Save, and then click Save Original Picture.
EaseUS Todo Backup Crack
ReplyDeleteEaseUS Todo Backup Crack code application will help you unlock its beautiful theme. This function makes concave sequences easier to control than competitors making it a great way to transition from your old car to your new one. With this app, you can reply to your emails and pick them up when you need them. It provides various connections where you can attach any file, partition, hard drive, or the entire system.
Driver Easy Pro Crack
ReplyDeleteDriver Easy full version cracked allows you to have a built-in database with a large number of drivers organized with features like size, date, version, type, date, etc. Driver Easy Pro torrent also broke the record for over 3 million trusted users worldwide. Don’t worry about being a new user. The software has a comprehensive guide, as well as helpful tutorials that will help you do things in a very understandable way. You can also exchange information and request help in the administrative area.
Freemake Video Converter 4.1.13.118 Crack Key 2022
ReplyDeleteMicrosoft Office Tutorials: Change The Size Of A Picture, Shape, Text Box, Or Wordart >>>>> Download Now
ReplyDelete>>>>> Download Full
Microsoft Office Tutorials: Change The Size Of A Picture, Shape, Text Box, Or Wordart >>>>> Download LINK
>>>>> Download Now
Microsoft Office Tutorials: Change The Size Of A Picture, Shape, Text Box, Or Wordart >>>>> Download Full
>>>>> Download LINK vW