Create mailing labels in Access
Microsoft Access gives you several different options for creating labels containing data stored in your Access tables. The simplest is to use the Label Wizard in Access to create and print a report that is formatted to fit your labels. The labels can contain data that is stored in Access tables, or data that is imported or linked from other sources such as Microsoft Excel workbooks or Microsoft Outlook contact lists. You can create the labels as a report within Access, or you can "merge" the data with a Microsoft Word document and then print the labels from Word. This article outlines the steps involved.
What do you want to do?
Use Access to create and print labels
In Access, you create labels as a report that is formatted with a small page size to fit the desired label. The most common use of labels is for mailing, but any Access data can be printed in a label format for a variety of purposes. In the case of mailing labels, the report gets the address data from the tables or queries containing the addresses. Printing the report gives you a single label for each address from the underlying record source.
For more information about linking or importing data from other sources (such as Microsoft Excel or Microsoft Outlook) to use on your labels, see the article Introduction to importing and exporting data.
The Label Wizard asks you a series of questions about your labels and the data you want to display on them. The wizard creates the report, which you can then customize, if needed.
Create labels by using the Label Wizard in Access
-
In the Navigation Pane, select the object that contains the data you want to display on your labels. This is usually a table, a linked table, or a query, but you can also select a form or report.
-
On the Create tab, in the Reports group, click Labels.
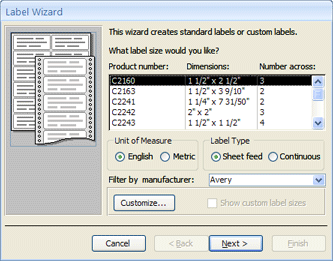
Access starts the Label Wizard.
-
If you know the manufacturer and product number of the labels:
-
Choose the manufacturer in the Filter by manufacturer box.
-
Select your label in the What label size would you like? box.
Otherwise, try to find a product whose values in the Dimensions and Number across columns match your labels.
If you can't find a similar label:
-
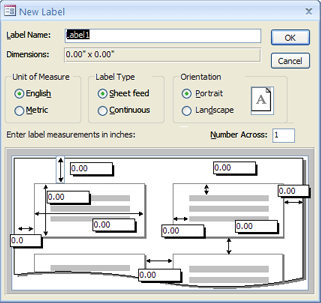
Click Customize and then click New.
The New Label dialog box is displayed.
-
Measure your labels and enter the measurements in the appropriate boxes in the New Label dialog box.
-
Enter a name for the custom labels in the Label Name text box, choose the label type and orientation you want, and then click OK.
If you have already created a custom label and you want to select it:
-
Click Show custom label sizes, and then click the custom label you want.
-
-
Select Sheet feed or Continuous under Label Type and then click Next.
-
Select the font name, size, weight and text color you want on your label, and click Next.
-
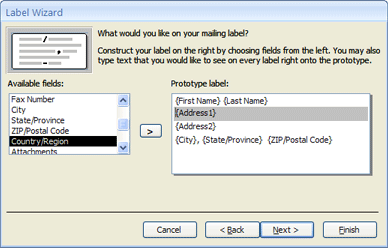
On the What would you like on your mailing label page of the wizard, choose the fields you want on your labels from the Available fields list, and double-click them to add to the Prototype label box.
-
To add space between the fields in the Prototype label box, press SPACEBAR.
-
To create a new line, press ENTER.
-
To move between fields and lines, use the arrow keys.
-
To remove a field from the box, press BACKSPACE.
-
To add other text or punctuation (for example, a comma after the city name), click to place the cursor where you want the text to appear and begin typing. This text will be the same on each label.
Note: You can only add fields of the following data types by using the Label Wizard: Short Text (Text), Long Text (Memo), Number, Date/Time, Currency, Yes/No, or Attachment. To add fields of other data types, open the label report in Design view after you have completed the Label Wizard, and then use the Field List pane to add the fields. To open the Field List pane while the report is open in Design view, press ALT+F8.
When you have the fields arranged on your label the way you want them, click Next.
-
-
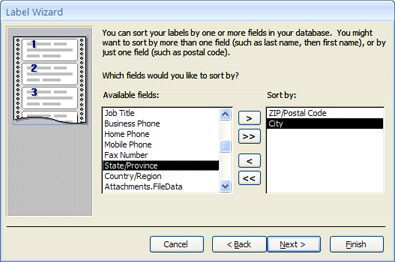
On the next page, you can choose fields on which to sort your labels. For example, you may want to sort by postal code for a large mailing. Choose the fields you want to sort by from the Available fields list, and double-click them to add to the Sort by box. When you are finished, click Next.
-
On the last page, enter a name for your labels, and click Finish.
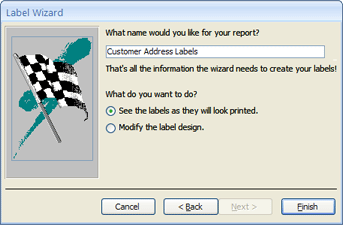
If you chose See the labels as they will look printed on the last page of the Label Wizard, Access will display the labels in Print Preview. You can click on the label to zoom in and out, or use the zoom control on the status bar.

If you chose Modify the label design on the last page of the Label Wizard, Access displays the label report in Design view.
Note: Print Preview is the only view in which you can see the columns as you have laid them out. If you view the report in Report View or Layout View, Access displays all the data in a single column.
-
Customize the appearance of the label
If the resulting labels don't look the way you want, you can customize the layout by opening the report in Design view and making your changes. When working with labels, it is usually easier to use Design view where you have more precise control over the layout. To see the results of changes you make in Design view, switch to Print Preview.
If Access displays a message about not having enough horizontal space to display the data
This message, when it appears, is a side-effect of the measurements of some labels. Usually it occurs when the labels come very close to the left and right edges of the label sheet. This can cause the wizard to specify some measurements that are outside of the normal printing range, and that in turn causes the message to appear when you preview or print the labels.
If you are satisfied with the alignment of the text on the labels, and you're not getting a blank page every other page, then you may want to leave the design of the report as it is, and just click OK on the message each time it appears. Otherwise, you can try adjusting some of the page setup options as described in the following section.
If your data is not lining up with the labels correctly
In many cases, you can fix minor problems with your label layout by making adjustments in Design view. You can move the controls and you can adjust the label size by changing the width or height of the Detail section.
To switch to Design view, right-click the report in the Navigation Pane and then click Design View on the shortcut menu.
If you need to change margins or spacing between labels, you can use the Page Setup dialog box while in Design view:
-
On the Page Setup tab, in the Page Layout group, click Columns.
The Page Setup dialog box is displayed with the Columns tab selected.
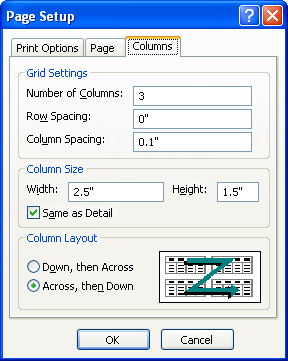
You can change the following settings in the three sections of the Page Setup dialog box:
| Section | Option | Description |
| Grid Settings | Number of Columns | This should equal the number of labels across the page. |
| Row Spacing | Enter a new value to increase or decrease the vertical space between the rows of labels. | |
| Column Spacing | Enter a new value to increase or decrease the horizontal space between the columns of labels. | |
| Column Size | Width | Keep in mind the margin settings and column spacing when setting this value. You can check and adjust the margins by clicking Print Options in the Page Setup dialog box. |
| Height | Adjust the height of each label, as needed. | |
| Same as Detail | When selected, sets the column width and height equal to the width and height of the Detail section in Design view. | |
| Column Layout | Down, then Across | When selected, your label data prints down the first column, then down the second column, and so on. |
| Across, then Down | When selected, your label data prints across the first row, then across the second row, and so on. |
Note: You can also open the Page Setup dialog box while in Print Preview by clicking Columns on the Print Preview tab. When you click OK to close the dialog box, your changes are immediately reflected in Print Preview.
Print the labels
-
Open the report in any view (or select the report in the Navigation Pane).
-
On the File tab, click Print, and then click Print.
Access displays the Print dialog box.
-
Enter your choices for options such as printer, print range, and number of copies.
-
Click OK.
Print Access data by using the Mail Merge Wizard in Microsoft Word
If your addresses are stored in Access, but you want to export them to Word so that you can use its mail merge functionality to format and print your labels, you can use the Mail Merge Wizard in Word.
-
In the Navigation Pane, select the table or query that contains the data you want to print.
-
On the External Data tab, in the Export group, click Word Merge.
-
In the Microsoft Word Mail Merge Wizard dialog box, if you have already created a document and you want to link your data to it, click Link your data to an existing Microsoft Word document. Otherwise, click Create a new document and then link the data to it.
-
Click OK.
If you chose Link your data to an existing Microsoft Word document, the Select Microsoft Word Document dialog box opens. Select the document you want, and click Open. The document will be opened in Word.
If you chose to create a new document, Word opens with a blank document.
-
In Word, follow the instructions in the Mail Merge task pane. When you arrive at step 3 of the Word Mail Merge process (Select recipients), the data source you chose in step 1 of this procedure will be already be selected.
For more information about the Word Mail Merge Wizard, see Word Help.
Note: You can use Word to print your addresses, regardless of where the addresses are stored. From Word, you can connect to address lists stored in a variety of programs, such as Excel, Outlook, and Access. Or, if you don't have an address list, you can create one in Word and then print labels. For more information, see Word Help.
No comments:
Post a Comment