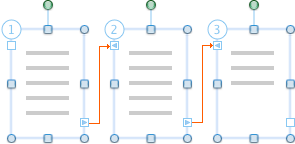
Flow text from one area to another
You can create text box links across a document to contain all the text within a story and flow text between them. When the text box is full, text in linked text boxes flows automatically from one text box to the next text box in the chain. You can have a maximum of 31 links in a story, with a maximum of 32 text boxes linked together.

Important: To see linked text boxes, you must view the document in print layout view or publishing layout view.
Do any of the following:
Create linked text boxes
-
On the View menu, click Print Layout or Publishing Layout.
-
On the Home tab, under Insert, click Text Box.

-
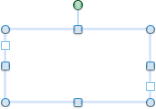
Drag the pointer to create a text box.
-
Rest the pointer on the text box link handle at the bottom right corner of the text box, click the plus sign
 , and then draw another text box.
 You now have two linked text boxes. When the first text box fills, text automatically flows into the next linked text box.
-
To link additional text boxes, repeat step 4.
Note: You can only link to an empty text box.
Break a link in a story
A text box can have only one forward (next) link and one backward (previous) link. You can break a link between any two text boxes that are part of a story. When you break a link in a story, you create two stories. The links before and after the break stay intact. However, the text stops flowing at the last text box before the broken link. The second series of linked text boxes, which now forms its own story, is empty. If you want to, you can then reflow the text starting in any empty text box.
-
On the View menu, click Print Layout or Publishing Layout.
-
Click the text box that you want to be the last link in the story.
-
On the Format tab, under Text Box, click Break Link
 .
.
Copy or move linked text boxes
You can copy a story, or a chain of linked text boxes, to another document or to another location in the same Word document. To successfully copy linked text boxes and the text that they contain, you must copy all the linked text boxes in a story.
-
On the View menu, click Print Layout or Publishing Layout.
-
Hold down SHIFT and select each text box in the story.
Note: There are two ways to see which text boxes belong to a story. In print layout view or publishing layout view, click the first text box, and then click the next text box handle
 . Repeat until you reach the last text box in the story. The other way to see which text boxes belong to a story is by color. The text boxes for a particular story all have the same outline color.
 -
On the Edit menu, click Copy.
-
Click the location in the document where you want to copy the story.
-
On the Edit menu, click Paste.
Tips:
-
To move text boxes, use the Cut command instead of the Copy command.
-
You can drag text boxes to new locations within the same document, or into another Word document.
-
To copy some of the text from a story, select only the text that you want to copy, and then copy it. Do not select the text box itself. You can paste the copied text directly into your document, into another location within the same story, or into another story.
-
Move among linked text boxes
You can step through linked text boxes to identify which text boxes are linked and to track the flow of a story. This is useful when a document contains multiple stories that span different pages, or contains stories with many linked text boxes.
-
On the View menu, click Print Layout or Publishing Layout.
-
Select a linked text box.
-
On the text box frame, click the next text box handle
 or previous text box handle
  .
.
Delete a linked text box without deleting story text
-
On the View menu, click Print Layout or Publishing Layout.
-
Select a text box that's part of a story. Rest the pointer on the border of the text box until the pointer becomes
 , and then click the border.
 The text box is selected when the resize handles appear.

-
Press DELETE .
Note: When you delete the text box, the story text from the deleted text box flows into the remaining linked text boxes. To show all the text, you might need to resize the remaining text boxes by dragging their resize handles.
Select all text in linked text boxes
You can select all text for a story that is contained in a series of linked text boxes.
-
On the View menu, click Print Layout or Publishing Layout.
-
Click in any linked text box, and then press
 + A .
+ A .
Reflow text in a story
A text box can have only one forward (next) link and one backward (previous) link. You can break a link between any two text boxes that are part of a story. When you break a link in a story, you create two stories. The links before and after the break stay intact. However, the text stops flowing at the last text box before the broken link. The second series of linked text boxes, which now forms its own story, is empty. If you want to, you can then reflow the text starting in any empty text box.
-
On the View menu, click Print Layout or Publishing Layout.
-
Click the text box that is immediately before the one that you want to reorder.
-
Click the Format tab, under Text Box, click Break Link
 .
. -
On the Format tab, under Text Box, click Create Link
 .
.The pointer changes to
 .
. -
Click an empty text box where you want to begin reflowing text.
The text flows through the empty text boxes in sequence.
Tips:
-
To change the order of linked text boxes, you must first break a link within the story.
-
To cancel the linking process, press ESC .
-
To see the outline of text boxes, on the View menu, click Publishing Layout. On the View menu, point to Show, and then click Outlines.
-
See also
Align text or adjust the margins within a text box
Use text boxes to create columns of text
No comments:
Post a Comment