Timelines in Visio help you plan and communicate project schedules by showing project phases and deadlines in a format that's easy to read and understand.
Get the Timeline template
-
In Visio, select File > New.
-
In the Search box, enter Timeline.
-
Select the Timeline template, and then select Create.
Lay the foundation
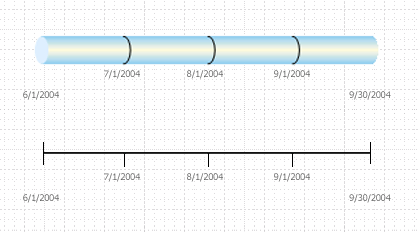
The first step in creating a timeline is to choose a timeline shape to represent the time span of the project. The timeline shape is the foundation to which you add the project milestones and events. You can choose from three styles—Cylindrical, Line, or Block—to set the tone of the timeline.
Create the foundation of a timeline
To find the right template to start from, go to File > New and, in the search box, type Timeline.
-
In Visio, open the Timeline template.
-
From the Timeline Shapes stencil, drag one of the timeline shapes (Block, Line, or Cylindrical) onto the drawing page.
The Configure Timeline dialog box opens.
-
On the Time Period tab, in the Start box, type or select the start date for the project.
-
In the Finish box, type or select the end date for the project.
-
Under Scale, choose a Time scale unit for the timeline.
-
If you choose Weeks, you can also choose which day that you want the weeks to begin on.
-
If you choose Months, you can also choose which day that you want the fiscal year to begin on.
-
-
On the Time Format tab, in the Language box, choose the language that you want for your timeline.
-
If you want the begin and end dates you chose in steps 3 and 4 to be visible at the ends of the timeline, leave the Show start and finish dates on timeline check box selected. Otherwise, clear the check box.
-
In the first Date format list, choose how you want the dates to look.
-
If you want each time scale unit (the unit you chose in step 5) to appear on the timeline, leave the Show interim time scale markings on timeline check box selected. Otherwise, clear the check box.
-
In the second Date format list, choose how you want the unit labels to look, or else clear the Show dates on interim time scale markings box.
-
Leave the Automatically update dates when markers are moved check box selected. This ensures that the dates associated with the markers update automatically when you re-position any milestones, intervals, or other markers on your timeline.
-
Click OK.
Note: To change any of these settings later, you can right-click the timeline, and then click Configure Timeline.
Add milestones, intervals, and markers
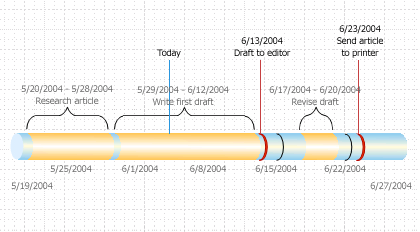
After you have the timeline foundation in place, you can start adding the vital content: markers that indicate important milestones and events.
| Marker type | Description |
|---|---|
| Milestone | Indicate a specific milestone date on the timeline (for example, the date when a writing project must be handed off to a publisher). |
| Interval | Indicate a critical time span on the timeline (for example, the time required to write a first draft). Choose an interval shape that matches the style of the timeline. |
| Today marker | Reflect the amount of time that has passed since the project began. A Today marker shifts automatically as the real-world date changes to reveal, at a glance, the status of your schedule in relation to your next deadline. |
Indicate a milestone on a timeline
-
Drag a milestone shape from the Timeline Shapes stencil and drop it directly on top of the timeline.
-
In the Configure Milestone dialog box, type or select the date and time for the milestone.
-
In the Description box, type a description of the milestone.
-
In the Date format list, choose how you want the date to look.
-
Click OK.
Tip: To quickly change a milestone's date, drag the milestone where you want it on the timeline. The date on the milestone changes to match the new position.
Indicate a time span on a timeline
-
Drag an interval shape from the Timeline Shapes stencil and drop it directly on top of the timeline.
-
In the Start date and Finish date boxes, type or select start and end dates for the time span.
-
In the Description box, type a description of the interval.
-
In the Date format list, choose how you want the dates to look.
-
Click OK.
Tip: To quickly change the time span of an interval, drag the green selection handles or move the interval where you want it on the timeline. The date on the interval changes to match the new position.
Move the text off a timeline
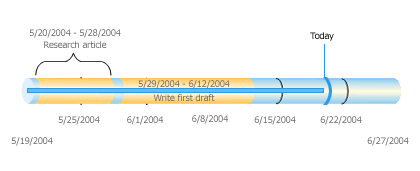
Timelines can sometimes get crowded. To make your timeline more readable, you can move the text off the timeline itself, as shown in the following illustration.
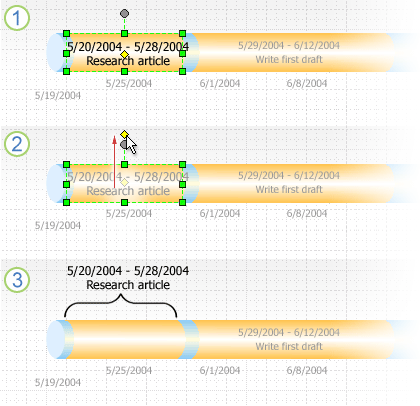
1. Click the yellow control handle to select the interval.
2. Drag the control handle above the interval shape to move the text to a better location.
3. A bracket automatically marks the beginning and end of the interval. If you want to change the type of bracket, right-click the bracket and select Set Interval Type.
Indicate elapsed time on a timeline
-
Drag the Elapsed time shape from the Timeline Shapes stencil and drop it directly on top of the timeline. The shape aligns its left end with the beginning of the timeline and extends to the current date.
-
Drag the Today marker shape from the Timeline Shapes stencil onto the timeline.
-
The shape is positioned at the current real-world date.
Each time you open a timeline drawing with an Elapsed time or Today marker shape on it, the shapes shift to align with the current real-world date.
Show details for a section of a timeline
You can expand a segment of an existing timeline as a second timeline to show more detail. The expanded timeline represents a segment of the original timeline, but you work with it individually. For example, you add milestones or intervals to the expanded timeline just as you would to the original timeline.
If you add a milestone or interval to the original timeline, it will also be added to the expanded timeline. However, if you add a milestone or interval to the expanded timeline, it won't be added to the original timeline.
Note: You must have a timeline on the drawing page to create an expanded timeline.
Show details for a section
-
From Timeline Shapes, drag the Expanded Timeline shape onto the page.
-
In the Configure Timeline dialog box, specify the options you want for the expanded timeline on the Time Period and Time Format tabs, and then click OK. (The start and finish dates must be within the time period of the original timeline.)
-
The expanded timeline appears on the drawing page and displays the following:
-
Gray dashed lines to associate the two timelines and indicate the section of the original timeline that the expanded timeline represents.
-
Shared milestones and intervals. These synchronize automatically so that if you change them on one timeline, they also change on the other.
Note: The expanded timeline uses the same shape type as the original timeline by default. To change the shape type, right-click the expanded timeline, and then click Set Timeline Type.
-
Tip: To quickly change the time span of an expanded timeline, drag the yellow control handles. The date on the expanded timeline changes to match the new position.
Synchronize milestones or intervals
If you have multiple timelines on a drawing page, you can synchronize specific intervals or milestones across those timelines so they are always concurrent. For example, if you change the date of the milestone on Timeline A, the synchronized milestone on Timeline B will automatically be updated with the new date information. The synchronized milestone will adjust itself by moving to the updated date position on the timeline.
-
Drag a Synchronized milestone or Synchronized interval onto a timeline.
The Synchronized ... dialog box opens.
-
Open the first drop-down list, and select the existing milestone or interval that you want to sync with.
-
Select a Date format.
-
Select OK.
Revise a timeline
Inevitably, milestone dates, predictions about how long a process will take, and even project end dates shift. You can easily revise and refine a Visio timeline in response to changes.
| What you want to change | Action to take |
|---|---|
| Project start or finish dates | Right-click the timeline shape, click Configure Timeline, then go to the Time Period tab. Type or select the new start or finish dates, and then click OK. |
| Number of divisions on a timeline bar | Right-click the timeline shape, click Configure Timeline, then go to the Time Period tab. In the Time scale list, choose a different time unit, and then click OK. |
| Visibility of timeline dates and divisions | Right-click the timeline shape, click Configure Timeline, then go to the Time Format tab. Under Formatting, select or clear check boxes to show or hide dates or time scale markings on the timeline. Click OK. |
| Appearance of arrowheads on a timeline bar | Right-click the timeline shape, point at Arrowhead, then select the option you want.. |
| Milestone type | Right-click the milestone, point at Set Milestone Type, and then choose the style that you want. |
| Interval type | Right-click the interval shape, point at Set Interval Type, and then choose the style that you want. |
| Milestone date | Right-click the milestone, and then click Configure Milestone. Enter the date that you want, and then click OK. |
| Time span dates | Right-click the interval, and then click Configure Interval. Enter the dates that you want, and then click OK. |
| Milestone or time span description | Double-click the text associated with the milestone or interval. Select the description, and then type the new description that you want. Press Esc when you're done typing. |
| Position of text associated with a milestone, interval, or today marker | Select the shape. Drag a control handle to change the distance between the text and timeline bar or the angle of the text. |
| Date format | Right-click the timeline, milestone, or interval, and then click Configure Timeline, Configure Milestone, or Configure Interval. In the Date format list, click the format that you want, and then click OK. |
Save a picture of the timeline to use elsewhere
You can save your Visio drawing as an image. Then you can insert the image in another Office file, such as a PowerPoint presentation or Word document.
-
With the Visio drawing open, select File > Export.
-
Select Change File Type.
-
Under Save Drawing, select one of the Graphic File Types, such as PNG or SVG.
-
Select the Save As button.
The Save As dialog box opens.
-
Choose a location to save the image file in, and then click Save.
You're now ready to insert the image in another Office file. Open that other file, then select Insert > Pictures. See Insert Pictures for more details.
If you have Visio Plan 2, there's an even easier way to transfer a timeline drawing to a PowerPoint slide. On the View tab of the ribbon, use the Slide Snippets Pane button to get started. See Create a PowerPoint presentation from Visio for instructions.
We're sorry. At this time, Visio for the web doesn't support creating a timeline diagram.
To emphasize your interest in this feature, please go to this "timeline" page in the Visio Suggestion box and click Vote.
Get the Timeline template
-
In Visio, select File > New.
-
Under Template Categories, select Schedule.
-
Under Choose a Template, select the Timeline template.
-
Select Create.
Lay the foundation
The first step in creating a timeline is to choose a timeline shape to represent the time span of the project. The timeline shape is the foundation to which you add the project milestones and events. You can choose from a variety of styles, such as Cylindrical or Line, to set the tone of the timeline.

Create the foundation of a timeline
To find the right template to start from, go to File > New and, in the search box, type Timeline.
-
In Visio, open the Timeline template.
-
From the Timeline Shapes stencil, drag one of the timeline shapes (Block, Line, or Cylindrical) onto the drawing page.
The Configure Timeline dialog box opens.
-
On the Time Period tab, in the Start box, type or select the start date for the project.
-
In the Finish box, type or select the end date for the project.
-
Under Scale, choose a Time scale unit for the timeline.
-
If you choose Weeks, you can also choose which day that you want the weeks to begin on.
-
If you choose Months, you can also choose which day that you want the fiscal year to begin on.
-
-
On the Time Format tab, in the Language box, choose the language that you want for your timeline.
-
If you want the begin and end dates you chose in steps 3 and 4 to be visible at the ends of the timeline, leave the Show start and finish dates on timeline check box selected. Otherwise, clear the check box.
-
In the first Date format list, choose how you want the dates to look.
-
If you want each time scale unit (the unit you chose in step 5) to appear on the timeline, leave the Show interim time scale markings on timeline check box selected. Otherwise, clear the check box.
-
In the second Date format list, choose how you want the unit labels to look, or else clear the Show dates on interim time scale markings box.
-
Leave the Automatically update dates when markers are moved check box selected. This ensures that the dates associated with the markers update automatically when you re-position any milestones, intervals, or other markers on your timeline.
-
Click OK.
Note: To change any of these settings later, you can right-click the timeline, and then click Configure Timeline.
Add milestones, intervals, and markers
After you have the timeline foundation in place, you can start adding the vital content: markers that indicate important milestones and events.

| Marker type | Description |
|---|---|
| Milestone | Indicate a specific milestone date on the timeline (for example, the date when a writing project must be handed off to a publisher). |
| Interval | Indicate a critical time span on the timeline (for example, the time required to write a first draft). Choose an interval shape that matches the style of the timeline. |
| Today marker | Reflect the amount of time that has passed since the project began. A Today marker shifts automatically as the real-world date changes to reveal, at a glance, the status of your schedule in relation to your next deadline. |
Indicate a milestone on a timeline
-
Drag a milestone shape from the Timeline Shapes stencil and drop it directly on top of the timeline.
-
In the Configure Milestone dialog box, type or select the date and time for the milestone.
-
In the Description box, type a description of the milestone.
-
In the Date format list, choose how you want the date to look.
-
Click OK.
Tip: To quickly change a milestone's date, drag the milestone where you want it on the timeline. The date on the milestone changes to match the new position.
Indicate a time span on a timeline
-
Drag an interval shape from the Timeline Shapes stencil and drop it directly on top of the timeline.
-
In the Start date and Finish date boxes, type or select start and end dates for the time span.
-
In the Description box, type a description of the interval.
-
In the Date format list, choose how you want the dates to look.
-
Click OK.
Tip: To quickly change the time span of an interval, drag the green selection handles or move the interval where you want it on the timeline. The date on the interval changes to match the new position.
Move the text off a timeline
Timelines can sometimes get crowded. To make your timeline more readable, you can move the text off the timeline itself, as shown in the following illustration.

1. Click the yellow control handle to select the interval.
2. Drag the control handle above the interval shape to move the text to a better location.
3. A bracket automatically marks the beginning and end of the interval. If you want to change the type of bracket, right-click the bracket and select Set Interval Type.
Indicate elapsed time on a timeline
-
Drag the Elapsed time shape from the Timeline Shapes stencil and drop it directly on top of the timeline. The shape aligns its left end with the beginning of the timeline and extends to the current date.
-
Drag the Today marker shape from the Timeline Shapes stencil onto the timeline.
-
The shape is positioned at the current real-world date.

Each time you open a timeline drawing with an Elapsed time or Today marker shape on it, the shapes shift to align with the current real-world date.
Show details for a section of a timeline
You can expand a segment of an existing timeline as a second timeline to show more detail. The expanded timeline represents a segment of the original timeline, but you work with it individually. For example, you add milestones or intervals to the expanded timeline just as you would to the original timeline.
If you add a milestone or interval to the original timeline, it will also be added to the expanded timeline. However, if you add a milestone or interval to the expanded timeline, it won't be added to the original timeline.
Note: You must have a timeline on the drawing page to create an expanded timeline.
Show details for a section
-
From Timeline Shapes, drag the Expanded Timeline shape onto the page.
-
In the Configure Timeline dialog box, specify the options you want for the expanded timeline on the Time Period and Time Format tabs, and then click OK. (The start and finish dates must be within the time period of the original timeline.)
-
The expanded timeline appears on the drawing page and displays the following:
-
Gray dashed lines to associate the two timelines and indicate the section of the original timeline that the expanded timeline represents.
-
Shared milestones and intervals. These synchronize automatically so that if you change them on one timeline, they also change on the other.
Note: The expanded timeline uses the same shape type as the original timeline by default. To change the shape type, right-click the expanded timeline, and then click Set Timeline Type.
-
Tip: To quickly change the time span of an expanded timeline, drag the yellow control handles. The date on the expanded timeline changes to match the new position.
Synchronize milestones or intervals
If you have multiple timelines on a drawing page, you can synchronize specific intervals or milestones across those timelines so they are always concurrent. For example, if you change the date of the milestone on Timeline A, the synchronized milestone on Timeline B will automatically be updated with the new date information. The synchronized milestone will adjust itself by moving to the updated date position on the timeline.
-
Drag a Synchronized milestone or Synchronized interval onto a timeline.
The Synchronized ... dialog box opens.
-
Open the first drop-down list, and select the existing milestone or interval that you want to sync with.
-
Select a Date format.
-
Select OK.
Revise a timeline
Inevitably, milestone dates, predictions about how long a process will take, and even project end dates shift. You can easily revise and refine a Visio timeline in response to changes.
| What you want to change | Action to take |
|---|---|
| Project start or finish dates | Right-click the timeline shape, click Configure Timeline, then go to the Time Period tab Type or select the new start or finish dates, and then click OK. |
| Number of divisions on a timeline bar | Right-click the timeline shape, click Configure Timeline, then go to the Time Period tab. In the Time scale list, choose a different time unit, and then click OK. |
| Visibility of timeline dates and divisions | Right-click the timeline shape, click Configure Timeline, then go to the Time Format tab. Under Formatting, select or clear check boxes to show or hide dates or time scale markings on the timeline. Click OK. |
| Appearance of arrowheads on a timeline bar | Right-click the timeline shape, and then click Show Start Arrowhead or Show Finish Arrowhead. |
| Milestone type | Right-click the milestone, and then click Set Milestone Type. In the Milestone Type list, click the style that you want, and then click OK. |
| Interval type | Right-click the interval shape, and then click Set Interval Type. Choose the style that you want, and then click OK. |
| Milestone date | Right-click the milestone, and then click Configure Milestone. Enter the date that you want, and then click OK. |
| Time span dates | Right-click the interval, and then click Configure Interval. Enter the dates that you want, and then click OK. |
| Milestone or time span description | Double-click the text associated with the milestone or interval. Select the description, and then type the new description that you want. |
| Position of text associated with a milestone, interval, or today marker | Select the shape. Drag a control handle to change the distance between the text and timeline bar or the angle of the text. |
| Date format | Right-click the timeline, milestone, or interval, and then click Configure Timeline, Configure Milestone, or Configure Interval. In the Date format list, click the format that you want, and then click OK. |
Save a picture of the timeline to use elsewhere
You can save your Visio drawing as an image. Then you can insert the image in another Office file, such as a PowerPoint presentation or Word document.
-
With the Visio drawing open, select File > Save & Send.
-
Select Change File Type.
-
Under Save Drawing, select one of the Graphic File Types, such as PNG or SVG.
-
Select the Save As button.
The Save As dialog box opens.
-
Choose a location to save the image file in, and then click Save.
You're now ready to insert the image in another Office file. Open that other file, then select Insert > Pictures. See Insert Pictures for more details.
Microsoft Office Tutorials: Create A Timeline In Visio >>>>> Download Now
ReplyDelete>>>>> Download Full
Microsoft Office Tutorials: Create A Timeline In Visio >>>>> Download LINK
>>>>> Download Now
Microsoft Office Tutorials: Create A Timeline In Visio >>>>> Download Full
>>>>> Download LINK 0t