Introduction
IMPORTANT: This article applies only to users in organizations that use Exchange Online exclusively and that don't have a hybrid deployment between Exchange Online in Microsoft 365 and on-premises Microsoft Exchange Server. If you do have a hybrid deployment, see the following article in the Microsoft Knowledge Base:
This article contains information about how to troubleshoot issues that prevent a user from viewing free/busy information of other users in Microsoft Office Outlook 2007 and in Microsoft Outlook 2010 in Microsoft 365.
A user may be unable to view free/busy information in scenarios such as these:
-
The user tries to schedule a calendar meeting request.
-
The user tries to view the availability of other users in Outlook.
In such cases, the user may be unable to view free/busy information because Outlook can't connect to the Exchange Availability service and to the Exchange Autodiscover service.
Procedure
Before you troubleshoot
Before you troubleshoot the issue, ensure that both the following conditions are true.
Ensure that the user has run the Microsoft 365 Desktop Setup Tool
For more information about how to set your desktop for Microsoft 365, go to the following Microsoft website:
Ensure that the computer meets the system requirements for Microsoft 365
For more information about the system requirements for Microsoft 365, go to the following Microsoft website:
Software requirements for Microsoft 365 for business
If the installation of Office has been updated, test to determine whether the issue is resolved by trying to retrieve free/busy information. If the issue isn't resolved, use the methods given below.
Troubleshoot the issue
To troubleshoot this issue, use one or more of the following methods, as appropriate for your situation.
Troubleshoot Availability service access
Steps 1 through step 3 in this section are steps that you can use to help isolate the source of the issue. Based on the results of these methods, you should be able to isolate the issue to the local computer or to the configuration of your organization.
Step 1: Verify whether the user account can access the Availability service in Exchange Online
To retrieve free/busy information from Exchange Online, you must have access to the Availability service. The Availability service endpoints are supplied by the Autodiscover service when an Outlook profile is set up. Depending on the configuration your organization employs, the Autodiscover service may be configured to point to the on-premises environment or directly to Exchange Online servers. It's important to confirm that the Autodiscover service is responding to requests from users who can't retrieve free/busy information.
To do this, follow these steps:
-
Start a web browser, and then browse to https://testconnectivity.microsoft.com/ to access the Microsoft Remote Connectivity Analyzer tool.
-
Click the Microsoft 365 tab.
-
Under Microsoft Office Outlook Connectivity Tests, click Outlook Autodiscover, and then click Next.
-
On the Outlook Autodiscover page, complete the information on the form, and then click Perform Test.
-
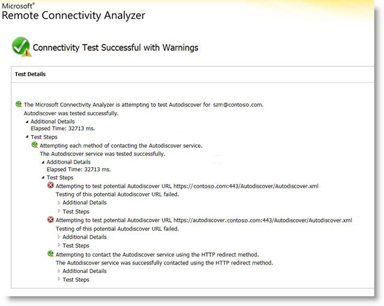
After the test completes, expand each test step on the Test Details page to isolate the issue. If the test is successful, you see the results of a successful Autodiscover query. The results show the list of URLs that are provided by the Autodiscover service. Successful results resemble those that are shown in the following screen shot.

If the test fails, the Microsoft 365 admin should make sure that the Autodiscover service is set up correctly in your organization. For more information about how to do this, skip down to Step 3: Create or modify the Autodiscover DNS record below.
Step 2: Use the Test E-mail AutoConfiguration tool to determine whether Outlook can connect to the Autodiscover service
After you confirm that the Autodiscover service works externally for your organization, determine whether the Autodiscover service works correctly from the local computer. Use the Test E-mail AutoConfiguration tool to determine whether the Autodiscover service and the Availability service are working from Outlook.
To do this, follow these steps:
-
Start Outlook.
-
Press and hold the Ctrl key, right-click the Outlook icon in the notification area, and then click Test E-mail AutoConfiguration.
-
Verify that the correct email address is in the E-mail Address box.
-
In the Test E-mail AutoConfiguration window, click to clear the Use Guessmart check box and the Secure Guessmart Authentication check box.
-
Click to select the Use AutoDiscover check box, and then click Test.
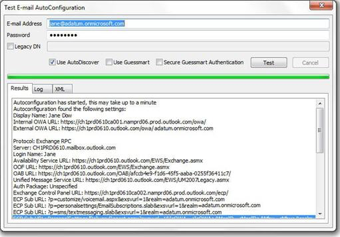
Ensure that this test is successful and that Outlook can retrieve the correct URLs for the Availability service. Successful results resemble what is shown in the figure below:

If this test isn't successful, the local computer may be unable to connect to the Autodiscover service. The following are some common reasons that may cause this issue:
-
A local firewall blocks Outlook from connecting to the Autodiscover service.
-
The Microsoft 365 Desktop Setup Tool hasn't been run on the computer.
See the Other Troubleshooting Methods section for more information about other methods that you can use to resolve the issue.
Step 3: Create or modify the Autodiscover DNS record
A custom domain is any domain other than the default DomainName.onmicrosoft.com that has been added to Microsoft 365. If your organization uses custom domains in Exchange Online, and all your users were migrated to the Microsoft 365, DNS records have to be configured to redirect migrated users to the Exchange Online Autodiscover service endpoints. You should create a CNAME record for autodiscover.contoso.com to point to autodiscover.outlook.com.
In this case, contoso.com is a placeholder for your company's domain name.
The Autodiscover CNAME record must contain the following information:
-
Alias: autodiscover
-
Target: autodiscover.outlook.com
For more information, see External Domain Name System records for Microsoft 365.
NOTE: If you have an Exchange hybrid deployment, set up the Autodiscover public DNS records for your existing SMTP domains to point to the on-premises environment. For more information, see Hybrid deployment prerequisites.
Other troubleshooting methods
The following methods may also resolve common free/busy issues.
Run Outlook together with the /cleanfreebusy switch
Outlook has several command-line switches that you can use to repair issues.
To repair free/busy connections, follow these steps:
-
Close Outlook.
-
Determine the path of the Outlook.exe file, follow these steps:
a. Click Start, point to Find, and then click Files or Folders.
b. In the Named box, type Outlook.exe, and then click Find Now.
c. Take note of the path of the Outlook executable for reference. For Outlook 2007, the default path is \Program Files\Microsoft Office\Office12\Outlook.exe. For Outlook 2010, the default path is \Program Files\Microsoft Office\Office14\Outlook.exe.
d. On the File menu, click Close. -
Click Start, and then click Run.
-
In the Open box, type the path of Outlook (include the file name in the path), press the spacebar one time, and then type /cleanfreebusy.
For example, the command-line command for Outlook 2007 is as follows:
"C:\Program Files\Microsoft Office\Office12\Outlook.exe" /Cleanfreebusy
NOTE: The full path has to be in quotation marks to preserve long file names. -
Determine whether the problem still occurs.
Determine whether the UseLegacyFB registry value is properly configured
IMPORTANT: This method contains steps that tell you how to modify the registry. However, serious problems might occur if you modify the registry incorrectly. Therefore, make sure that you follow these steps carefully. For added protection, back up the registry before you modify it. Then, you can restore the registry if a problem occurs. For more information about how to back up and restore the registry, click the following article number to view the article in the Microsoft Knowledge Base:
How to back up and restore the registry in Windows
If your organization recently migrated to Microsoft 365, Outlook 2007 could still be configured to use a registry entry that was carried over from the previous environment. This entry forces Outlook to use the account's free/busy message on the "Schedule+ Free/Busy" public folder. Public folders aren't used by Exchange Online for free/busy data. To determine whether this configuration exists, follow these steps:
-
Start the Registry Editor.
-
Locate and expand the following registry subkey:
HKEY_CURRENT_USER\Software\Microsoft\Offlice\12.0\Outlook\Options\Calendar -
Locate the UseLegacyFB registry entry. If the UseLegacyFB registry entry exists, delete the entry. Or, change the value of the UseLegacyFB registry entry to 0.
NOTE: If the user can view free/busy information for all other users except one user, the problem is to be found with the specific user whose free/busy information the user cannot view. Troubleshoot that specific user to discover why the Outlook client for that user cannot publish free/busy information.
Still need help? Go to Microsoft Community.
No comments:
Post a Comment