Document projects using Project 2007
Microsoft Office Project 2007 Inside Out
By Teresa S. Stover
Teresa S. Stover is a project management expert who has consulted with the Microsoft Office Project Team since version 4. She is an instructional designer and award-winning author with more than two decades of technical communication experience. Teresa is the author of countless user manuals, tutorials, and help systems — plus more than a dozen computer books, including Microsoft Office Project 2003 Inside Out and Microsoft Project Version 2002 Inside Out.
To learn more about other books on the 2007 Microsoft Office system, visit Microsoft Press.
In this article
Because the heart of project management is planning, it's no wonder that the planning processes of a new project has you doing a significant amount of work just to set the stage. You define the big picture and obtain stakeholder approval for the specifications of the product or service you're creating and for the boundaries defining the overall scope of the project itself. After this vision is in place, you're ready to create your project blueprint — the project plan — using Microsoft Office Project 2007. Then you break down your project goals and objectives into the actual phases, milestones, and tasks that form the backbone of your project information system. You can add your supporting documentation, such as the vision or strategy document, to the project plan. Likewise, you can add other supplementary information such as notes or hyperlinks to individual tasks, milestones, and phases. All this information makes your project plan the central repository of all project information.
Focus the project vision
You might already have a clear picture in your mind of what your project is about and what it will be when it is complete. On the other hand, the project might still seem a little fuzzy, at least around the edges. It's not uncommon for other stakeholders to have a clear vision when you're not sure if you get it just yet.
And don't be surprised if one stakeholder's expectations seem clear enough, but another stakeholder's expectations sound entirely contradictory.
The challenge at this important starting point is to clearly define the project without ambiguity, so that everyone involved is talking about the same project, the same expectations, and the same results. Defining the vision clearly at the beginning prevents redirection (and the attendant wasted effort) in the middle of the project or disappointment at the end.
So how do you create a vision? You work with key stakeholders such as the customers, potential users, sponsors, executives, and project team members to get their project expectations. You might have to reconcile conflicting views and opposing agendas. Throughout this process, you'll identify the goals of the project as well as their measurable objectives. You'll identify project assumptions, spell out potential risks, and make contingency plans for those risks. You'll also identify known limitations, such as budget, time, or resources.
By the time you finish this high-level project planning and get the necessary approval, everyone involved will know exactly what they're signing up for.
Define scope
A defined scope articulates the vision of the product you're creating and the project that will create it. As your project is executed and issues arise, your defined scope can help you make decisions. The scope definition is your guideline for whether the direction you're considering is really the job of this project. If you don't stay focused on the agreed-upon scope of the project, you're likely to experience "scope creep," in which you end up spending time, money, and resources on tasks and deliverables that are not part of the original vision.
This is not to say that scope can't change during the course of a project. Business conditions, design realities, budgets, time, resource availability, and many other factors can make it necessary to change project scope midway through. In addition, as members of your project team work on their tasks, they are likely to generate great new ideas. Nonetheless, your scope document helps you make decisions and manage those changes so that you change in the proper direction — in line with your organization's overall strategy, the product's reason for being, and the project's goals.
Understand product scope and project scope
There are two types of scope: product scope and project scope. First, you define the product scope, unless it has already been defined for you. The product scope specifies the features and functions of the product that will be the outcome of the project. The product scope might well be part of the product description in your charter. The product can be tangible, such as the construction of a new office building or the design of a new aircraft. The product can also be the development of a service or event, for example, deployment of a new computer system or implementation of a new training initiative.
Regardless of the type of product, the product scope indicates the specifications and parameters that paint a detailed picture of the end result. For example, the product scope of the construction of a new office building might include square footage, number of stories, location, and architectural design elements.
The project scope specifies the work that must be done to complete the project successfully, according to the specifications of the associated product scope. The project scope defines and controls what will and will not be included in the project. If there will be multiple phases of product development, the project scope might specify which phase this project is handling. For example, a computer system deployment project might specify that its scope encompass the infrastructure development and installation of the new computer system, but not the documentation and training for new system users. Or it might specify that the project handle all aspects of the product, from concept through completion of the final stage.
Develop the scope statement
To define the project scope and communicate it to other key stakeholders, you develop and record the scope statement. Depending on your organization's planning methods, certain elements of the scope statement might be defined very early, sometimes even before you've been assigned as project manager. Other elements might be defined just before you begin identifying and sequencing the project's tasks. Your scope statement should include the following:
-
Project justification The scope statement should define the business need or other stimulus for this project. This justification provides a sound basis for evaluating future decisions, including the inevitable trade-offs.
-
Product description The scope should characterize the details of the product or service being created. The project justification and product description together should formulate the goals of the project.
-
Project constraints or limitations The scope should include any limiting factors to the project. Factors that can limit a project's options include a specific budget, contractual provisions, a precise end date, and so on.
Note: Because we use the term constraints throughout this book to mean task constraints, in this chapter we're using the term limitations to refer to overall project constraints.
-
Project assumptions The scope should list any elements considered to be true, real, or certain — even when they might not be — for the sake of being able to continue developing the project plan and moving forward. By their nature, assumptions usually carry a degree of risk. For example, if you don't know whether the building for a commercial construction project will be 10,000 or 15,000 square feet, you have to assume one or the other for the sake of planning. The risk is that the other choice might end up being correct. You can adjust the plan after the facts are known, but other project dependencies might already be in place by then.
Note: Although certain aspects of your scope statement might remain unchanged through the iterative planning process, that's not necessarily the case with project limitations and assumptions. As the scope becomes more tightly defined, the limitations and assumptions come to light and are better exposed. Likewise, as you continue down the road in the planning process, the entire project scope tends to become more and more focused.
-
Project deliverables The scope should list the summary-level subproducts created throughout the duration of the project. The delivery of the final subproject deliverable marks the completion of the entire project. This list might bring into focus major project phases and milestones, which will be valuable when you start entering tasks into your project plan.
-
Project objectives The scope should enumerate the measurable objectives to be satisfied for the project to be considered successful. The objectives map to the deliverables and are driven by the project goals, as described by the project justification and product description. To be meaningful, the project objectives must be quantifiable in some way, for example, a specific dollar amount, a specific timeframe, or a specific level of quality.
Note: Your scope statement might also address other project planning issues such as communications, quality assurance, and risk management. It can define the reporting requirements and the collaboration tools to be implemented. The scope statement can also specify the minimum level of quality acceptable, define the potential risks associated with the itemized limitations and assumptions, and stipulate methods of countering the risks.
Product scope and project scope are intricately linked. The project scope relies on a clear definition of the product scope. The project scope is fulfilled through the completion of work represented in the project plan. In the same way, product scope is fulfilled by meeting the specifications in the product requirements.
With the draft of the scope statement in hand, you have a document you can use to clearly communicate with other project stakeholders. This draft helps you flush out any cross-purposes, mistaken assumptions, and misplaced requirements. As you continue to refine the scope statement, the project vision is honed to the point where all the stakeholders should have a common understanding of the project. And because all the stakeholders participated in the creation of the vision, you can feel confident that everyone understands exactly what they're working toward when you begin to execute the project plan.
Attach project documentation
You can make Project 2007 the central repository for all your important project documentation. For example, you might want to attach or link your scope statement to your project plan, as well as other documents such as the needs analysis, market study, and product specifications.
Show the project summary task
To attach planning documentation to your project, the first step is to display the project summary task. Not only does the project summary task eventually provide summary date and cost information for the project as a whole, it can serve as the location for your attached or linked planning documents. To display the project summary task, follow these steps:
-
Click Tools, Options and then click the View tab.
-
Under Outline Options, select the Show Project Summary Task check box.
-
Click OK. A summary task appears in Row 0 of the Gantt Chart (see Figure 1), adopting the name of the file as the project summary task name. If you want to change the name, click in the Task Name field for the project summary task. Edit the name in the entry field above the task sheet.
 Figure 1 Use the project summary task to attach or link planning documents.
Copy a document into your project file
You can include planning documents created in other programs within Project 2007. Although this can significantly increase your file size, you'll know that all your project information is stored in one place. To include the documents, follow these steps:
-
With the project summary task selected, click Task Information on the Standard toolbar and then click the Notes tab. You can also double-click the task to open the Summary Task Information dialog box. On the Notes tab, click the Insert Object button.
-
In the Insert Object dialog box, select the Create From File option and then click the Browse button.
-
In the Browse dialog box, select the project planning document you want to attach or embed into your project file. Click the Insert button.
-
Back in the Insert Object dialog box again, select the Display As Icon check box (see Figure 2).
If the document is small, consider clearing the Display As Icon check box. Clearing this check box embeds the content of the file into your project Notes box, so you can read it directly from there.
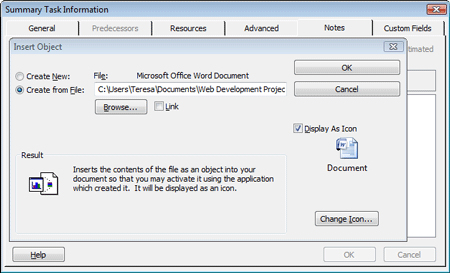 Figure 2 The selected document will be embedded in your project plan.
 -
Click OK. The document's icon appears in the Notes area of the Summary Task Information dialog box (see Figure 3).
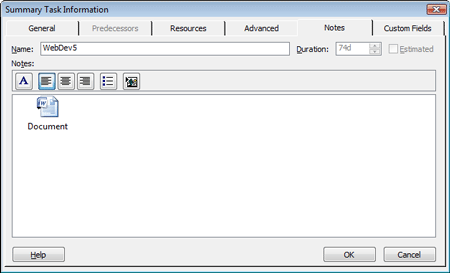 Figure 3 Double-clicking the icon opens it in its originating application.
 -
In the Summary Task Information dialog box, click OK. The Notes indicator appears in the Gantt Chart (see Figure 4).
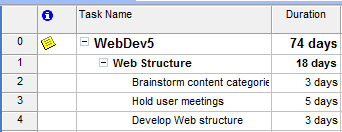 Figure 4 When you store something in a Notes tab, the Notes indicator appears in the corresponding row of the Gantt Chart.
Now, whenever you need to review the document, just double-click the Notes indicator to open the Notes tab of the Summary Task Information dialog box. Then double-click the document icon.
Note: In addition to attaching documents to the project summary task, you can attach documents to summary tasks and individual tasks. This can be useful when you have specifications or drawings that further define the scope of a particular sub-phase or task. You can also attach deliverables or milestone reports on milestone tasks.
Hyperlink a document to your project file
Hyperlinking is another way to include planning documents with your project file. Hyperlinking is a preferred method when you want to keep your file size trimmer, and you know that your project plan and associated planning documents will always be in the same place. It's also a very efficient method for opening associated documents quickly. To insert a hyperlink, follow these steps:
-
With the project summary task selected, click Insert Hyperlink on the Standard toolbar.
-
In the Text To Display box, type a descriptive name for the document to which you are linking, for example, Project Scope Statement.
-
Find and select the project planning document you want to link to your project file (see Figure 5).
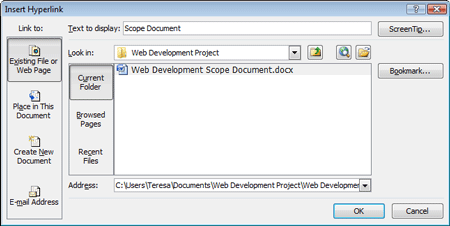 Figure 5 The path and name of the selected document appear in the Address box.
 -
Click OK. The Hyperlink indicator appears in the Indicators field of the Gantt Chart (see Figure 6).
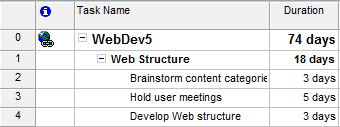 Figure 6 When you hyperlink a document to a task, the Hyperlink indicator appears in the corresponding row of the Gantt Chart.
Now, whenever you need to review the document, just click the Hyperlink indicator. The document opens in its own application window.
Note: In addition to hyperlinking to documents from the project summary task, you can create a hyperlink from summary tasks and individual tasks. If you're using Microsoft Office Project Professional 2007 with Microsoft Office Project Server for enterprise project management, the preferred method for keeping all project documents together is to use the document library. By setting up Microsoft Office Project Web Access with Windows SharePoint Services, you can set up and maintain a document library. This way, all your team members and other stakeholders can view the documents through their Web browsers. They can also check documents in and out, providing vital version control.
No comments:
Post a Comment