Add several users at the same time to Office 365 - Admin Help
Each person on your team needs a user account before they can sign in and access Office 365 services, such as email and Office. If you have a lot of people, you can add their accounts all at once from an Excel spreadsheet or other file saved in CSV format. Not sure what CSV format is?
Add multiple users to Office 365 in the Office 365 admin center
-
Sign in to Office 365 with your work or school account.
-
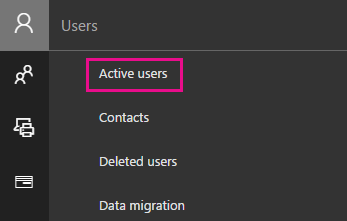
In the Office 365 admin center, choose Users > Active users.
-
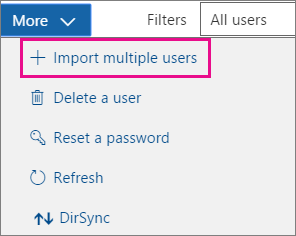
In the More drop-down, choose Import multiple users.
-
On the Import multiple users panel, you can optionally download a sample CSV file with or without sample data filled in.
Your spreadsheet needs to include the exact same column headings as the sample one (User Name, First Name, etc...). If you use the template, open it in a text editing tool, like Notepad, and consider leaving all the data in row 1 alone, and only entering data in rows 2 and below.
Your spreadsheet also needs to include values for the user name (like bob@contoso.com) and a display name (like Bob Kelly) for each user.
            User Name,First Name,Last Name,Display Name,Job Title,Department,Office Number,Office Phone,Mobile Phone,Fax,Address,City,State or Province,ZIP or Postal Code,Country or Region
  chris@contoso.com,Chris,Green,Chris Green,IT Manager,Information Technology,123451,123-555-1211,123-555-6641,123-555-9821,1 Microsoft way,Redmond,Wa,98052,United States
  ben@contoso.com,Ben,Andrews,Ben Andrews,IT Manager,Information Technology,123452,123-555-1212,123-555-6642,123-555-9822,1 Microsoft way,Redmond,Wa,98052,United States
  david@contoso.com,David,Longmuir,David Longmuir,IT Manager,Information Technology,123453,123-555-1213,123-555-6643,123-555-9823,1 Microsoft way,Redmond,Wa,98052,United States
  cynthia@contoso.com,Cynthia,Carey,Cynthia Carey,IT Manager,Information Technology,123454,123-555-1214,123-555-6644,123-555-9824,1 Microsoft way,Redmond,Wa,98052,United States
melissa@contoso.com,Melissa,MacBeth,Melissa MacBeth,IT Manager,Information Technology,123455,123-555-1215,123-555-6645,123-555-9825,1 Microsoft way,Redmond,Wa,98052,United States -
Enter a file path into the box, or choose Browse to browse to the CSV file location, then choose Verify.
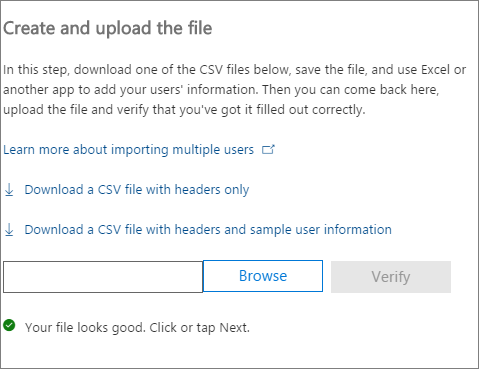
If there are problems with the file, the problem is displayed in the panel. You can also download a log file.
-
On the Set user options dialog you can set the sign-in status and choose the product license that will be assigned to all users.
-
On the View your result dialog you can choose to send the results to either yourself or other users (passwords will be in plain text) and you can see how many users were created, and if you need to purchase more licenses to assign to some of the new users.
Watch the video
Watch a short video that shows you how to bulk add users.

Next steps
-
Now that these people have accounts, they need to install Office on their PC or Mac. Each person on your team can install Office 365 on up to 5 PCs or Macs.
-
Each person can also install the Office mobile apps on up to 5 tablets and 5 phones, such as iPhones, iPads, and Android phones and tablets. This way they can edit Office files from anywhere.
See Set up Office 365 for Business for an end-to-end list of the setup steps.
More information about how to add users to Office 365
Not sure what CSV format is?
A CSV file is a file with comma separated values. You can create or edit a file like this with any text editor or spreadsheet program, such as Excel.
You can download this sample spreadsheet as a starting point. Remember that Office 365 requires column headings in the first row so don't replace them with something else.
Save the file with a new name, and specify CSV format.

When you save the file, you'll probably get a prompt that some features in your workbook will be lost if you save the file in CSV format. This is okay. Click Yes to continue.

Tips for formatting your spreadsheet
-
Do I need the same column headings as in the sample spreadsheet? Yes. The sample spreadsheet contains column headings in the first row. These headings are required. For each user you want to add to Office 365, create a row under the heading. If you add, change, or delete any of the column headings, Office 365 might not be able to create users from the information in the file.
-
What if I don't have all the information required for each user? The user name and display name are required, and you cannot add a new user without this information. If you don't have some of the other information, such as the fax, you can use a space plus a comma to indicate that the field should remain blank.
-
How small or large can the spreadsheet be? The spreadsheet must have at least two rows. One is for the column headings (the user data column label) and one for the user. You cannot have more than 251 rows. If you need to import more than 250 users, you can create more than one spreadsheet.
-
What languages can I use? When you create your spreadsheet, you can enter user data column labels in any language or characters, but you must not change the order of the labels, as shown in the sample. You can then make entries into the fields, using any language or characters, and save your file in a Unicode or UTF-8 format.
-
What if I'm adding users from different countries or regions? Create a separate spreadsheet for each area. You'll need to step through the Bulk add users wizard which each spreadsheet, giving a single location of all users included in the file that you're working with.
-
Is there a limit to the number of characters I can use? The following table shows the user data column labels and the maximum character length for each in the sample spreadsheet.
| User data column label | Maximum character length |
| User Name (Required) | 79 including the at sign (@), in the format name@domain.<extension>. The user's alias cannot exceed 30 characters, and the domain name cannot exceed 48 characters. |
| First Name | 64 |
| Last Name | 64 |
| Display Name (required) | 256 |
| Job Title | 64 |
| Department | 64 |
| Office Number | 128 |
| Office Phone | 64 |
| Mobile Phone | 64 |
| Fax | 64 |
| Address | 1023 |
| City | 128 |
| State or Province | 128 |
| ZIP or Postal Code | 40 |
| Country or Region | 128 |
Still having problems when adding users to Office 365?
-
Double-check that the spreadsheet is formatted correctly. Check the column headings to make sure they match the headings in the sample file. Make sure you're following the rules for character lengths and that each field is separated by a comma.
-
If you don't see the new users in Office 365 right away, wait a few minutes. It can take a little while for changes to go across all the services in Office 365.
Add multiple users to Office 365 in the old Office 365 admin center
-
Download this sample spreadsheet and open it in Excel.
Your spreadsheet needs to include the exact same column headings as the sample one (User Name, First Name, etc...). If you use the template, consider leaving all the data in row 1 alone, and only entering data in rows 2 and below.
Your spreadsheet also needs to include values for the user name (like bob@contoso.com) and a display name (like Bob Kelly) for each user. To leave other fields blank, enter a space plus a comma in the field as shown in the following figure.

If you have people working in different countries, you'll need to create one spreadsheet for users in each country. For example, one spreadsheet that lists everyone who works in the US, and another that lists everyone who works in Japan. This is because the availability of Office 365 services varies by region.
Tip: Before you add many users to Office 365, you might want to practice with the sample spreadsheet. For example, edit the sample spreadsheet with data for a few of your users, say 5 or 10, and save the file with a new name. Run through steps described in this procedure, check the results, and then delete the new accounts and start over again. This way you can practice getting all of the data right for your situation. Also check out Tips for formatting your spreadsheet.
-
Sign in to Office 365 with your work or school account.
-
Go to the Office 365 admin center.
-
For people to use Office 365 services, they need to be assigned a license. Before continuing, you might want to check that you have enough licenses for everyone listed in your spreadsheet. Choose Billing > Subscriptions to see if you have enough. If you need to buy more licenses, choose Change license quantity. Or, you can run the wizard and assign the licenses you have, then buy more licenses later and rerun the wizard.
-
Now go to the Bulk add users wizard: choose Users > Active Users. Choose
 as shown in the following figure.
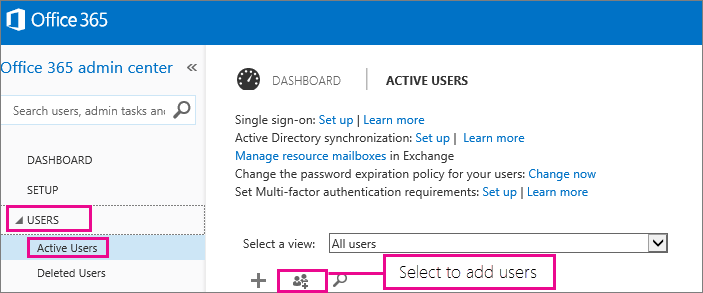
The Bulk add users wizard appears and steps you through adding a group of users to Office 365.
-
In Step 1 - Select a CSV file, specify your own spreadsheet as shown in the following figure.
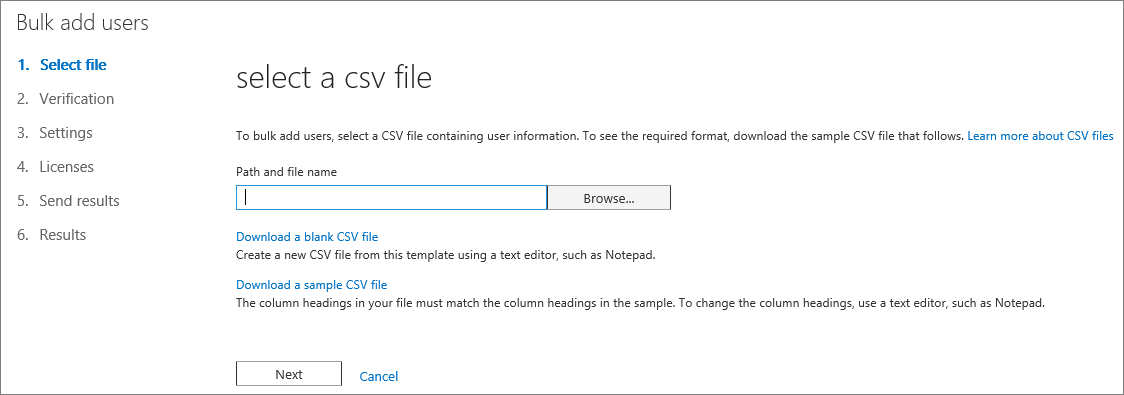
-
In Step 2 - Verification, the wizard tells you whether the content in the spreadsheet is formatted correctly.
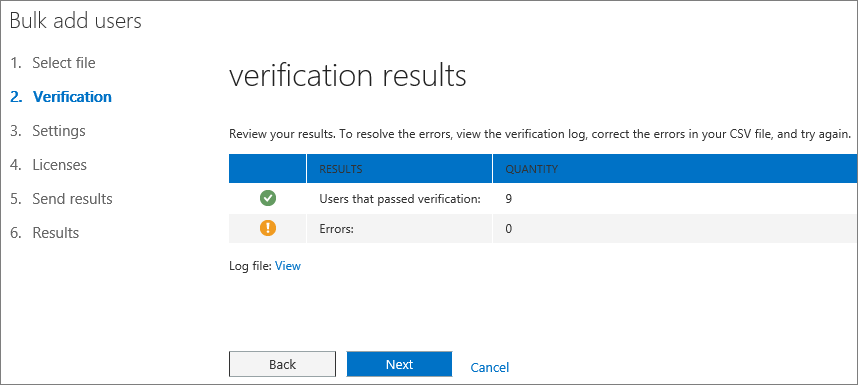
-
In Step 3 - Settings, choose Allowed so that the people listed in your spreadsheet will be able to use Office 365. Also choose the country in which these people will use Office 365. Remember if some people in your organization are going to use Office 365 in a different country, create a separate spreadsheet with their names and run the Bulk add users wizard again to add them.
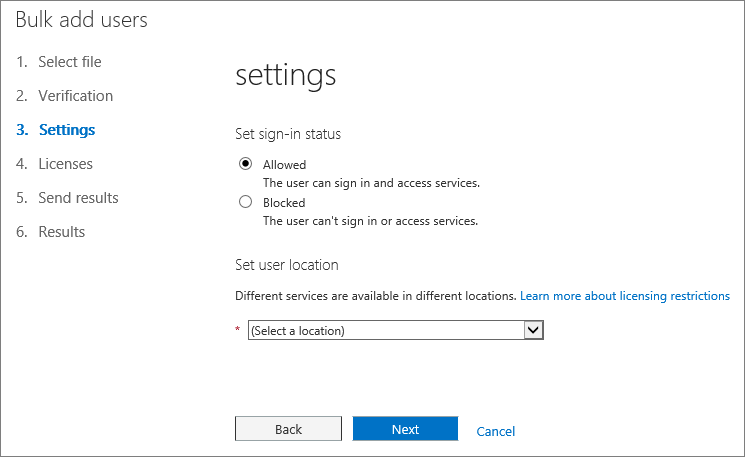
-
The assign licenses page tells you how many licenses are available.
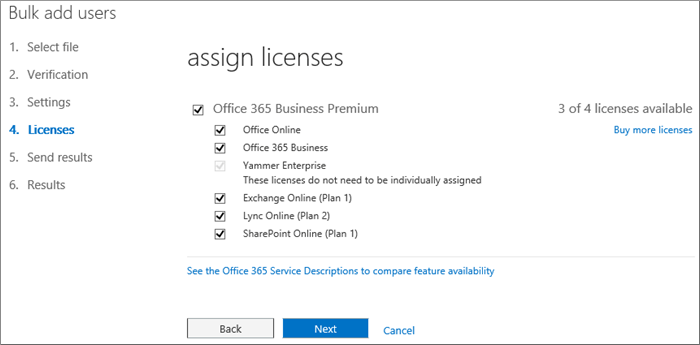
You can choose Buy more licenses, but you'll leave the Bulk add users wizard and go to Billing in the Office 365 admin center. After buying more licenses, you'll have to wait a few minutes for the order to be processed and then start the Bulk add users wizard from the beginning.
If you don't buy more licenses, accounts won't be created for everyone listed in your spreadsheet.
In this example, we don't buy any more licenses and continue with the Bulk add users wizard.
-
In Step 5 - Send Results, type the email addresses of the people who you want to get an email that lists all of the Office 365 user names and temporary passwords for the people in the spreadsheet.

The following email is sent to all the email addresses you specified in Step 5 - Send results. This email indicates which accounts were created. Notice that accounts weren't created for some people because there weren't enough licenses.
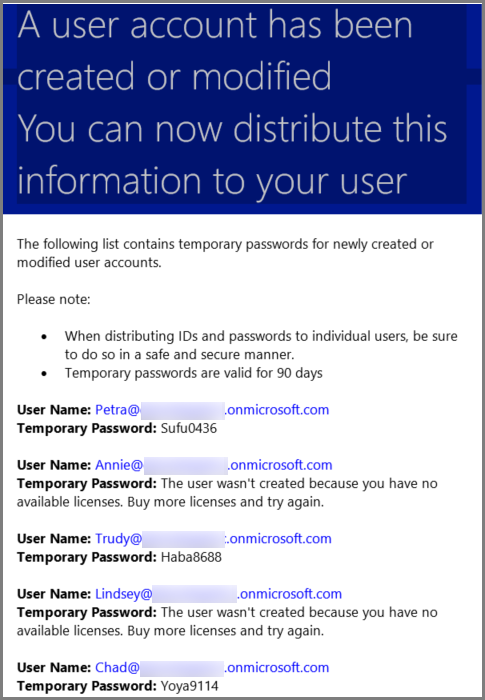
You can buy more licenses later and rerun the Bulk add users wizard with the same spreadsheet. The wizard skips over the users that already have accounts; on the results report, it will say "duplicate user name" to indicate someone with that information already has an account.
-
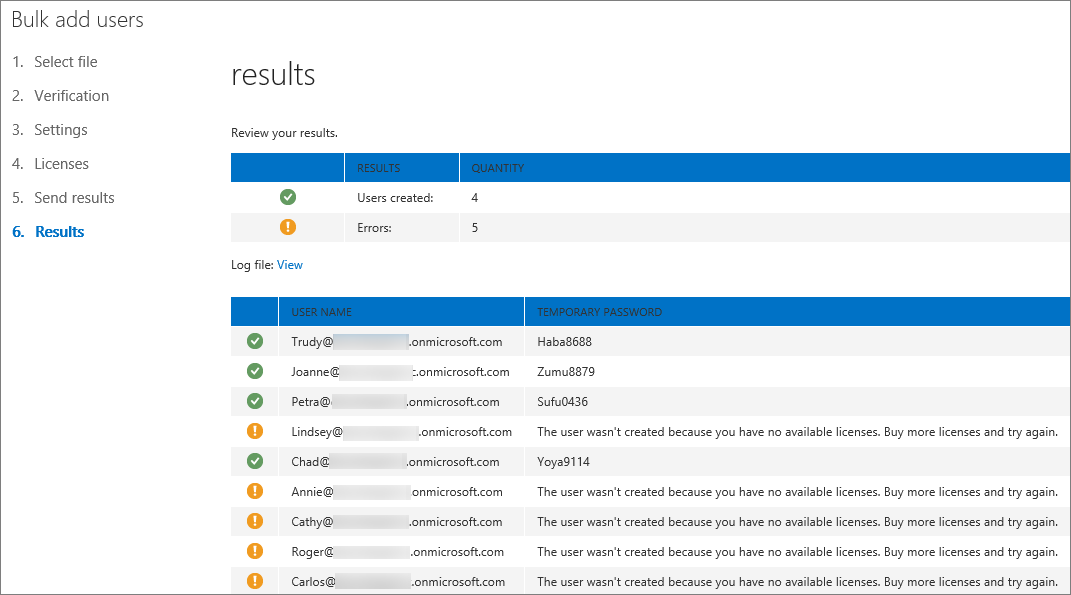
The final page in the Bulk add users wizard lists the user names and temporary passwords, as shown in the following figure.
-
After you've added users to Office 365, you need to tell them about their Office 365 account information. Use your normal process for communicating new passwords.
Microsoft Office Tutorials: Add Several Users At The Same Time To Office 365 - Admin Help >>>>> Download Now
ReplyDelete>>>>> Download Full
Microsoft Office Tutorials: Add Several Users At The Same Time To Office 365 - Admin Help >>>>> Download LINK
>>>>> Download Now
Microsoft Office Tutorials: Add Several Users At The Same Time To Office 365 - Admin Help >>>>> Download Full
>>>>> Download LINK Fx