Bleed is a slight overlap of the printed area beyond the edge of a printed page that is used to ensure that the printed area extends all the way to the edge of the paper.
Neither Publisher nor most home printers are the best option for printing with a bleed. However, you can create the effect of a bleed by changing the paper size, repositioning graphics, and then either manually trimming the page or sending the file to a professional printer. Both options are described below.
Print on a home printer and trim
To create a bleed effect on a home printer, you need to set your publication up to print on a sheet of paper that is larger than the finished publication page that you want.
-
On the Page Design tab, click Size, and then click Page Setup.
-
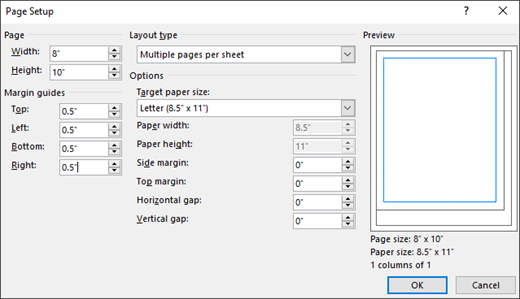
In the Page Setup dialog box, under Page, select the dimensions you want. To create a custom page size, enter your changes in the Width and Height boxes, and make sure to select a paper size that is larger than your finished publication page size.

-
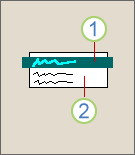
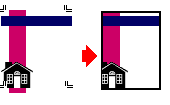
Position your object or graphic so that it extends beyond the edges of the publication page.

1 The object
2 The publication page
-
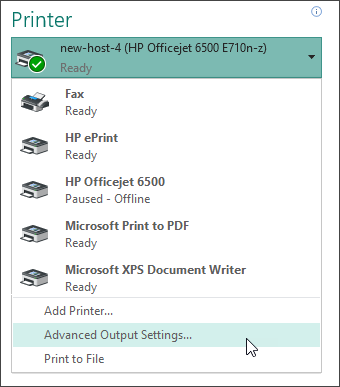
Click File > Print, click the menu to select a printer, and then click Advanced Output Settings.

-
On the Marks and Bleeds tab, under Printer's marks, select the Crop marks check box.
-
Under Bleeds, select both Allow bleeds and Bleed marks.
-
Print your publication.
Note: Remember that you must use a larger paper size to allow for your bleed and bleed marks.
-
Trim the paper to the intended size of the publication by using the crop marks as your guides.

Send to a professional printer
To create the effect of a bleed in Publisher to send to a professional printer, you need to change the paper size, move your objects or graphics to the edge of the page, and then return the paper to its the original size before sending your file to the printer.
-
On the Page Design tab, click Size, and then click Page Setup.
-
In the Page Setup dialog box, under Page, enter a new width and height that are slightly larger than the indented page size of your document.
For example, for document that is 8.5" x 11", enter a width of 8.75" and a height of 11.25".
-
Position your object or graphic so that it extends just to the edges of the publication page.
-
Change your page size back to the original intended size, such as 8.5″ x 11″. When printed professionally, any graphics touching the edge will extend beyond your publication page.
Print on a home printer and trim
To create a bleed effect on a home printer, you need to set your publication up to print on a sheet of paper that is larger than the finished publication page that you want.
-
On the File menu, click Page Setup.
-
In the Page Setup dialog box, under Page, select the dimensions you want. To create a custom page size, enter your changes in the Width and Height boxes, and make sure to select a paper size that is larger than your finished publication page size.
-
Position your object or graphic so that it extends beyond the edges of the publication page.

1 The object
2 The publication page
-
On the File menu, click Print, click the Printer Details tab, and then click Advanced Printer Setup.
-
On the Page Settings tab, under Printer's marks, select the Crop marks check box.
-
Under Bleeds, select both Allow bleeds and Bleed marks.
-
Print your publication.
Note: Remember that you must use a larger paper size to allow for your bleed and bleed marks.
-
Trim the paper to the intended size of the publication by using the crop marks as your guides.

Send to a professional printer
To create the effect of a bleed in Publisher to send to a professional printer, you need to change the paper size, move your objects or graphics to the edge of the page, and then return the paper to its the original size before sending your file to the printer.
-
On the File menu, click Page Setup.
-
In the Page Setup dialog box, under Page, enter a new width and height that are slightly larger than the indented page size of your document.
For example, for document that is 8.5" x 11", enter a width of 8.75" and a height of 11.25".
-
Position your object or graphic so that it extends just to the edges of the publication page.
-
Change your page size back to the original intended size, such as 8.5″ x 11″. When printed professionally, any graphics touching the edge will extend beyond your publication page.
Microsoft Office Tutorials: Create A Bleed For Your Publication >>>>> Download Now
ReplyDelete>>>>> Download Full
Microsoft Office Tutorials: Create A Bleed For Your Publication >>>>> Download LINK
>>>>> Download Now
Microsoft Office Tutorials: Create A Bleed For Your Publication >>>>> Download Full
>>>>> Download LINK ZP