Managing users and specifying permissions for a Web site based on Windows SharePoint Services technology
| Applies to |
| Microsoft Windows® SharePoint® Services technology |
This tutorial guides you through the process of viewing a list of users and changing information about a user of your site, plus adding users and assigning them to site groups. You'll also learn how to create permissions for a specific list or document library.
Imagine that you manage a site based on Microsoft Windows SharePoint Services for Contoso Corporation. You maintain the list of users for the site, and you control their levels of access. Contoso recently hired a new employee who needs to be added to the site. Later, you learn that this new employee has recently changed her name and you must update the site with that information. Her job function has also changed and so she needs to be granted the appropriate level of access so that she can work with the content on the site and make design changes. You must make these changes to the user lists for the site, plus secure a SharePoint list so that only one user can edit the information, even though everyone else can view it.
Goals
After completing this tutorial, you will know how to:
-
Add a user to a site.
-
View a list of users and view and change details about a user.
-
Change the level of permissions for a user.
-
Give a user or group access to a specific SharePoint list.
Before you begin
To complete this tutorial, you'll need to be a member of the Administrator site group on a Windows SharePoint Services site. It's best to try out these tutorials on a site that's not being used by a team.
Create a practice site
-
On the top link bar in an existing site, click Create.
-
In the Web Pages section, click Sites and Workspaces.
-
In the Title and Description section, type a name, such as Practice Site, and a description for the new site.
-
In the Web Site Address section, complete the Web address (URL) that you will type to go to the new site.
The first part of the address is provided for you.
-
In the Permissions section, click Use unique permissions.
-
Click Create.
-
On the Template Selection page, in the Template list, click Team Site, and then click OK.
Now that you have your practice site, you can create a practice list.
Create a practice list
-
On the top link bar in your practice site, click Create.
-
In the Custom Lists section, click Custom List.
-
In the Name box, type Incentives, and then click Create.
With your practice site set up, you're ready to manage the users and permissions on the site.
Adding users to a site
Contoso Corporation recently hired a new salesperson. This employee, Mary North, needs to be added to the site and assigned to the Contributor site group so that she can start working with the other members of the sales team.
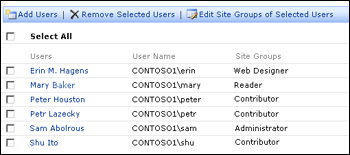
By using the Manage Users page you can see the list of users, sort the list, add users to it, change site group membership, and delete users.
Note: You must be a member of the Administrators site group for the site to be able to use the Manage Users page.

You can use either a domain user address (DOMAIN\username) or an e-mail address (such as someone@example.com) to add a user. If you are adding users from your organization's domain, the user's display name will be looked up and filled in automatically. If you are creating unique accounts based on e-mail addresses, you can fill in the user's display name, or let the user update their display name later.
For this tutorial, you will be adding a fictitious user with a fictitious e-mail address. If you prefer, or if your environment requires a real user name and address, you can add a real user account from your organization.
Add a user to your site
-
On your practice Web site, click Site Settings.
-
On the Site Settings page, in the Administration section, click Manage users.
-
On the Manage Users page, click Add Users.
-
In the Step 1: Choose Users section type mary@contoso.com to add a fictitious user (Mary North).
You can also type the actual e-mail address or DOMAIN\username of a user in your organization to add a real user.
-
In the Step 2: Choose Permissions section, select the Contributor check box, and then click Next.
-
In the Step 3: Confirm Users section, verify the e-mail address, and if you are adding a fictitious user, type maryn as the user name and Mary North as the display name.
If you are using a real user account, verify the user name and display name for that account.
-
In the Step 4: Send E-mail section, clear the Send the following e-mail to let these users know they've been added check box.
Note: Because this is a practice exercise, you do not want to send an e-mail message to your new user.
-
Click Finish.
If the message "The user does not exist" appears, try repeating these steps by using information for a real user in your organization.
Viewing and changing information about site users
Mary North recently changed her name to Mary Baker. You did not know about the name change when you added her account, so you must now update it so that her new name is reflected on your site.
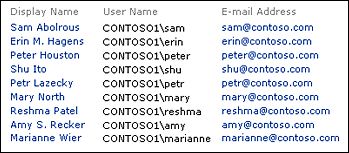
You can see a list of all users who belong to a site from the User Information page. This list displays summary information, and you can click each user name to see details about that user.
View a list of users
-
On your practice site, click Site Settings.
-
Under Manage My Information, click View information about site users.
You can view a list of all users on the site.

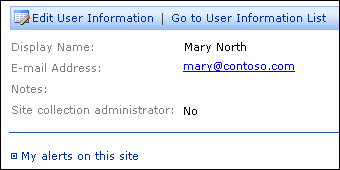
If you click a user name, you can see the user's e-mail address and any notes about that user that a site administrator has added. If you are a member of the Administrators site group, you can also see whether the user is a site administrator (or owner of the site) and you can change the user's information.

Note: Any member of the site can see the list of users on the User Information page, and can click to view details about a user. However, only a member of the Administrator site group, or the users themselves, can change the user information.
Change a user's name
-
On the User Information page, click Mary North (or the user account you added).
-
Click Edit User Information.
-
In the Display Name box, select "North" and type "Baker" (or change the corresponding last name for the user account you created).
-
Click Save and Close.
Assigning users to groups
Mary Baker, previously Mary North, has been assigned to help you create content for your site and make sure that the site design is fresh and interesting. She can currently add and change only items in lists and libraries, but now she needs to be able to change more of the site. You can grant her more extensive rights so that she can make the changes she needs to.
In Windows SharePoint Services, rights to a site are controlled by membership in site groups. Users must be assigned to a site group to be able to view a site, or make any changes to a site. There are five site groups by default:
-
Guest A special group that gives guest users access to a specific list, without giving them access to the entire site. (See the following section, "Setting user permissions on a list or document library", for more information about the Guest site group.)
-
Reader Allows a user to view items in lists and document libraries, view pages in the site, and create a site by using Self-Service Site Creation.
-
Contributor Allows a user to interact with Web Parts and lists and document libraries. They can also create and manage personal views and cross-site groups, and personalize Web Part Pages.
-
Web Designer Allows a user to customize the Web site by using the HTML tools or a Web page editor compatible with Windows SharePoint Services, such as Microsoft Office FrontPage 2003. For example, members of the Web Designer site group can create lists from within the site or add pages to the site by using a Web page editor.
-
Administrator Allows a user to have complete control over a Web site. Members of the Administrator site group can configure settings, manage users and site groups, and view usage analysis data.
When you added Mary North (now Baker) to the site, you assigned her to the Contributor site group. You can change these assignments at any time. If you want to change which site groups a user is a member of, you use the Manage Users page. You must be a member of the Administrators site group for the site to use the Manage Users page.
If you remove a user from all site groups, that user no longer has any rights on the site.
Assign a user to a different site group
-
On the top navigation bar for your practice site, click Site Settings.
-
On the Site Settings page, in the Administration section, click Manage Users.
-
On the Manage Users page, select the check box next to Mary Baker (or the user you created).
-
Click Edit Site Group of Selected Users.
-
In the Site Group Membership area, select the check box next to Web Designer and clear the check box next to Contributor.
-
Click OK.
Mary Baker is now a member of the Web Designers site group, and can create lists or change the site as needed.
Setting user permissions on a list or document library
Your site contains an incentives list — a list of perks that are granted to help motivate the salespeople to generate revenue. You need to secure this list so that only Mary Baker can add, change, or delete the incentives, but you also must make sure everyone else can view the list.
With Windows SharePoint Services, you can set specific permissions for a list or document library, separate from the rest of the Web site. You can remove the users who should not have access to the list and add only those who should.
For example, by default, members of the Contributor site group can view, insert, edit, and delete items in lists and document libraries. If you want only three people to have these rights on your incentives list, you can remove the Contributor site group's permissions on that list, and simply add the three users with the appropriate rights.
When you grant users permission to a list or document library, you do so by selecting the actual permissions you want them to have. So, if you want a user to be able to view items, you click View items.
Per-list and per-document library permissions are managed from the list or document library itself. You can add or remove users for a list or document library without adding or removing them from the site as a whole.
If you do add a user to a list or document library who is not already a member of the site, the user is added to the site, but assigned to the Guest site group. This special site group is only used to grant users permissions to a specific list or document library but conveys no additional rights to the site as a whole. Members of the Guest site group can see the left and top navigation bars when they view the list or document library.
Assign list or library permissions to a user
-
In the Quick Launch bar on the Home page of your practice site, in the Lists section, click Incentives.
-
In the Actions list, click Modify settings and columns.
-
On the Customize Incentives page, in the General Settings section, click Change permissions for this list.
-
On the list toolbar, click Add Users.
-
In the Step 1: Choose Users section, in the Users area, in the text box, type mary@contoso.com to add Mary Baker, or type the e-mail address or DOMAIN\user name of the user you previously added.
-
In the Step 2: Choose Permissions section, under Site groups, click View, insert, edit, delete items; change list settings, and then click Next.
-
In the Step 3: Confirm Users section, verify that the e-mail address, user name, and display name for Mary Baker (or your other user) are correct.
-
In the Step 4: Send E-Mail section, clear the Send the following e-mail to let these users know they've been added check box.
Note: Because this is a practice exercise, you do not want to send an e-mail message to your new user.
-
Click Finish.
Although the preceding procedure steps you through assigning per-list permissions for a specific user, these same steps can be used for a document library. Just go to the document library page, click Modify settings and columns, and on the Customize <Document Library Name> page, click Change permissions for this document library, and then follow steps 4 through 9 below.
Now that Mary Baker has permissions to change the list, you need to change the permissions of the Contributor site group to prevent members from changing the list. Again, this procedure can also work for a document library.
Change list or library permissions for a site group
-
On the Change Permissions: Incentives page, select the Contributor check box, and then click Edit Permissions of Selected Users.
-
In the Choose Permissions section, click View items, and then click OK.
Again, this procedure can also work for a document library.
Suggested next steps
After you have completed this tutorial, you should delete your practice user so that you don't leave a fictitious user on your site. To delete a user, on the Site Settings page, click Manage Users. On the Manage Users page, select the check box next to Mary North, and then click Remove Selected Users.
You may also want to delete your practice site so that you don't waste your server resources. To delete a site, on the Site Settings page, click Go to Site Administration. On the Site Administration page, in the Management and Statistics section, click Delete this site. On the confirmation page, click Delete.
The tasks in this tutorial are not intended to be an exhaustive list of the administration tasks for a site based on Windows SharePoint Services. They are merely representative of the types of tasks you need to perform when you manage a SharePoint site. For more information about managing your site, see the Help system.
The example companies, organizations, products, domain names, e-mail addresses, logos, people, places, and events depicted herein are fictitious. No association with any real company, organization, product, domain name, email address, logo, person, places, or events is intended or should be inferred.
No comments:
Post a Comment