Create an outline to structure notes
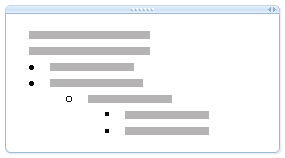
The outline feature in OneNote makes quick work of organizing long or complex documents, plans, and presentations. It can organize up to five levels of information, and it starts to assign a hierarchical structure to your notes as soon as you indent one paragraph under another.

You can promote or demote items in the outline hierarchy by changing their indentation. You can also organize information into headings and subheadings, apply numbered and bulleted lists, and control which levels of information are displayed.
Outlines are a great way to organize information and create a hierarchical structure to your notes. You can collapse and expand up to five levels of content in an outline so you can see the big picture at a glance.

Create an outline
-
Type a line or paragraph of text, and then press Enter.
The first paragraph you type is formatted as Level 1 of the outline.
-
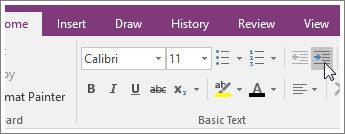
To make the second paragraph a subparagraph (Level 2) of the first, click Increase Indent Position.

-
On the indented line, type the second paragraph, and then press Enter.
As you type each additional paragraph below the next, increase or decrease the indentation position to either raise or lower the hierarchy of a particular paragraph.
Note: Each new paragraph you create automatically continues at the same level as the previous paragraph unless you increase or decrease its indentation.
In large outlines, adding bullets and numbering will give you a more detailed structure.
Collapse an outline
One of the benefits of structuring notes in an outline format is that you can hide sublevels.
-
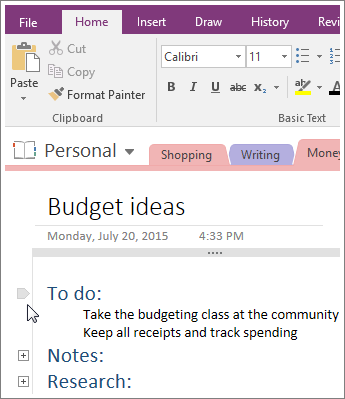
Move the mouse pointer to a Level 1 paragraph, and then double-click the small gripper icon.
(If you're using OneNote 2010, your gripper icon will look like a four headed arrow in a box.)

You can expand an outline the same way. Double-click the small gripper icon again.
Notes:
-
For any paragraph with subheadings, you can choose how many levels you want to display. Simply right-click the gripper icon, click Select, and choose a level.
-
If you usually place the same kind of information at the same level in your outlined notes, you can select all text at that level. Right-click the gripper icon, click Select, and then click Select All at Level 1, Select All at Level 2, or whatever level you want.
What do you want to do?
Create an outline
-
Type a paragraph of text, and then press ENTER.
The first paragraph you type is automatically formatted as level 1 of the outline.
-
If the Outlining toolbar is not already showing, point to Toolbars on the View menu, and then click Outlining.
-
To make the second paragraph a subparagraph (level 2) of the first, press TAB or click Increase Indent
 on the Outlining toolbar.
 -
Type the second paragraph, and then press ENTER.
-
As you type each additional paragraph, increase or decrease the indentation to raise or lower the hierarchy of the paragraph. To decrease the indentation, press BACKSPACE (or SHIFT+TAB if your outline is also a numbered or bulleted list).
Note: Each new paragraph continues at the same level as the previous paragraph unless you change its indentation.
Format outline paragraphs with bullets and numbering
In large outlines, mere indentations may not adequately show the relationship among the various levels in the outline hierarchy. Bullets and numbering can help to distinguish them.
To apply bullets or numbering to a paragraph in an outline, do the following:
-
Place the cursor on the line of text that you want to apply bullet or numbering formatting to.
-
On the Formatting toolbar, do one of the following:
-
To apply a bullet style, click the arrow next to Bullets
 , and then click the style that you want.
 -
To apply a numbering style, click the arrow next to Numbering
 , and then click the style that you want.
-
-
The next paragraph will continue the bullet or numbering format unless you cancel it. To cancel bullet or numbering formatting for the new paragraph, click Bullets or Numbering on the Formatting toolbar.
Expand or collapse an outline
You can use the Expand and Collapse commands on the Outlining toolbar to view certain levels of the outline.
-
Click the paragraph handle
 next to any text at the level that you want to expand or collapse.
 -
If the Outlining toolbar is not already showing, point to Toolbars on the View menu, and then click Outlining.
-
On the Outlining toolbar, do one of the following:
-
To expand the outline elements, click Expand, and then click a level to show all paragraphs that are at that level.
-
To collapse the elements, click Collapse, and then click a level to hide all paragraphs that are at that level.
Note: Whenever you collapse a paragraph in an outline by clicking its handle, be sure you use the Type Text or Select Objects
 tool instead of the Pen
  tool.
tool.
-
Show text based on the outline hierarchy
For any paragraph with subheadings, you can choose how many levels of the hierarchy you want to display, up to five levels.
-
Right-click the handle of a collapsed heading.
-
On the shortcut menu, point to Hide Levels Below, and then click the level that you want.
Select all text at the same level of the outline hierarchy
If you consistently place the same kind of information at the same level in your outlined notes — for example, if you list projects as level 1 headings and tasks as level 2 headings — selecting all of the notes on a specific level can help you work more quickly.
-
Right-click the handle of a line of text at the level that you want to display.
-
On the shortcut menu, click Select All at Same Level.
No comments:
Post a Comment