Create a workflow initiation form
You may want your workflow to collect information from the person who starts it, and then reference this information later in the workflow. For example, imagine that you are designing a workflow that assigns a document review task. In some workflows of this kind, it might make sense to always automatically assign the review task to the same participant and to always use the same formula for calculating the due date. But in your workflow, you want the person who manually starts the workflow to specify both the reviewer and the due date. You can set this up by adding custom fields to the workflow initiation form and requiring that the workflow be started manually.
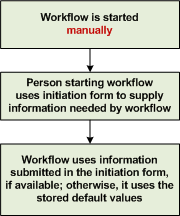
You can also use the parameters supplied in an initiation form to instruct the workflow to include or exclude specified actions or steps, or which choice to make between alternative branches. Alternatively, you can set up your workflow to copy information from the initiation form into the current list item, where that information can be referenced by a secondary workflow.
This article explains how initiation forms work and provides examples and instructions for setting up initiation forms for a variety of purposes.
In this article
What is an initiation form?
The initiation form is the page that is presented each time that a person starts a workflow manually. The default initiation form is very simple, including only the name of the workflow and two buttons, Start and Cancel.
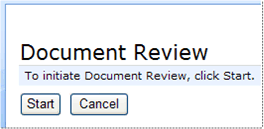
You can build upon this simple form by adding one or more form fields. Using these fields, the person starting the workflow can provide information that the workflow needs to complete its processes.
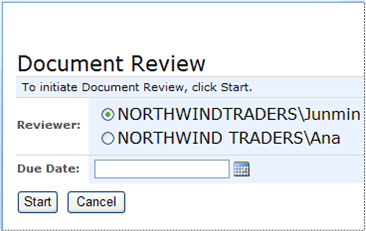
The initiation form can have as many form fields as you choose to create. The following form provides fields for specifying a reviewer and a due date.
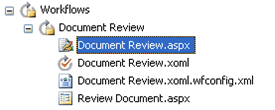
In Office SharePoint Designer 2007, the initiation form appears as an .aspx page in the folder for that workflow. The file name of the initiation form corresponds to the name of the workflow.
An initiation form is attached to the site's default master page and contains a Data Form Web Part to interact with the workflow. The initiation form can be customized for layout and appearance — for example, you can attach a different master page or modify the styles. However, to change which fields appear on the form, or to change the format or default values of any field, you must use the Workflow Initiation Parameters dialog box in the Workflow Designer. You cannot make such changes to the form fields by editing the Data Form Web Part directly.
Important: If you make customizations to the layout and appearance of the Data Form Web Part (that is, changes for presentation and not for functionality), note that such changes are lost each time that the workflow is recompiled. Layout and appearance customizations that you make to the rest of .aspx page are preserved.
If you create a form field by using the Workflow Initiation Parameters dialog box and then later change the format of that field, you may see the following warning.

If you make changes to the fields on the initiation form and then recompile the workflow, any running instances of the workflow continue to run but are able to reference only the data and data formats that are available in the new form. If you delete or modify a field (for example, by renaming it or changing its format) and then a running instance of the workflow attempts to reference data that is either present in an unexpected format or not present at all, a workflow error occurs. Therefore, it is important not to make any change that deletes, renames, or otherwise alters any form field that currently running workflow instances may attempt to reference.
Sometimes, you may set up a workflow to copy information from an initiation form field into a field in a list item. For example, a person starting a primary workflow can specify on the initiation form a due date for a document review task, and the primary workflow can copy that date into a Due Date field in the current item, where that date could subsequently be referenced by a secondary workflow that sends due-date reminders. In such a case, it is important to ensure that the information entered on the initiation form and copied into the list-item field is not changed while the secondary workflow still needs to be able to reference it. This is particularly important to remember if the secondary workflow pauses or waits for any period of time.
What are the types of initiation form fields?
The following illustration shows an example of each type of initiation form field.
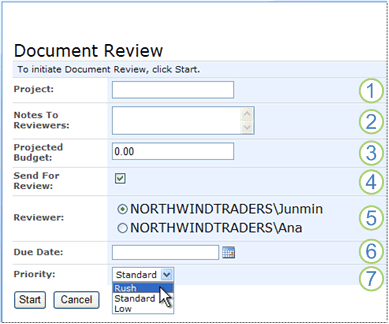
1. Single line of text
2. Multiple lines of text
3. Number
4. Yes/No (check box)
5. Choice (menu to choose from) as radio buttons
6. Date and Time
7. Choice (menu to choose from) as drop-down menu
You should choose the appropriate field type for each parameter that you create:
-
Single line of text Use this field type for a brief free-form text response.
-
Multiple lines of text Use this field type for a free-form text response of any length.
-
Number This field type is intended for numerical values only. Do not include commas in the default value.
-
Date and Time For this field type, you have a choice of three default values (a blank field, or the date and time of the item's creation, or a specific date and time that you indicate) and two display formats (date only, or date and time).
-
Choice (menu to choose from) This field type can be displayed on the form either as a drop-down menu or as a set of radio buttons. In either case, only one of the listed items can be selected at any one time.
-
Yes/No (check box) If you do not specify the default value for fields of this type, a default value of Yes is assigned.
For all field types, if a default value is specified, it is displayed on the form.
Here are some considerations to keep in mind when you are working with initiation form fields:
-
Data validation Most of the field types currently available for use on the initiation form provide little or no data validation. It is not possible, for example, to set up a Date and Time field to check whether the date entered is later than today. (Of course, you can include a workflow step that tests whether an entered date falls within a specified range — and, if it does not, sends an e-mail message about the discrepancy to the person who started the workflow, and then stops the workflow.) The lowest level of data validation is provided by the fields Single line of text, Multiple lines of text, and Number, each of which accepts any entry that does not exceed the maximum character length. (Though Number accepts only numeric values as default values, it accepts both numeric and text values from the person who starts the workflow and completes the initiation form.) The strongest data verification is provided by the Choice (menu to choose from) field, for which the person who starts the workflow must choose one of the pre-formatted options specified by the form.
-
Field descriptions and instructions The individual fields on an initiation form do not provide a space for a description of the field or for instructions about how information should be entered. However, you can add descriptions and instructions for the entire initiation form — including instructions about which fields must be contain a value and which fields can be left blank — by editing the .aspx page. Just make sure that you add your descriptions and instructions outside of the Data Form Web Part, so that they are not lost when the workflow is recompiled.
-
Range of fields available Because an initiation form is not associated with a list item — unlike a custom task form, which is associated with an item in a tasks list — the initiation form does not provide as many types of form fields as the custom task form does.
What are default values and when do I use them?
When you design the initiation form, you choose whether or not to supply a default value for each of the parameters that you define. If you supply a default value for a parameter, and the person starting the workflow does not replace the default value with another value, then the workflow will use the default value.
Therefore, if the workflow requires a non-blank value in any parameter in order to run correctly, it is a good idea to specify a default value. For example, in the example Document Review workflow, you can supply a default reviewer and a default priority level on the initiation form.
If the workflow must have a non-blank value in a field for which there is no safe or appropriate default value, it is a good idea to set up the first step of the workflow to test whether the required field is blank. If it is, the workflow can stop — but only after sending an e-mail message to the person who started it, explaining that they must start a new instance of the workflow on the same item, this time specifying a value in the required field.
The only parameter type that always has a default value is the Yes/No (check box) parameter, which is always set to default either to Yes or to No.
Important: If you set up your workflow to start automatically, and if you do not supply a default value for one or more parameters, you will see the following message, reminding you that blank values in some parameters might prevent the workflow from running correctly.

Example 1: Provide information to the current workflow
If you are using your workflow to assign a task (like the document review task in our example) and you want the person starting the workflow to be able to choose the people to assign the task to, you can set that up by adding a parameter to the initiation form.
Add a Reviewer field to the initiation form
To add the Reviewer parameter:
-
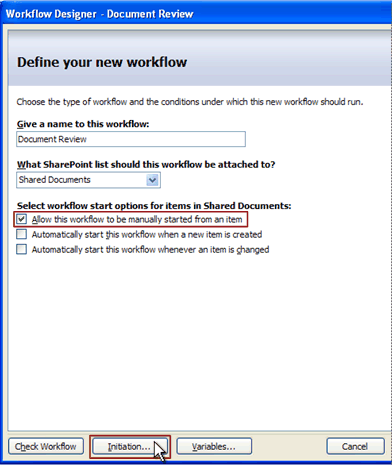
In the Workflow Designer, make sure that the workflow can be started only manually and not automatically, and then click Initiation.
-
In the Workflow Initiation Parameters dialog box, click Add.
-
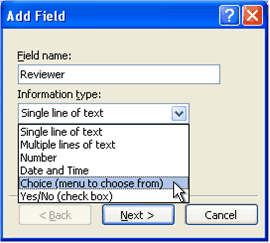
In the Add Field dialog box, name the new field Reviewer and then, in the Information type box list, click Choice (menu to choose from).
-
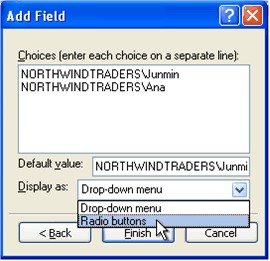
Click Next and then, in the Choices (enter each choice on a separate line) box, type the e-mail addresses of the reviewers that you want to offer as options for this parameter.
Note: When sending an e-mail message, a workflow can use either the domain name\user name or the full e-mail address of a person — for example, either NORTHWINDTRADERS\Ana and Ana@Northwindtraders.com would work on the To or Cc lines of a workflow e-mail message.
-
In the Default value box, specify the reviewer whom you want the workflow to use if the person completing the initiation form makes no changes to this parameter.
Important: If you do not supply a default value for a field in which the workflow requires information, and if the person who starts the workflow also does not enter a value for that field, the workflow will fail.
-
In the Display as list, click either Drop-down menu or Radio buttons. (In this example, Radio buttons is selected.)
-
Click Finish and then, in the Workflow Initiation Parameters dialog box, click OK.
Configure a workflow action to use an initiation form parameter
To set up the workflow to assign the document review task to the participants specified in the initiation form:
-
In the Workflow Designer, on the page that represents the step where you want to locate the task, click Actions, and then click the action that you want.
For this example, click Assign a To-do item.
-
In the action, click a to-do item and then, in the Custom Task Wizard, click Next, and then name the task Review Document.
-
In the Description box, type the instructions to include in the task, and then click Finish.
-
In the action, click these users.
-
In the Select Users dialog box, in the Or select from existing Users and Groups list, click Workflow Lookup, and then click Add.
-
In the Define Workflow Lookup dialog box, choose the following options:
-
Source: Workflow Data
-
Field: Initiation: Reviewer
-
-
Click OK, and then click OK again to close the Select Users dialog box.
Your action now looks like this.

Using the Reviewer field on the initiation form, the person who starts the workflow can now tell the workflow which person to assign the task to.
In the next section, you learn how to use the initiation form to help the workflow decide whether or not to perform a particular action or set of actions.
Example 2: Instruct the current workflow to skip or include a step or action
Sometimes you may want a step in your workflow to run or not to run on a particular list item based on specific information about that item. For example, you might have a New Document workflow that you run on every new document in your Shared Documents library, but you might want a Review Document task that is included in the workflow to run only on selected documents and not on others.
Add a Send For Review field to the initiation form
To add the Send For Review parameter:
-
In the Workflow Designer, make sure that the workflow can be started only manually and not automatically, and then click Initiation.
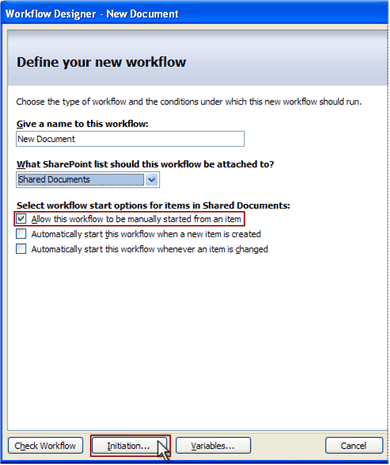
-
In the Workflow Initiation Parameters dialog box, click Add.
-
In the Add Field dialog box, name the new field Send For Review and then, in the Information type list, click Yes/No (check box).
-
Click Next, and then specify a default value (if you do not specify a value, the field defaults to Yes).
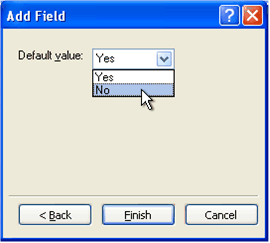
-
Click Finish and then, in the Workflow Initiation Parameters dialog box, click OK.
Add a condition to the workflow
To set up the workflow to use the Send For Review value to decide whether or not to run the current workflow step (in the example, the step in which the Review Document task is assigned):
-
In the Workflow Designer, on the page of the workflow that represents the step that you want to associate with the check box, click Conditions, and then click Compare any data source.
-
In the condition, click the first value, and then click Display data binding
 .
. -
In the Define Workflow Lookup dialog box, choose the following options:
-
Source: Workflow Data
-
Field: Initiation: Send For Review
-
-
Click OK.
-
In the condition, click the second value and then, in the list, click Yes.
Your condition now looks like the one in the following illustration.
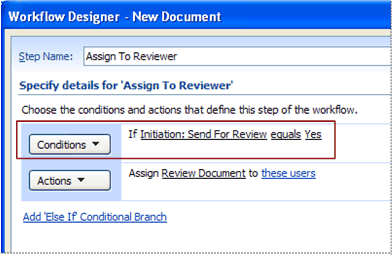
Now, by using the check box on the initiation form, the person who starts the workflow can inform the workflow to perform or not to perform the actions in the current step.
In the next section, you learn how to copy information from the initiation form into the current list item so that a secondary workflow can reference the information.
Example 3: Provide information to a secondary workflow
If you are using a secondary workflow running on the Tasks list to set due dates for tasks that are created by a primary workflow on another list (in the example, the Shared Documents library), you can use the initiation form of the primary workflow to specify a due date for the task. For more information about secondary workflows, see the article Create a secondary workflow.
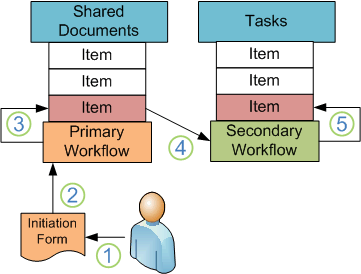
1. Person starting primary workflow specifies due date.
2. Initiation form supplies due date to primary workflow.
3. Primary workflow copies due date into Due Date field of current list item.
4. Secondary workflow acquires due date by querying list item.
5. Secondary workflow copies due date to task item.
Notes:
-
For a secondary workflow to reference the original list item on which the primary workflow runs, the secondary workflow must know the list item ID of that original item. Only task items that were created by one of the workflow task actions automatically know this list item ID, which is stored in the Workflow Item ID column in the task list. If your secondary workflow runs on a list that is not a tasks list but needs to reference the original item, then the primary workflow must store the list item ID of the item that it is running on in the item that it creates and on which the secondary workflow runs. You can set this up by adding a lookup column to the list where the secondary workflow runs, where this lookup column references the ID column of the list or library that the primary workflow runs on. Then, when you configure the primary workflow to create an item in the list that the secondary workflow runs on, you map the list item ID of the primary workflow's current item to the lookup field in the other list.
-
If you have not already added the Due Date column to the Shared Documents library, you must do so before you perform the procedures in this section. If you want to include both date and time information in this column, be sure to make that selection in the Additional Column Settings section of the Add Columns page.
If you do not want the Due Date field to appear on forms such as EditForm.aspx, where people can change the field's value, you can hide this field from forms. To do so, first make sure that the management of content types is allowed in the list or library (on the list Settings page, click Advanced Settings). Then, hide the Due Date field separately for each content type (on the list Settings page, click a content type, then click the Due Date column, and then select Hidden (Will not appear in forms)). Note that you can hide a column only per content type, and not for an entire list or library at once.
Add a Due Date field to the initiation form
To add the Due Date parameter:
-
In the Workflow Initiation Parameters dialog box, click Add.
-
In the Add Field dialog box, name the new field Due Date and then, in the Information type box list, click Date and Time.
-
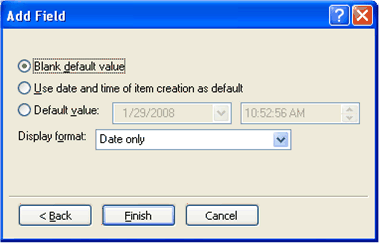
Click Next, and then make sure that the Blank default value radio button is selected and that Date only is selected in the Display format box.
-
Click Finish and then, in the Workflow Initiation Parameters dialog box, click OK.
The field is added to the initiation form.

Use the primary workflow to set the current item's due date
To set up the workflow to copy the due date value from the initiation form to the Due Date field of the current list item:
-
In the Workflow Designer, click Actions, and then click Set Field in Current Item.
If this action does not appear in the list, click More Actions to see the full list.
-
In the action, click field and then, in the list, click Due Date.
-
In the action, click value, and then click Display data binding
 .
. -
In the Define Workflow Lookup dialog box, choose the following options:
-
Source: Workflow Data
-
Field: Initiation: Due Date
-
-
Click OK.
Now, when the person starting the workflow specifies a due date (or due date and time) on the initiation form, that value is copied to the Due Date column for the list item.
Note: The primary workflow must perform this action before it assigns the task, because the primary workflow pauses immediately after it assigns the task, and the secondary workflow queries for the due date information while the primary workflow is still paused.
Use the secondary workflow to copy the due date to the task item
To set up the secondary workflow to copy the Due Date value from the Shared Documents list item to the Tasks list item:
-
With the secondary workflow open in the Workflow Designer, on the page that represents the step where you want to set the Due Date value for the task, click Actions, and then click Set Field in Current Item.
-
In the action, click field and then, in the list, click Due Date.
-
In the action, click value, and then click Display data binding
 .
. -
In the Define Workflow Lookup dialog box, choose the following options:
-
Source: Shared Documents
-
Field: Due Date
-
Field: Shared Documents: ID
-
Value: Click Display data binding
 .
.A second Define Workflow Lookup dialog box opens. Choose the following options:
-
Source: Current Item
-
Field: Workflow Item ID
-
-
Click OK.
The first Define Workflow Lookup dialog box now looks like this one.
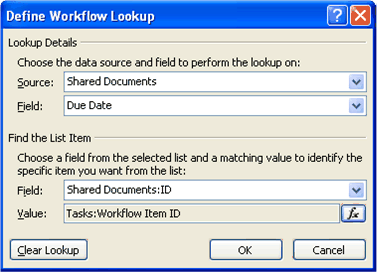
This lookup says, '"Go to the Due Date column in the Shared Documents library, then go to the row in that library whose ID matches the Workflow Item ID stored in the current item in the Tasks list, and retrieve the Due Date value from that row."
-
Click OK.
Your action now looks like the one shown here.

Now, when the person who starts the primary workflow uses the initiation form to set a due date value in the current item in the Shared Documents library, the secondary workflow running on the Tasks list can retrieve that due date and use it for sending due date reminders and performing other actions.
You can use the same basic procedures employed in this section to set or update other values in both the current item and the task item.
How can I set or update other values in the current list item?
To set or update other values in the current list item by using information supplied on the workflow initiation form, you can use the same general process that is used in the Example 3: Provide information to a secondary workflow section of this article:
-
Add a parameter for the desired information to the initiation form.
-
Set up the workflow to copy the value entered in the initiation form field into the appropriate field of the current list item.
You can include conditions to instruct the workflow to copy or not to copy a value under specified circumstances, or to check a value in the initiation form and then make a change to a current item field other than simply copying the initiation form value into it.
For example, the workflow could check the value entered in a Projected Budget field on the initiation form, and then set a Projected Budget field in the current item to either High or Low, depending on the level of projected expense.
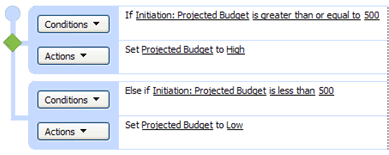
In the next section, you will learn about how the workflow can reset the values originally supplied in the initiation form, by using the initiation form parameters as local workflow variables.
How can I use a parameter as a dynamic workflow variable?
The values specified for an initiation form parameter by the person starting the workflow can be replaced by other values while the workflow is running, and thus can be used as local variables within the workflow.
If there is a parameter the value of which may change from step to step in your workflow — either because of calculations performed by the workflow itself or because of input from one of the people participating in the workflow — then whenever appropriate the workflow can use the Set Workflow Variable action to reset that value.
For example, the following illustration shows an action in a workflow step that is set up to dynamically change an initiation form value

No comments:
Post a Comment