Wednesday, June 30, 2021

Pv function

Returns a Double specifying the present value of an annuity based on periodic, fixed payments to be paid in the future and a fixed interest rate.

Syntax

PV( rate, nper , pmt [, fv ] [, type ] )

The PV function syntax has these arguments:

Argument

Description

rate

Required. Double specifying interest rate per period. For example, if you get a car loan at an annual percentage rate (APR) of 10 percent and make monthly payments, the rate per period is 0.1/12, or 0.0083.

nper

Required. Integer specifying total number of payment periods in the annuity. For example, if you make monthly payments on a four-year car loan, your loan has a total of 4 * 12 (or 48) payment periods.

pmt

Required. Double specifying payment to be made each period. Payments usually contain principal and interest that doesn't change over the life of the annuity.

fv

Optional. Variant specifying future value or cash balance you want after you've made the final payment. For example, the future value of a loan is $0 because that's its value after the final payment. However, if you want to save $50,000 over 18 years for your child's education, then $50,000 is the future value. If omitted, 0 is assumed.

type

Optional. Variant specifying when payments are due. Use 0 if payments are due at the end of the payment period, or use 1 if payments are due at the beginning of the period. If omitted, 0 is assumed.

Remarks

An annuity is a series of fixed cash payments made over a period of time. An annuity can be a loan (such as a home mortgage) or an investment (such as a monthly savings plan).

The rate and nper arguments must be calculated using payment periods expressed in the same units. For example, if rate is calculated using months, nper must also be calculated using months.

For all arguments, cash paid out (such as deposits to savings) is represented by negative numbers; cash received (such as dividend checks) is represented by positive numbers.

Query example

Expression

Results

SELECT FinancialSample.*, PV([AnnualRate]/12,[TermInYears]*12,-[MonthlyRePayment],0,0) AS PresentValue FROM FinancialSample;

Returns all the fields from the table "FinancialSample", calculate the Present value of an annuity based on the "AnnualRate","MonthlyRePayment" and "TermInYears" and displays the results in column PresentValue.

VBA example

Note: Examples that follow demonstrate the use of this function in a Visual Basic for Applications (VBA) module. For more information about working with VBA, select Developer Reference in the drop-down list next to Search and enter one or more terms in the search box.

In this example, the PV function returns the present value of an $1,000,000 annuity that will provide $50,000 a year for the next 20 years. Provided are the expected annual percentage rate (APR), the total number of payments (TotPmts), the amount of each payment (YrIncome), the total future value of the investment (FVal), and a number that indicates whether each payment is made at the beginning or end of the payment period (PayType). Note that YrIncome is a negative number because it represents cash paid out from the annuity each year.

Dim Fmt, APR, TotPmts, YrIncome, FVal, PayType, PVal
Const ENDPERIOD = 0, BEGINPERIOD = 1
Fmt = "###,##0.00" ' Define money format.
APR = .0825 ' Annual percentage rate.
TotPmts = 20 ' Total number of payments.
YrIncome = 50000 ' Yearly income.
FVal = 1000000 ' Future value.
PayType = BEGINPERIOD ' Payment at beginning of month.
PVal = PV(APR, TotPmts, -YrIncome, FVal, PayType)
MsgBox "The present value is " & Format(PVal, Fmt) & "."

Join or leave an outlook com group

Currently, you can't join an Outlook.com group unless an owner or member adds you. To learn more, see Create an Outlook.com group and add members. If you've been added to a group, you can leave the group at any time.

If you've been added to a group using your Microsoft Account - an Outlook.com, Hotmail.com, or Live.com email address - the other members of the group will be able to see the current display name, and primary email address of your account.

Leave an Outlook.com group

There are several ways to leave an Outlook.com group. 
 

Notes: 

  • Of course you can always ask the group owner, or the member who added you, to remove you from the group. 

  • If you are the last group owner and you leave the group, the other members will be notified and the group's data and content will be deleted in 30 days. If you want the group to continue after you leave you'll need to make somebody else (or better yet, two people) group owner before you leave the group. To learn how to make a member an owner, see Create an Outlook.com group and add members.

Leave the group from the original welcome message

All group members can leave a group by using the Leave group option in the group's welcome email message. 

  1. Search for the group's welcome email in your inbox. If you don't see it in your inbox it's possible it went into your junk e-mail, or spam, folder.

  2. Scroll down to the message footer and select Leave group.

  3. On the confirmation page, select OK.

Outlook.com, Hotmail.com, and Live.com group members

If you've been added to a group with your Outlook.com, Hotmail.com, or Live.com email addresses, you have two additional ways to leave the group. 

Leave the group from the Group Settings pane

  1. In the left pane, under Groups, select the group you want to leave.

    Screenshot of a group in the left pane

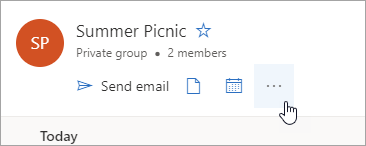
  2. At the top of the message list, select More options icon > Settings.

    A screenshot of the More options button

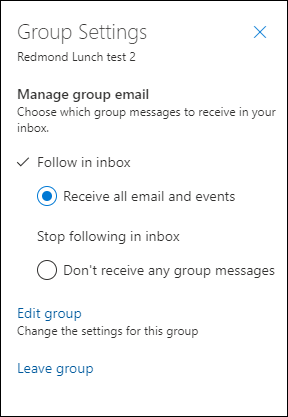
  3. Select Leave group.
    You can leave a group from the Group Settings.

Leave the group from the group card

  1. Select the group you want to leave.

  2. Click on the group name to pull up the group card.

  3. Go to the Member tab.

  4. Click the X next to your account to remove yourself from the group. You can also remove any other members you have added to the group.

See Also

Learn more about Outlook.com groups

Edit or delete an Outlook.com group

How to change your Microsoft Account display name

Adjust indents and spacing

Change paragraph indents and spacing

  1. Select one or more paragraphs that you want to adjust.

  2. Go to Home and then select the Paragraph dialog box launcher Button image .

  3. Choose the Indents and Spacing tab.

  4. Choose your settings, and then select OK.

The Paragraph dialog box options are described in Adjust indents and spacing.

  1. Select the text you want to adjust.

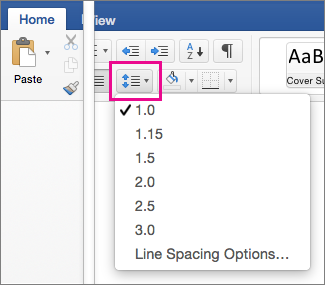
  2. Go to Home and select Line and Paragraph Spacing > Line Spacing Options at the bottom of the menu.

    On the Home tab, Line Spacing is hightlighted

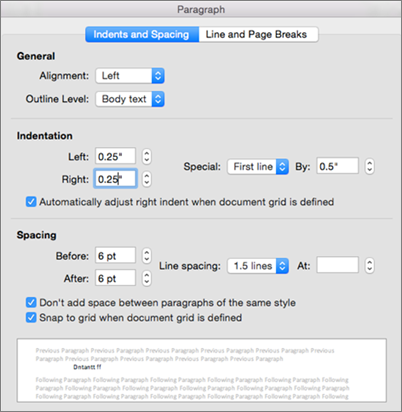
    The Paragraph dialog box opens.

    Paragraph dialog box

  3. On the Indents and Spacing tab, select the options you want, and click OK.

    The Paragraph dialog box options are described in Adjust indents and spacing.

You can quickly adjust indents and spacing in Word for the web.

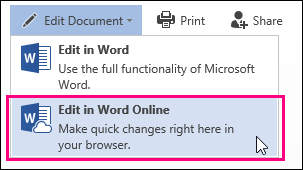
  1. If you're not already in Editing View, select Edit Document > Edit in Word for the web. The doc will switch from Reading View to Editing View.

    Image of Edit in Word Online command

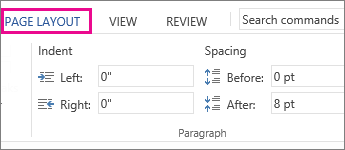
  2. Select Page Layout and notice the Indent left and right and Spacing before and after options.

    Image of Indent and Spacing options on Page Layout tab

  3. Place your cursor at the beginning of the paragraph you want to adjust.

  4. To indent the paragraph, type the distance you want in the Left or Right box under Page Layout.

    For example, type 0.1 to indent the paragraph one tenth of an inch.

  5. To change the amount of space before or after the paragraph, type a number in the Before or After box.

Tip: To change the indents for an entire document, it's much faster to adjust the margins. Under Page Layout, select Margins, and choose the margin settings you want.

Create a new base calendar

Project includes a few different base calendars, by default:

  • Standard: 8AM to 5PM, with a one-hour lunch break at 12PM.

  • 24 Hours: 12AM to 12AM, every day.

  • Night Shift: 11PM to 8AM, with a one-hour break at 3AM.

Notes: 

  • If these calendars aren't quite working, you can adjust them for your project, or create a new base calendar that others can also use.

  • If you changed calendar settings, but the resource's schedule didn't change as you expected, see Troubleshooting below.

Important: Using Project with Project Web App? If so, check with your administrator to request changes to base calendars.

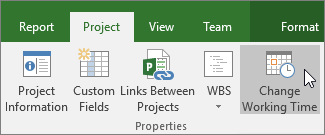
  1. Click Project > Properties > Change Working Time.

    Change Working Time

  2. Click Create New Calendar.

    Create New Calendar

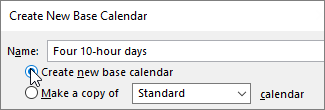
  3. Give the new calendar a Name, select Create new base calendar, and then click OK.

    Create New Base Calendar

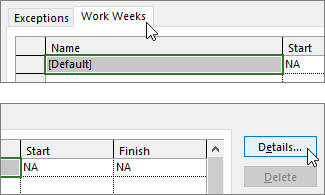
  4. Click the Work Weeks tab, and then click Details.

    Work Weeks tab

    Note: What about holidays? Use the Exceptions tab to add holidays to your schedule. Learn more.

  5. Select the day(s) that you want to change the working times for, and then choose whether you want them to be working or nonworking time.

    Select days and working or nonworking

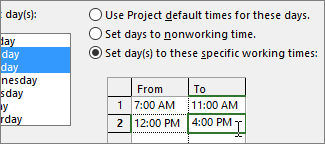
  6. If you chose Set day(s) to these specific working times, use the From and To columns to set the working times for the selected days.

    Set working times

  7. Click OK to return to the Change Working Time dialog box, and then click OK again.

To make your new base calendar available for other projects to use, save the project as a template so this work schedule will be there for every new project created with that template. If you're using Project with Project Web App, contact your administrator to request changes to the base calendars for your entire organization.

Troubleshooting

Project automatically creates a resource calendar (based on the project calendar as specified in the Project Information dialog box) for each resource. If you create a new base calendar for a resource and modify the working time in the new base calendar, but don't base the resource calendar on the new base calendar, it will look as though the calendar settings you entered were ignored. By default, Project will base the resource calendar on the project calendar, unless you specify otherwise.

Note: To make resource calendar changes to an enterprise resource, you must first check out the resource.

Resolution

  • To replace the resource calendar that you created with the default resource calendar (the Standard calendar), choose View > Resource Sheet. Select the resource name, and in the Base Calendar field, choose Standard. The resource is now scheduled using the Standard calendar instead of the one that you created for it. Choose Information on the Resource tab, choose Change Working Time on the General tab, and then reenter the nonworking days and times that you entered for the other calendar.

  • To synchronize multiple calendars to a resource's base calendar (which you created in the Change Working Time dialog box) without replacing the calendars, choose View > Resource Sheet. Select the resource name, choose Information on the Resource tab, and then choose Change Working Time on the General tab. In the Base calendar box, select the name of the resource calendar that you created and modified. The settings of this resource calendar are set for the default resource calendar when you use it as the base calendar.

    If you need to make further changes to this resource's working time or nonworking time, you can do it in either calendar, because the base calendar updates the resource calendar. If you need to use the base calendar for another resource, enter updated information in the base calendar. Further changes that you make to the default resource calendar will not show up in the base calendar.

What else can I do with calendars?

Project enables you to fine-tune scheduling using multiple calendars. If you understand how they all work together, it's easier to plan for how your project's dates will be impacted. Here are a few more articles you might find helpful in building a more accurate picture of the working and nonworking days in your organization.

PROJECTS
Set the general working days and times for a project
Add a holiday to the project calendar

TASKS
Create a calendar for a task

RESOURCES
Set a unique schedule for a specific resource
Add a resource's vacation time
Change resource availability without using a calendar

Tip: If you don't need a calendar anymore, delete it!

Use furigana phonetic guides with japanese text

Some of the content in this topic may not be applicable to some languages.

In Excel, you can choose between three types of phonetic guides: full-width katakana, half-width katakana, and hiragana. You can change the font style, font size, and alignment of phonetic guides. You can modify phonetic guides, and you can add phonetic guides to Japanese data that has been entered in a cell. The phonetic character string that was used to enter the Japanese data is used to apply phonetic guides. When you sort sheet data, Japanese data is sorted by its phonetic guides by default. If the correct phonetic guides have been used on characters that use them, Japanese terms are sorted in the same order as they would occur in a Japanese dictionary. If the phonetic guides are not entered correctly, make the necessary corrections.

When you display phonetic guides in the Japanese version of Excel and enter kanji (Chinese characters that are used in the Japanese language), Excel automatically adds the phonetic symbols to the guides.

Important: If you don't see Display phonetic characters to clairify pronunciation under Font on the Home tab, you must turn on Japanese language features. To learn more, see Change the language Office uses in its menus and proofing tools.

Do any of the following:

Change phonetic guide font or type

  1. Select the cells that contain the phonetic guides whose font or type you want to change.

  2. On the Home tab, under Font, click Display phonetic characters to clarify pronunication  Home tab, Font group, Phonetic Guide button (JPN) , and then click Settings.

  3. Do any of the following:

To

Do this

Change the font

Click the Font tab, and then in the Font box, click the font that you want.

Change the font size

Click the Font tab, and then in the Size box, click the font size that you want.

Change the phonetic guide type

Click the Setting tab, and then under Type, click the phonetic guide type that you want.

Tip: You can apply formatting (such as bold or italic formatting), colors, underlining, or character effects to phonetic guides on the Font tab.

Modify phonetic guides

  1. Select the cell that contains the text with the phonetic guides that you want to change.

  2. On the Home tab, under Font, click Display phonetic characters to clarify pronunication Home tab, Font group, Phonetic Guide button (JPN) , and then click Show Phonetic Fields.

  3. Double-click the cell that contains the phonetic guides that you want to modify, and then click the phonetic guides.

  4. Modify the phonetic guides.

  5. To confirm the modified phonetic guides, press RETURN twice.

    To cancel the changes, press ESC twice.

    Notes: 

    • To use the keyboard to move the cursor to the phonetic guides, press OPTION + SHIFT + UP ARROW . To return to the parent string that the phonetic guides apply to, press OPTION + SHIFT + DOWN ARROW . The color of the parent character string changes while the phonetic guides are being modified.

    • If the displayed phonetic guides are incorrect, you can select the cell that shows the incorrect phonetic guides and change it by using the same method you use to enter a character string. On the Home tab, under Font, click Phonetic, and then click Edit.

Change phonetic guide alignment

The default alignment of phonetic guides is left alignment (that is, placed along the left edge of the kanji to which the phonetic guides apply). You can change the alignment to no alignment (all phonetic guides are combined and aligned along the left edge of the cell), center alignment (centered against the kanji to which the guides apply), or distributed alignment (set with equal spacing against both edges of the kanji to which the guides apply).

  1. Select the cells that contain the phonetic guides whose alignment you want to change.

  2. On the Home tab, under Font, click Display phonetic characters to clarify pronunication  Home tab, Font group, Phonetic Guide button (JPN) , and then click Settings.

  3. On the Setting tab, under Alignment, click the alignment that you want to apply.

Show or hide phonetic guides

  1. Select the cells that contain the phonetic guides that you want to show or hide.

  2. On the Home tab, under Font, click Display phonetic characters to clarify pronunication Home tab, Font group, Phonetic Guide button (JPN) , and then click Show Phonetic Fields.

    When phonetic guides are displayed, the check mark next to Show Phonetic Fields is visible. To hide phonetic guides, clear the check mark.

    Note: Excel automatically adds phonetic symbols only to new data entered in the Japanese version of Excel. If you open files that were created in earlier versions of Excel or in other programs, phonetic symbols are not generated automatically.

See also

Change the language Office uses in its menus and proofing tools

Find text in a document

Looking for text in your document? The Find pane helps you find characters, words, and phrases. If you want, you can also replace it with different text.

If you're in Reading View, switch to Editing View by clicking Edit Document > Edit in Word Web App.

Image of Edit in Word Online command

To open the Find pane from the Edit View, press Ctrl+F, or click Home > Find.

Find button in edit view

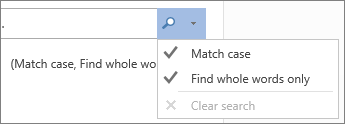
Find text by typing it in the Search the document for… box. Word Web App starts searching as soon as you start typing. To further narrow the search results, click the magnifying glass and select one or both of the search options.

Find and replace options, expanded

Tip:  If you don't see the magnifying glass, click the X at the end of the Search the document for… box. The magnifying glass reappears.

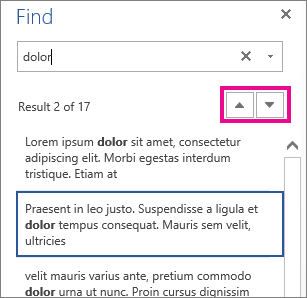
When you type in your document or make a change, Word Web App pauses the search and clears the Find pane. To see the results again, click the Next Search Result or Previous Search Result arrow.

previous search rsult and next search result buttons

When you're done searching, click the X at the end of the Search the document for… box.

Change the font format for hyperlinks

You can change the default hyperlink text styles in a workbook by formatting the Hyperlink or Followed Hyperlink cell styles. Here's how:

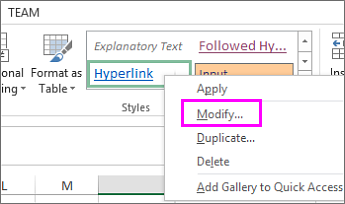
  1. Click the cell with the hyperlink. On the Home tab, right-click the Hyperlink style and pick Modify.

    The Hyperlink Style in the fonts gallery

    Tips: 

    • If you don't see the Hyperlink style, click the arrow to expand the style gallery.

    • click the down arrow in the fornt style gallery to expand view

  2. In the Style box, click Format.

  3. Click Font, choose your formatting options and click OK.

  4. Click OK to close the Style box.

    You can also change the appearance of hyperlinks that were clicked by using the above steps for the Followed Hyperlink style.

    Note: Changes made to Hyperlink or Followed Hyperlink styles are applied to all hyperlinks in the current workbook. You can't change the appearance of individual hyperlinks.

Save hyperlink cell styles for future workbooks

To reuse your hyperlink styles in new workbooks, create a template with your preferred hyperlink styles.

  1. Create a new workbook by clicking File > New > Blank workbook.

  2. Right-click a cell and pick Hyperlink.

    Keyboard Shortcut: Press Ctrl + K.

  3. Type the hyperlink text you want displayed in the Text to display box.

  4. Type a link address in the Address box.

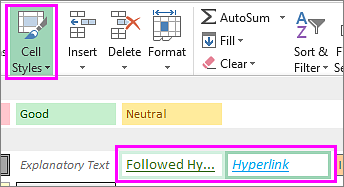
  5. Click the cell with the hyperlink and on the Home tab, click Cell Styles.

  6. Depending on which style you want to change, right-click Followed Hyperlink or Hyperlink and pick Modify.

    Cell style formatting options
  7. In the Style box, click Format and on the Font tab, set your hyperlink font style options.

  8. Click the cell with the hyperlink text and press Delete.

  9. Click File > Save As and browse to the My Templates folder on your computer.

    Note: My Templates folder is usually located at C:\Users\Public\PublicDocuments. If you don't see it, just add a new folder named My Templates.

  10. In the File name box, type a name for your template.

  11. Under Save as type, pick Excel Template and click Save.

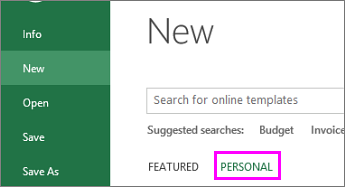
  12. The next time you create a workbook, click File > New > Personal and open your template.

    Click New and Personal to find your new template

For more on using hyperlinks, see Work with hyperlinks in Excel.

Learn more about saving a workbook as a template.

Sign in and get started with teams

Sign in to Teams

  1. Start Teams.

    • In Windows, click Start Start buttonMicrosoft Teams.

    • On Mac, go to the Applications folder and click Microsoft Teams.

    • On mobile, tap the Teams icon.

  2. Sign in with your Microsoft 365 username and password.

Note: Teams is a part of Microsoft 365, so you need a Microsoft 365 Apps for business or Enterprise license to use it. For details, see How do I get access to Microsoft Teams?

Sign in to Microsoft Teams

Pick a team and channel

A team is a collection of people, conversations, files, and tools — all in one place. A channel is a discussion in a team, dedicated to a department, project, or topic.

The best way to get familiar with teams and channels is to pick a team and channel and start exploring!

  1. Select Teams Teams button on the left side of the app and then pick a team.
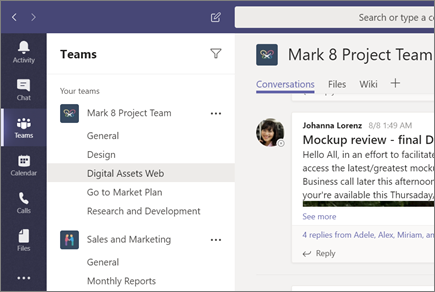
    If you're not on a team and want to create one, see Onboard your teams.

  2. Select a channel and explore the Conversations, Files, and other tabs.

    For more info, see Teams and channels.

Select a team and channel

Next: Chat and share files in Teams

Analyze and visualize hr data with intuitive tools

Compiling and analyzing HR data can be hard when teams are focused on improving employee engagement across the organization. You need an easy way to help employees get insights about their productivity and give companies an aggregated view of their teams to improve processes.

Your browser does not support video.

Details  

HR teams can quickly import and analyze data using Excel. Use the Get & Transform function to import data from multiple HR systems, then use formatting, charts, and graphs to filter data and understand the variables you need to present. 

After you've analyzed your data, use Power BI to present your insights in a meaningful way. Power BI uses an interactive dashboard that makes it easy for stakeholders to see insights. 

Employees can learn about their individual productivity with MyAnalytics. It shows them how much time they spend in meetings versus how much time they have to focus on work. It's completely private, so employees only see their own data. 

Companies can use Workplace Analytics to view and evaluate their team productivity. Workplace Analytics pulls aggregated results from MyAnalytics, but the employees' information remains private. Managers can see if their teams spend too much time in meetings or responding to emails and set up new processes to improve productivity.

Highlights

  • Import and manage your data more efficiently.

  • Present data using interactive visuals to help make informed decisions.

  • Improve individual and team productivity with insights into how employees spend their time.

Learn More

Human Resources sample for Power BI: Take a tour

Change the page setup by using auto size or selecting size and orientation

Page Auto Size extends the diagramming page as needed while you work, which helps you create diagrams that are larger than one printed page.

Auto Size doesn't change the printer paper size when it extends the page. But in combination with the Page Breaks option (View > Show > Page Breaks) it shows you where page breaks would happen if you were to print the diagram.

You can specify the printer paper size and orientation for each page in a multi-page diagram independently of the other pages. If Auto Size is on, it will make the diagram page view match the printer paper size and orientation.

Your browser does not support video.

What do you want to do?

Change printer paper size when Auto Size is on

  1. On the Design tab, in the Page Setup group, click Size.

  2. Click the printer paper size you want to use.

The paper size outlines that are created by page break lines (called tiles) on the current page in your diagram are resized to match the printer paper size.

Top of Page

Change the page orientation to Portrait or Landscape when Auto Size is on

  1. On the Design tab, in the Page Setup group, select Orientation.

  2. Click either Portrait or Landscape.

The tile orientation (as shown by page break lines) is set for the current page.

Top of Page

Advanced page setup

You can set the diagram page size and the printer paper size independently by using the Page Setup dialog box.

Top of Page

Open the Page Setup dialog box

  • On the Design tab, in the Page Setup group, click the Page Setup Dialog Box Launcher.

Use the controls on the Print Setup and Page Size tabs to make changes to the printer paper and the diagramming page view independently.

A thumbnail preview on each tab shows how your diagramming page view compares with the printer paper setup.

Top of Page

Quickly resize the drawing page by dragging the page edges

  1. Click the Pointer tool.

  2. Position the pointer at the edge of the page, and then press the CTRL key.

    The pointer changes to a double-headed arrow or a rotation cursor.

  3. Drag the page edge to where you want it.

If you drag the corner of a page, it adjusts the page size in both dimensions. To rotate the page, move the pointer a little outside the corner of the page until it turns into the rotation cursor, then click and drag the page.

If Auto Size is on, dragging the page edge turns it off.

Top of Page

Automatically resize the drawing page to fit the shapes on the page

  1. On the Design tab, in the Page Setup group, click Size.

  2. Click Fit to Drawing.

The drawing page size changes to fit the drawing with only the page margin included as surrounding white space. To set the page margin, open the Page Setup dialog box as described above. On the Print Setup tab, click Setup. You can set the margins and make other adjustments.

If Auto Size is on, clicking Fit to Drawing turns it off.

Sign out of microsoft onenote

You can stay signed in to OneNote for iPad or iPhone indefinitely, but if you want to change accounts or are using a shared iPad or iPhone, you can sign out of OneNote.

  1. In OneNote, tap the Settings icon Settings icon in OneNote for iOS located in the upper right.

  2. On the Settings screen, under Account, tap the account name you'd like to sign out of.

  3. Tap Sign Out.

  4. Accept the notification that appears to confirm signing out.

Note: You can close any notebooks you're not using (or not signed into) if you don't want to see them in the list. From the notebooks list, press and hold the notebook name for the notebook you'd like to close until a checkmark appears, and then on the bottom left, tap the Close Close Notebook icon button.

Now function

Returns a Variant (Date) specifying the current date and time according your computer's system date and time.

Syntax

Now

Query examples

Expression

Results

SELECT Now() AS Expr1 FROM ProductSales GROUP BY Now();

Returns the current system "Date and Time" in the default system Time format and displays in the column Expr1.

SELECT Now() AS CurrentDateandTime FROM ProductSales GROUP BY Now();

Returns the current system "Date and Time" in the default system Time format and displays in the column CurrentDateandTime.

VBA example

Note: Examples that follow demonstrate the use of this function in a Visual Basic for Applications (VBA) module. For more information about working with VBA, select Developer Reference in the drop-down list next to Search and enter one or more terms in the search box.

This example uses the Now function to return the current system date and time.

Dim Today
Today = Now ' Assign current system date and time.

See Also

Choose the right date function

Find your product key for office for mac 2011

This article is for Office for Mac 2011. Are you using Office on PC? See Using product keys with Office.

Where do I find my Office for Mac 2011 product key?

Once you have your product key, see Activate Office for Mac 2011.

When you install or reinstall Microsoft Office, you are prompted to enter the product key. The product key is used during installation to "unlock" the software. If you can't find your product key, it may be in one of these places:

Tip: If your copy of Office came with a PIN instead of a product key, go to https://www.microsoft.com/mac/getkey and enter your PIN to get your product key.

Where did you get Office?

Check here for your key...

Can't find it?

I downloaded Office from an online store.

The product key should be in your email receipt. If you didn't get a receipt, check your junk mail folder.

Email receipt

Try logging into the site where you purchased Office to check your order details. If you still can't find your product key, contact the seller to ask for the link or receipt to be resent.

I downloaded it from MicrosoftStore.com.

Go to your Account page and click Digital Content. Or search your inbox for an email from @microsoftstore.com.

Check your Order History page for information on how to contact Support.

I bought Office without a DVD at a physical store.

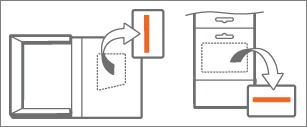
If Office came with a box or card, look on the card or packaging. This is a one-time PIN. If you have not used it, go to https://www.microsoft.com/mac/getkey and enter your PIN to get your product key.

Box and card

If you used the PIN, your product key may have been stored on your account page.

I bought a DVD at a physical store.

The 25 digit product key is on a yellow sticker on the inside of the DVD case.

Typical Product Key sticker for Office for Mac 2011 with disc

If you misplaced your key before you redeemed it, you may need to purchase a replacement.

MSDN

Find your product key by logging into the MSDN subscriber download site.

If you are having trouble accessing your product key, contact Microsoft Support.

Home Use Program

If you're in the Home Use Program, you'll need a program code, not a product key. To get your program code, go to the Home Use Program, select your country/region, enter your work email address, and click Don't Know Your Program Code? On the next page, click Verify Email. You can also try searching your inbox for a confirmation email from hup.us@digitalriver.com.

If you are having trouble accessing your product key, contact Microsoft Support.

Video add a header or footer

Your browser does not support video.

Try it!

Add a header or footer that acts like a background page and can be applied to all or selected pages in your diagrams.

Create a header and footer page

  1. Select Design > Borders & Titles, and select the style you want for the header or footer.

  2. Visio creates a new header and footer page called VBackground-X.

    Right-click the header and footer background page tab, select Rename, and type in a new name.

  3. Select the header and footer page.

  4. Double-click any of the text areas, and type in text.

    Tip: To add the date, time, or page information, select a text box in the header or footer area, select Insert > Field, and select the field you want to add.

Create a new text box in the footer

  1. Select Text Box.

  2. Drag to create a new text box in the footer.

  3. Type in the text you want.

Apply a background

  • Select Design > Backgrounds, and select the background you want.

Apply an existing header and footer to a page

  1. Select the page you want to add the header and footer to.

  2. Select Design.

  3. In the Page Setup group, select the More arrow.

  4. Select Page Properties.

  5. In the Background list, select the header and footer page you want.

    Note: Header and footer pages work best when they are the same size as the foreground page.

Want more?

Add a header or footer in Visio