Create an XML data file and XML schema file from worksheet data
If you want to create an XML data file and XML schema file from a cell range on a worksheet, you can use version 1.1 of the Excel 2003 XML Tools Add-in to enhance the existing XML features in Microsoft Excel 2007 and later.
Step 1: Download the XML Tools Add-in and activate it
-
To download the add-in, click this link, Excel 2003 XML Tools Add-in, and then follow the instructions on the download page.
-
Start Excel.
-
Click the File > Options > Add-Ins.
In Excel 2007, click the Microsoft Office Button
 > Excel Options > Add-Ins.
 -
In the Manage box, click Excel Add-ins, and then click Go.
-
In the Add-Ins dialog box, click Browse, locate the XmlTools.xla file, select the file, and then click OK.
By default, this file is stored in the following folder on your hard drive:
\Office Samples\OfficeExcel2003XMLToolsAddin. -
Verify that the XmlTools check box is selected in the Add-Ins available list, and then click OK to load the add-in.
-
To verify that the add-in is active, on the Add-ins tab, in the Menu commands category, make sure that the XML Tools command menu appears.
Note: This add-in was developed for Excel 2003. The documentation and the user interface refer to lists, which are now called Excel tables in versions of Excel later than Excel 2003.
For more information about how to use this add-in, see the article Using the Excel 2003 XML Tools Add-in Version 1.1.
Step 2: Convert a cell range to an XML Table
-
Enter the data for which you want to create the XML data file and XML schema file. The data must be in a tabular format of columns and rows (also called flat data).
-
On the Add-ins tab, in the Menu commands group, click the arrow next to XML Tools, and then click Convert a Range to an XML List.
-
Enter the cell range of the data that you want to convert as an absolute reference in the text box.
Tip: To make it easier to enter the correct cell reference, in the dialog box, click the button to the right of the text box, click and hold the upper-left cell of the range, and then drag to the lower-right cell of the range.
-
Under Use first row as column names, select No if the first row contains data or Yes if the first row contains column headers, and then click OK.
Excel automatically creates an XML schema, maps the cells to the schema, and creates an XML table.
Important: If the Visual Basic Editor appears and displays a Visual Basic for Applications (VBA) error message, do the following:
-
Click OK.
-
In the highlighted line in the VBA code module, remove "50" from the line. In other words, change:
XMLDoc As msxml2.DOMDocument50
To:
XMLDoc As msxml2.DOMDocument -
Press F5 to find the next line that contains "XMLDoc As msxml2.DOMDocument50," click OK, and change the line as you did in step 2.
-
Press F5 again to find and change any additional instances of the string.
-
When you press F5 and the VBA error message no longer appears, close the Visual Basic Editor to return to your workbook. Your cell range will have been converted to an XML table.
Note: To see all the XML maps in the workbook, on the Developer tab, in the XML group, click Source to display the XML Source task pane. In the lower portion of the task pane, click XML Maps.
If the Developer tab is not visible, perform the three steps under step 1 in the next section to add it to the Excel Ribbon.
-
Step 3: Export the XML table to an XML data file (.xml)
-
If the Developer tab is not available, enable it. For more information, see Show the Developer tab.
-
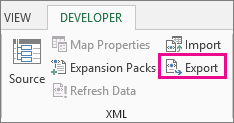
On the Developer tab, in the XML group, click Export.

Note: If a small Export XML dialog box with only an OK and Cancel button appears, click the XML map that you want to use, and then click OK. This small Export XML dialog box appears only if no XML table is selected and the workbook contains more than one XML map.
-
In the large Export XML dialog box, in the File name box, type a name for the XML data file.
-
Click Export.
Note: When creating XML maps and exporting data in Excel to XML files, there is a limit on the number of rows that can be exported. Export to XML from Excel will save a maximum of 65536 rows. If your file contains more than 65536 rows, Excel will export the first (#ROWS mod 65537) rows. For example, if your worksheet has 70000 rows, Excel will export 70000 mod 65537 = 4464 rows. Our recommendation is to 1) use xlsx instead or 2) save the file as XML Spreadsheet 2003 (.xml), which will lose the mappings, or 3) delete all rows after 65536 and then export again which will keep the mappings but lose the data at the end of the file.
Step 4: Save the XML schema to an XML schema file (.xsd)
-
Select any cell in a mapped Excel table.
-
On the Add-ins tab, in the Menu commands group, click the arrow next to XML Tools, and then click Create XSD files for the XML Schema at the active cell.
Excel copies the XML schema and pastes it into Notepad.
-
In Notepad, click File, and then click Save As.
-
Type a file name and file type, such as ProdOrders.xsd, and then click Save.
Need more help?
You can always ask an expert in the Excel Tech Community, get support in the Answers community, or suggest a new feature or improvement on Excel User Voice.
No comments:
Post a Comment