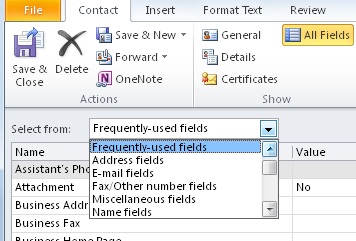
Add information to a contact by using the All Fields page
Not all contact information fields fit on the contact form. To add or update information for a contact, you can view all of the information fields in a table by using the All Fieldspage. When you switch back to the contact form, the updated information is available in the corresponding field.
Note: If the updated information does not appear in the contact form, perhaps because of space constraints, the information is available in the list in the related section of the contact form or in the related All Fields table.
Add or update contact information
-
In an open contact, on the Contact tab, in the Show group, click All Fields.
-
In the Select from list, choose the type of information that you want to add or change.

-
Locate the information that you want to add or change in the Name column, and in the Value column next to it, type the information.
-
On the Contact tab, in the Actions group, click Save & Close.
Note: To display the open contact at any time, in All Fields view, on the Contact tab, in the Show group, click General. The new information is not saved, however, until you click Save & Close in either view.
Create a custom field
You are not limited to the fields provide in the contact form. To create a user-defined, or custom contact field, do the following:
-
In an open contact, on the Contact tab, in the Show group, click All Fields.
-
In the Select from list, choose User-defined fields in this item.
-
Click New at the bottom of the contact window.
-
In the New Field dialog box, in the Name box, type a name for the field.
-
In the Type and Format lists, select the appropriate properties for the field. Information types include such as text, number, date/time, yes/no and keywords. The appropriate format depends on the type selected.
Note: To make changes to user-defined fields, click the field, click Properties, and then make the changes.
No comments:
Post a Comment