The Notes pane is where you put supplemental information that doesn't appear on-slide during a presentation. You may want to make key words in the notes bold so that you can see them better, or use a smaller font size if you have a lot of notes.
The Notes pane can show bold, italic, underlines, and superscripts/subscripts. You can use numbered or bullet lists.
You can also adjust the alignment (left, centered, or right) and the indentation from the margin.
For the printed version of notes you can customize the font and font size. These font customizations appear in printed notes pages, but they don't appear in the Notes pane or in Presenter View.
Turn on formatting for the Notes pane
To be able to see text formatting in the Notes pane, first you must turn formatting on:
-
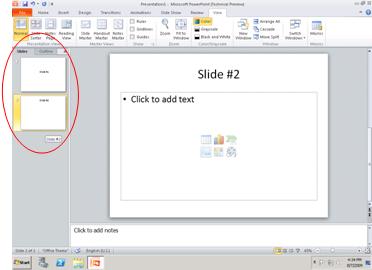
On the View tab, select Outline View.
-
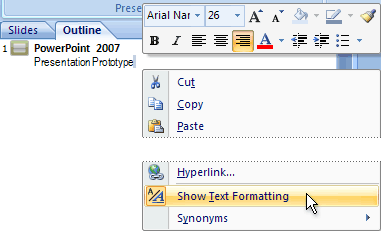
Right-click the Outline pane on the left side, and select Show Text Formatting on the pop-up menu.
-
On the View tab, switch back to Normal view.
Add formatting to text in the Notes pane
Once you've done the procedure above, you add character or paragraph formatting as you would normally expect: First you select the text you want to apply the formatting to, then you apply it.
Change the font size in Presenter View for an on-screen presentation
Presenter View shows your notes on the right side of your screen as you present. You see the notes, but your audience only sees your slides. In Presenter View, you can increase or decrease the size of the text in the Notes box.
-
On the Slide Show tab, ensure that Use Presenter View is selected.
-
On the Slide Show tab, in the Start Slide Show group on the left, select From Beginning.
The notes appear in a pane on the right. The text wraps automatically, and a vertical scroll bar appears, if necessary.
-
To increase or decrease the size of the text in the Notes pane, use the buttons at the lower left corner of the Notes pane:

Learn more details about Presenter View in the article, Start the presentation and see your notes in Presenter view.
Change the font or font size for printed notes
You can change the font or font size that's used in printed notes. The changes you make won't appear in the Notes pane in Normal view, but you'll be able to see them in Print Preview and when you print your Notes pages.
Choose a font for printed notes
-
On the View tab, select Notes Master.
-
In the Background group, select Fonts, and then, at the bottom of the menu, select Customize Fonts.
The Create New Theme Fonts dialog box opens.
-
Open the list of options under Body font (Latin), and select the font you want to use for the printed notes.
-
Click Save.
-
On the toolbar ribbon, select Close Master View.
Change the size of the font for printed notes
-
On the View tab, select Notes Master.
The "template" for the layout of printed notes appears. Two primary boxes appear in the layout: one shows a thumbnail image of a slide, and the other shows where Notes will appear. By default, in this master view, the text says Edit master text styles and it shows multiple levels of text in case you use a hierarchical outline for your notes.
-
Select all the text in that box.
-
On the Home tab, in the Font group, choose the font size you want. By default, the font size is 12 points. Change the 12 to a larger size if you want larger text in the printed notes.
-
Switch back to the Notes Master tab, and then click Close Master View.
-
To see a preview of your typed notes with the font and size you've selected, select File > Print. Under Settings, select the down arrow on second drop-down box and choose Notes Pages.
The Preview pane shows a notes page with a slide thumbnail image and the notes that go with that slide.
Turn on formatting for the Notes pane
-
On the View tab, in the Presentation Views group, click Normal.
-
In the pane that contains the Outline and Slides tabs, click the Outline tab.

-
Right-click the Outline pane, and then click Show Text Formatting on the shortcut menu. You will then be able to see the changes that you made in the Notes pane on a given slide. You can also make additional changes and see those changes in the Notes pane immediately.
Add formatting to text in the Notes pane
Once you've done the procedure above, you add character or paragraph formatting as you would normally expect: First you select the text you want to apply the formatting to, then you apply it.
Change the font size in Presenter View for an on-screen presentation
Presenter View shows your notes on the right side of your screen as you present. You see the notes, but your audience only sees your slides. In Presenter View, you can increase or decrease the size of the text in the Notes box.
-
On the Slide Show tab, ensure that Use Presenter View is selected.
-
On the Slide Show tab, in the Start Slide Show group on the left, select From Beginning.
The notes appear in a pane on the right. The text wraps automatically, and a vertical scroll bar appears, if necessary.
-
To increase or decrease the size of the text in the Notes pane, use the Zoom buttons at the lower left corner of the Notes pane.
Learn more details about Presenter View in the article, Start the presentation and see your notes in Presenter view.
Change the font or font size for printed notes
You can change the font or font size that's used in printed notes. The changes you make won't appear in the Notes pane in Normal view, but you'll be able to see them in Print Preview and when you print your Notes pages.
Choose a font for printed notes
-
On the View tab, select Notes Master.
-
In the Background group, select Fonts, and then, at the bottom of the menu, select Create New Theme Fonts.
The Create New Theme Fonts dialog box opens.
-
Open the list of options under Body font, and select the font you want to use for the printed notes.
-
Click Save.
-
On the toolbar ribbon, select Close Master View.
Change the size of the font for printed notes
-
On the View tab, select Notes Master.
The "template" for the layout of printed notes appears. Two primary boxes appear in the layout: one shows a thumbnail image of a slide, and the other shows where Notes will appear. By default, in this master view, the text says Click to edit Master text styles and it shows multiple levels of text in case you use a hierarchical outline for your notes.
-
Select all the text in that box.
-
On the Home tab, in the Font group, choose the font size you want. By default, the font size is 12 points. Change the 12 to a larger size if you want larger text in the printed notes.
-
Switch back to the Notes Master tab, and then click Close Master View.
-
To see a preview of your typed notes with the font and size you've selected, select File > Print. Under Settings, select the down arrow on second drop-down box and choose Notes Pages.
The Preview pane shows a notes page with a slide thumbnail image and the notes that go with that slide.
Turn on formatting for the Notes pane
-
In the pane that contains the Outline and Slides tabs, click the Outline tab.
-
Right-click the Outline pane, and then click Show Text Formatting on the shortcut menu.

Add formatting to text in the Notes pane
Once you've done the procedure above, you add character or paragraph formatting as you would normally expect: First you select the text you want to apply the formatting to, then you apply it.
Change the font size in Presenter View for an on-screen presentation
Presenter View shows your notes on the right side of your screen as you present. You see the notes, but your audience only sees your slides. In Presenter View, you can increase or decrease the size of the text in the Notes box.
-
On the Slide Show tab, ensure that Use Presenter View is selected.
-
On the Slide Show tab, in the Start Slide Show group on the left, select From Beginning.
The notes appear in a pane on the right. The text wraps automatically, and a vertical scroll bar appears, if necessary.
-
To increase or decrease the size of the text in the Notes pane, use the Zoom buttons at the lower left corner of the Notes pane.
Learn more details about Presenter View in the article, Start the presentation and see your notes in Presenter view.
Change the font or font size for printed notes
You can change the font or font size that's used in printed notes. The changes you make won't appear in the Notes pane in Normal view, but you'll be able to see them in Print Preview and when you print your Notes pages.
Choose a font for printed notes
-
On the View tab, select Notes Master.
-
In the Background group, select Fonts, and then, at the bottom of the menu, select Create New Theme Fonts.
The Create New Theme Fonts dialog box opens.
-
Open the list of options under Body font, and select the font you want to use for the printed notes.
-
Click Save.
-
On the toolbar ribbon, select Close Master View.
Change the size of the font for printed notes
-
On the View tab, select Notes Master.
The "template" for the layout of printed notes appears. Two primary boxes appear in the layout: one shows a thumbnail image of a slide, and the other shows where Notes will appear. By default, in this master view, the text says Click to edit Master text styles and it shows multiple levels of text in case you use a hierarchical outline for your notes.
-
Select all the text in that box.
-
On the Home tab, in the Font group, choose the font size you want. By default, the font size is 12 points. Change the 12 to a larger size if you want larger text in the printed notes.
-
Switch back to the Notes Master tab, and then click Close Master View.
-
To see a preview of your typed notes with the font and size you've selected, select Office Button > Print. Under Print What, select Notes Pages and click OK. Then select Office Button > Print Preview.
The Preview pane shows a notes page with a slide thumbnail image and the notes that go with that slide.
No comments:
Post a Comment