| Here are some basic tasks that you can do in Microsoft Outlook 2010. |
In this article
What is Outlook?
Microsoft Outlook 2010 offers premium business and personal e-mail management tools to more than 500 million Microsoft Office users worldwide. With the release of Outlook 2010, you get a richer set of experiences to meet your communication needs at work, home, and school.
From a redesigned look to advanced e-mail organization, search, communication and social networking features, Outlook 2010 provides you with a world-class experience to stay productive and in touch with your personal and business networks.
Add an e-mail account
Before you can send and receive e-mail messages using Outlook 2010, you must add and configure an e-mail account. If you have used an earlier version of Microsoft Outlook on the same computer where you have installed Outlook 2010, your account settings are automatically imported.
If you are new to Outlook or are installing Outlook 2010 on a new computer, the Auto Account Setup feature automatically starts and helps you configure account settings for your e-mail accounts. This setup requires only your name, e-mail address, and password. If your e-mail account cannot be automatically configured, you must enter the required additional information manually.
-
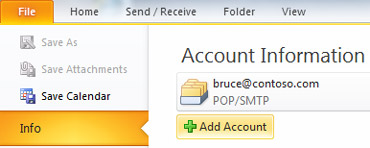
Click the File tab.
-
Under Account Information, and click Add Account.

For more information, see Outlook email setup.
Note: To add an Outlook.com account (formerly Hotmail), see Add your Outlook.com account in Outlook for Windows.
Create a new e-mail message
Outlook 2010 enables you to communicate with one or more recipients with a rich set of features and customizations.
-
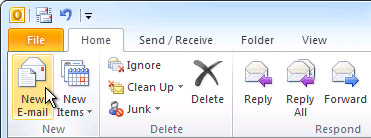
In Mail, on the Home tab, in the New group, click New E-mail.

Keyboard shortcut To create an e-mail message, press CTRL+SHIFT+M.
For more information, see Create an email message.
Forward or reply to an e-mail message
-
On the Home or Message tab, in the Respond group, click Reply, Reply All, or Forward.

Note: The name of the tab depends on whether the message is selected in the message list or opened in its own window.
To remove a name from the To and Cc lines, click the name and then press DELETE. To add a recipient, click in the To, Cc or Bcc box and enter the recipient.
For more information, see Reply to or forward an e-mail message.
Add an attachment to an e-mail message
Files can be attached to an e-mail message. Also, other Outlook items, such as messages, contacts, or tasks can be included with messages that you send.
-
Create a message, or for an existing message, click Reply, Reply All, or Forward.
-
In the message window, on the Message tab, in the Include group, click Attach File.

For more information, see Attach a file or other item to an e-mail message.
Open or save an e-mail message attachment
You can open an attachment from the Reading Pane, or from an open message. After opening and viewing an attachment, you may choose to save it to a disk drive. If a message has more than one attachment, you can save multiple attachments as a group or one at a time.
Open an attachment
-
Double-click the attachment.
Save an attachment
-
Click the attachment in the Reading Pane or the open message.
-
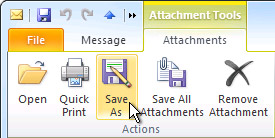
On the Attachments tab, in the Actions group, click Save As. You can also right-click the attachment, and then click Save As.

For more information, see Open and save attachments.
Add an e-mail signature to messages
You can create personalized signatures for your e-mail messages that include text, images, your Electronic Business Card, a logo, or even an image of your handwritten signature.
Create a signature
-
Open a new message. On the Message tab, in the Include group, click Signature, and then click Signatures.

-
On the E-mail Signature tab, click New.
Add a signature
-
In a new message, on the Message tab, in the Include group, click Signature, and then click the signature that you want.

For more information, see Create and add a signature to messages.
Create a calendar appointment
Appointments are activities that you schedule in your calendar that do not involve inviting other people or reserving resources.
-
In Calendar, on the Home tab, in the New group, click New Appointment. Alternately, you can right-click a time block in your calendar grid, and then click New Appointment.

Keyboard shortcut To create an appointment, press CTRL+SHIFT+A.
For more information, see Schedule an appointment.
Schedule a meeting with other people
A meeting is an appointment that includes other people and can include resources such as conference rooms. Responses to your meeting requests appear in your Inbox.
-
In Calendar, on the Home tab, in the New group, click New Meeting.

Keyboard shortcut To create a new meeting request from any folder in Outlook, press CTRL+SHIFT+Q.
For more information, see Schedule a meeting with other people.
Set a reminder
You can set or remove reminders for a variety of items, including e-mail messages, appointments, and contacts.
For appointments or meetings
In an open item, on the Appointment or Meeting tab, in the Options group, in the Reminder drop-down list, select the amount of time before the appointment or meeting when you want the reminder to appear. To turn a reminder off, select None.
For e-mail messages, contacts, and tasks
-
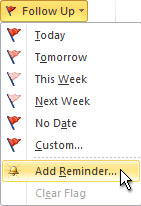
On the Home tab, in the Tags group, click Follow Up, and then click Add Reminder.

Tip: You can quickly flag e-mail messages as to-do items by using reminders. Right-click the Flag Status column in the message list. Or if you have the message open, on the Message tab, in the Tracking group, click Follow Up, and then click Add Reminder.
For more information, see Set or remove reminders.
Create a contact
Contacts can be as simple as a name and e-mail address, or include additional detailed information such as street address, multiple phone numbers, a picture, birthdays, and any other information that relates to the contact.
-
In Contacts, on the Home tab, in the New group, click New Contact.

Keyboard shortcut To create a contact from any folder in Outlook, press CTRL+SHIFT+C.
For more information, see Create or add a contact.
Create a task
Many people keep a list of things to do — on paper, in a spreadsheet, or with a combination of paper and electronic methods. In Microsoft Outlook you can combine various lists into one, get reminders and track task progress.
-
In Tasks, on the Home tab, in the New group, click New Task.

Keyboard shortcut To create a new task, press CTRL+SHIFT+K.
For more information, see Create tasks and to-do items.
Create a note
Notes are the electronic equivalent of paper sticky notes. Use notes to jot down questions, ideas, reminders, and anything you would write on paper.
-
In Notes, in the New group, and click New Note.

Keyboard shortcut To create a note, press CTRL+SHIFT+N.
For more information, see Create a note.
Print an e-mail message, contact, calendar item, or task
You can print individual items, such as e-mail messages, contacts, or calendar items, or larger views, such as calendars, address books, or content lists of Mail folders.
The procedure for printing is the same in Mail, Calendar, or any other folders in Microsoft Outlook — all printing settings and functions are found in the Backstage view. Click the File tab to open the Backstage view.
-
Click an item or folder in Outlook that you want to print.
-
Click the File tab.
-
Click Print.
For more information, see Print items in Outlook.

No comments:
Post a Comment