Monday, May 31, 2021

Add a list box or combo box to a worksheet in excel

When you want to display a list of values that users can choose from, add a list box to your worksheet.

Sample list box

Add a list box to a worksheet

  1. Create a list of items that you want to displayed in your list box like in this picture.
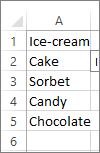
    value list for use in combo box
  2. Click Developer > Insert.

    Note: If the Developer tab isn't visible, click File > Options > Customize Ribbon. In the Main Tabs list, check the Developer box, and then click OK.

  3. Under Form Controls, click List box (Form Control).
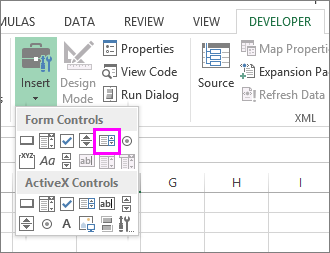
    the list box form control button
  4. Click the cell where you want to create the list box.

  5. Click Properties > Control and set the required properties:
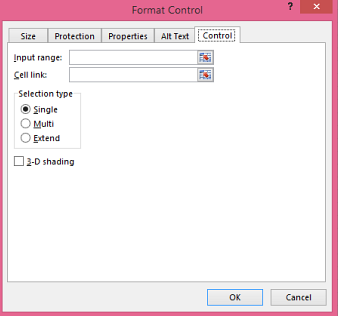
    Proprties for the list box control.

    • In the Input range box, type the range of cells containing the values list.

      Note: If you want more items displayed in the list box, you can change the font size of text in the list.

    • In the Cell link box, type a cell reference.

      Tip: The cell you choose will have a number associated with the item selected in your list box, and you can use that number in a formula to return the actual item from the input range.

    • Under Selection type, pick a Single and click OK.

      Note: If you want to use Multi or Extend, consider using an ActiveX list box control.

Add a combo box to a worksheet

You can make data entry easier by letting users choose a value from a combo box. A combo box combines a text box with a list box to create a drop-down list.
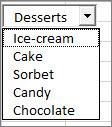
Combo box

You can add a Form Control or an ActiveX Control combo box. If you want to create a combo box that enables the user to edit the text in the text box, consider using the ActiveX Combo Box. The ActiveX Control combo box is more versatile because, you can change font properties to make the text easier to read on a zoomed worksheet and use programming to make it appear in cells that contain a data validation list.

  1. Pick a column that you can hide on the worksheet and create a list by typing one value per cell.

    value list for use in combo box

    Note: You can also create the list on another worksheet in the same workbook.

  2. Click Developer > Insert.

    Note: If the Developer tab isn't visible, click File > Options > Customize Ribbon. In the Main Tabs list, check the Developer box, and then click OK.

  3. Pick the type of combo box you want to add:

    • Under Form Controls, click Combo box (Form Control).

      Or

    • Under ActiveX Controls, click Combo Box (ActiveX Control).
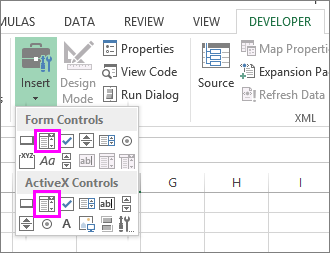
      Insert combo box

  4. Click the cell where you want to add the combo box and drag to draw it.

Tips: 

  • To resize the box, point to one of the resize handles, and drag the edge of the control until it reaches the height or width you want.

  • To move a combo box to another worksheet location, select the box and drag it to another location.

Format a Form Control combo box

  1. Right-click the combo box and pick Format Control.

  2. Click Control and set the following options:
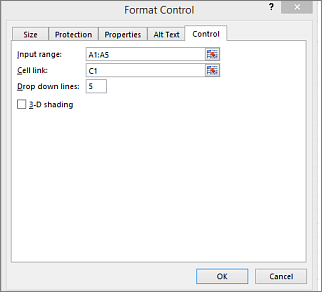
    Format control dialog box

    • Input range: Type the range of cells containing the list of items.

    • Cell link: The combo box can be linked to a cell where the item number is displayed when you select an item from the list. Type the cell number where you want the item number displayed.

      For example, cell C1 displays 3 when the item Sorbet is selected, because it's the third item in our list.
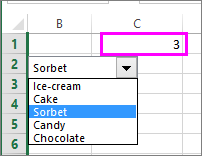
      Linked cell shows item number when item is selected.

      Tip: You can use the INDEX function to show an item name instead of a number. In our example, the combo box is linked to cell B1 and the cell range for the list is A1:A2. If the following formula, is typed into cell C1: =INDEX(A1:A5,B1), when we select the item "Sorbet" is displayed in C1.
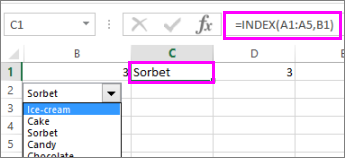
      Enter formula to show item from linked cell
    • Drop-down lines: The number of lines you want displayed when the down arrow is clicked. For example, if your list has 10 items and you don't want to scroll you can change the default number to 10. If you type a number that's less than the number of items in your list, a scroll bar is displayed.

      Scroll bar is displayed.
  3. Click OK.

Format an ActiveX combo box

  1. Click Developer > Design Mode.

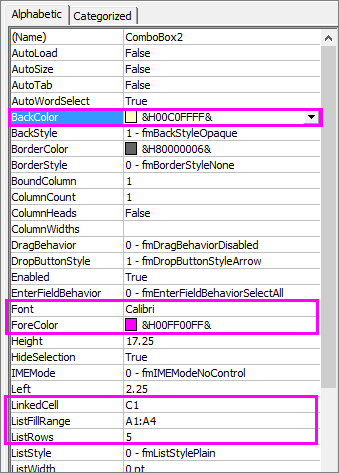
  2. Right-click the combo box and pick Properties, click Alphabetic, and change any property setting that you want.

    Here's how to set properties for the combo box in this picture:

    Example of a combo box.

    Property settings for ActiveX combo box.

    To set this property

    Do this

    Fill color

    Click BackColor > the down arrow > Pallet, and then pick a color.
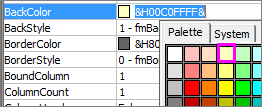
    Color fill property for a combo box.

    Font type, style or size

    Click Font > the... button and pick font type, size, or style.

    Setting for fonts in text box

    Font color

    Click ForeColor > the down arrow > Pallet, and then pick a color.

    Link a cell to display selected list value.

    Click LinkedCell

    Link Combo Box to a list

    Click the box next to ListFillRange and type the cell range for the list.

    Change the number of list items displayed

    Click the ListRows box and type the number of items to be displayed.

  3. Close the Property box and click Designer Mode.

  4. After you complete the formatting, you can right-click the column that has the list and pick Hide.

Need more help?

You can always ask an expert in the Excel Tech Community, get support in the Answers community, or suggest a new feature or improvement on Excel User Voice.

See Also

Overview of forms, Form controls, and ActiveX controls on a worksheet

Add a check box or option button (Form controls)

Onedrive desktop app for windows

Here are some answers to the frequently asked questions about the OneDrive desktop app for Windows.

Windows 10   

Good news! If your computer uses Windows 10 OneDrive is built in. If you do need to re-install, click here to download.

Downloading the app means you agree to the Microsoft Services Agreement and privacy statement.

This software might also download and install its updates automatically.

Windows 10   

OneDrive will update itself automatically. If you want to ensure you have the latest version, click here to download.

If you don't want to use OneDrive, the easiest solution is to unlink it. If you just want to stop syncing for a while, you can temporarily pause OneDrive and then resume syncing later. Learn how to pause and resume sync in OneDrive.

Windows 10   

Select the Start button, type Programs and select Add or remove programs in the list of results.

Under Apps & features, find and select Microsoft OneDrive, and then select Uninstall.

If you don't see OneDrive in the list, press the Windows key  Press the Windows key    and R to open a Run dialog, then type appwiz.cpl and press OK.

Windows 8/8.1

OneDrive is built into Windows 8 and Windows 8.1, so you can't uninstall it like an app.

However, you can hide it and stop syncing OneDrive files to your PC. To do so, follow the steps in Turn off or uninstall OneDrive.

Windows 7   

Click the Start button, then in the search box, type Add Programs, and then, in the list of results, click Programs and Features.

Click Microsoft OneDrive, and then click Uninstall.

Windows 10   

In Windows 10, OneDrive is the default save location for your files and documents. This means new documents or files are automatically saved to OneDrive unless you opt to save them to a different location on your PC.

Learn more about how files save to OneDrive by default in Windows 10.

Windows 8/8.1   

Read how to Change the location of your OneDrive folder.

Windows 7   

Read how to Change the location of your OneDrive folder.

Need more help?

Online

Get online help
See more support pages for OneDrive and OneDrive for work or school.
For the OneDrive mobile app, see Troubleshoot OneDrive mobile app problems.

OneDrive Admins can also view the OneDrive Tech Community, Help for OneDrive for Admins.

Microsoft virtual support agent icon

Contact Support
If you still need help, contact support through your browser or shake your mobile device while you're in the OneDrive app.

OneDrive Admins can contact Microsoft 365 for business support.

Office 365 community forums

Tips
Letting us know your location may help us resolve your issue more quickly.

All fixed? If you contacted us and OneDrive starts working again, please let us know by replying to the email we sent you.

Month function

This article describes the formula syntax and usage of the MONTH function in Microsoft Excel.

Description

Returns the month of a date represented by a serial number. The month is given as an integer, ranging from 1 (January) to 12 (December).

Syntax

MONTH(serial_number)

The MONTH function syntax has the following arguments:

  • Serial_number    Required. The date of the month you are trying to find. Dates should be entered by using the DATE function, or as results of other formulas or functions. For example, use DATE(2008,5,23) for the 23rd day of May, 2008. Problems can occur if dates are entered as text.

Remarks

Microsoft Excel stores dates as sequential serial numbers so they can be used in calculations. By default, January 1, 1900 is serial number 1, and January 1, 2008 is serial number 39448 because it is 39,448 days after January 1, 1900.

Values returned by the YEAR, MONTH and DAY functions will be Gregorian values regardless of the display format for the supplied date value. For example, if the display format of the supplied date is Hijri, the returned values for the YEAR, MONTH and DAY functions will be values associated with the equivalent Gregorian date.

Example

Copy the example data in the following table, and paste it in cell A1 of a new Excel worksheet. For formulas to show results, select them, press F2, and then press Enter. If you need to, you can adjust the column widths to see all the data.

Date

15-Apr-11

Formula

Description

Result

=MONTH(A2)

Month of the date in cell A2

4

See Also

DATE function

Add or subtract dates

Date and time functions (reference)

Set up email on apple iphone ipad and ipod touch with office 365 operated by 21vianet

Note: This topic applies only to Microsoft 365 operated by 21Vianet.

You can set up your email account using the Outlook for iOS app available from the Apple Store or the built-in iOS mail app.

Set up email with Outlook for iOS

Image of a grey line
Open Outlook for iOS. The icon looks like this:

iOS Outlook app

If you don't have it yet, download it from the App Store.

Note: Available for iOS devices using iOS 10.0 or higher.

Image of a grey line
Open the collapsed menu in the upper left corner.

Note: First time using Outlook for iOS? Just tap Get Started.

Tap to open the collapsable menu in the corner

Tap SettingsOutlook app settings > Add Account > Add Email Account.
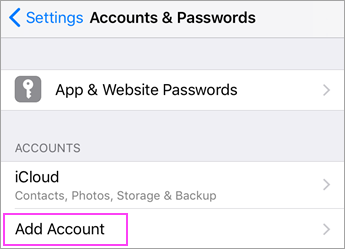
Image of a grey line
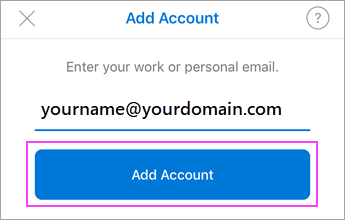
Type your full email address, then tap Add Account.

Note: If you're prompted for more information, you may have to manually setup or use IMAP or POP.

Enter your email address

Image of a grey line
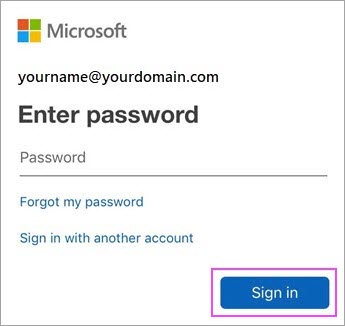
Enter your email account password and tap Sign In.

Enter your Outlook.com password

Image of a grey line
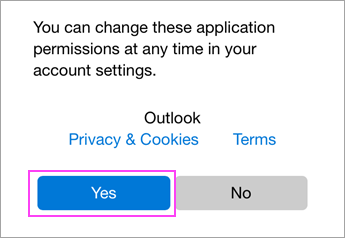
Tap Yes or Allow to give Outlook permission to sync calendar, contacts, etc.

Allow permissions.

Image of a grey line
Swipe through the intro and you're now ready to use Outlook for iOS!

Checkmark - success!

Set up email with iOS Mail app

Image of a grey line
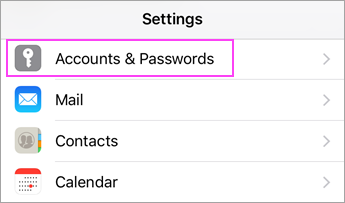
Go to your device's Settings, scroll down and tap Mail > Accounts >Add Account.

Device Settings > Accounts & Passwords

Tap "Add Account"

Image of a grey line
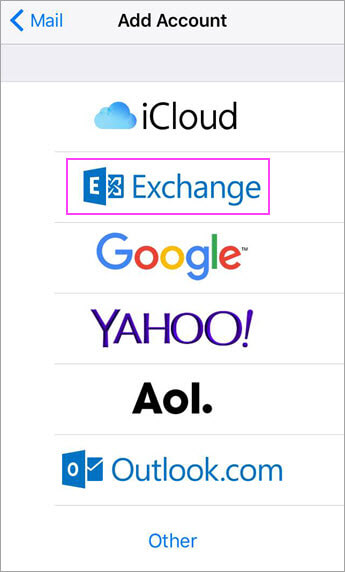
Select Exchange.

Choose Exchange

Image of a grey line
Enter your Microsoft 365 email address, password, and a description of your account. Tap Next.

Note: Your email address should be your Microsoft 365 business account or school account. Such as you@contoso.cn.

Exchange Sign In

Image of a grey line
If you're prompted to enter server settings, enter the following and tap Next.

  • Email: your full email address.

  • Server: partner.outlook.cn

  • Username: your full email address.

  • Password: email account password.

Image of a grey line
The Mail app may request certain permissions such as accessing your calendar and contacts. To agree, tap Yes.

Then choose the apps you want your email account to sync with your iOS device and tap Save.

Image of a grey line
Now you're all set to go!

Checkmark

If you're using a Microsoft 365 account operated by 21Vianet and you're prompted to enter settings manually, or you need server settings for IMAP or POP, use the following if available:

Incoming Server Settings

  • Domain\Username
    Make sure your full email address appears. For example, yourname@contoso.cn.

  • Password
    Use the password that you use to access your email.

  • Server
    Use partner.outlook.cn for Microsoft 365 accounts operated by 21Vianet.

  • Port
    Use 443 or 993.

  • Security type
    Select SSL/TLS or make sure the Use secure connection (SSL) checkbox is checked, then tap Next.

Outgoing SMTP Server Settings

  • SMTP Server
    Use smtp.office365.cn for Microsoft 365 accounts operated by 21Vianet.

  • Security Type
    Choose TLS.

  • Port Number
    Enter 587. Tap Next.

Note: If you're setting up an Exchange-based account and you don't know the name of your Exchange Server, you can Find your Exchange ActiveSync with the expander below.

If your email program is not able to automatically find your Exchange ActiveSync server name, you may need to look it up.

If you're connecting to your Microsoft 365 email, use partner.outlook.cn as your Exchange ActiveSync server name. The Exchange ActiveSync server name partner.outlook.cn can be used if you are using the latest version of Microsoft 365.

If you're not using Microsoft 365 or if you aren't sure if you are using the latest version of Microsoft 365, follow these steps to look up your Exchange ActiveSync server name. Follow these steps to determine your Exchange ActiveSync server name.

  1. Sign in to your account using Outlook Web App.

  2. In Outlook Web App, on the toolbar, click Settings Settings icon > Mail > POP and IMAP.

Note: Although you're not setting up a POP3 or IMAP account, you'll use the POP server name to determine your Exchange ActiveSync server name.

  1. On the Settings for POP and IMAP Access page, under POP setting, look at the value for Server name.

  2. If the Server name shows partner.outlook.cn, your Microsoft 365 account is on the latest version of Microsoft 365, and you can use partner.outlook.cn as your Exchange ActiveSync server name.

  3. If the Server name value is in the format podxxxxx.partner.outlook.cn, your Microsoft 365 or other Exchange Online account is not yet on the latest version of Microsoft 365, and you can use m.partner.outlook.cn as your Exchange ActiveSync server name.

  4. If the Server name value includes your organization's name, for example, pop.contoso.com, then your Exchange ActiveSync server name is contained in address bar in your browser when you are signed in to Outlook on the Web--but without the leading https:// and without the trailing /owa. For example, if the address you use to access Outlook on the Web is https://mail.contoso.cn/owa, your Exchange ActiveSync server name is mail.contoso.cn.

See Also

Mobile setup for Microsoft 365 operated by 21Vianet

Export contacts from outlook com to a csv file

You can export your contacts from Outlook.com and then import them into other email apps such as Gmail or Yahoo, or other versions of Outlook.

  1. Sign in to Outlook.com.

  2. Select People at the lower left corner of the page to go to the People page.
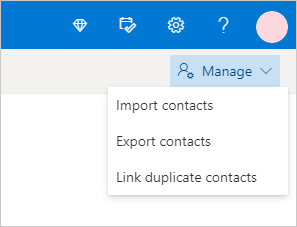
  3. On the far right of the toolbar, select Manage > Export contacts..

    Manage contacts menu in Outlook.com
  4. Choose to export all contacts or only contacts from a specific folder, and then select Export.

  5. At the bottom of the page, select Save to save "contacts.csv" in your default Downloads folder. Or, select the arrow next to Save and select Save as.

Now that your contacts are copied to a .csv file, you can import the contacts into other email apps or other versions of Outlook.

Still need help?

Note: You will need to sign in first to get support. If you can't sign in, go to Account support.

Related Topics

Import contacts to Outlook.com

Import and export Outlook email, contacts, and calendar

What version of Outlook do I have?

Synchronized files use windows 10 encryption locally but not on the onedrive for business site

This article contains information about how to use the OneDrive sync app (onedrive.exe).

Note: To determine which OneDrive sync client you're using, see Which OneDrive app?

Problem

Consider the following scenario:

You use the following method in Windows 10 to encrypt the contents of a file or a folder:

  1. Right-click the folder or file that you want to encrypt, and then select Properties.

  2. Select the General tab, and then select Advanced.

  3. Select the Encrypt contents to secure data check box, click OK, and then click OK again.

You use the sync app to synchronize the encrypted file or folder:

In this scenario, when you view the synchronized file or folder on your OneDrive for work or school site, Windows 10 encryption is not applied to the file or folder. However, the Windows 10 encryption is applied to the same file or folder on the local hard disk.

Solution

This is expected behavior. Windows 10 encryption occurs only on the local disk on which the file or folder was encrypted. When a file is moved from the local disk to the OneDrive for work or school site, the Windows 10 encryption from the client computer is no longer applied.

More information

The following additional information applies to files that are encrypted in Windows 10 and are uploaded to OneDrive for work or school or SharePoint in Microsoft 365: 

  • Files and folders that are uploaded to the SharePoint in Microsoft 365 Document library are available to users through the usual SharePoint in Microsoft 365 permissions.

  • A Windows 10 client won't encrypt the files or folders within the OneDrive for work or school library on the site.

  • On the OneDrive for work or school site, when you create a file or a folder that's configured to synchronize by using the sync app (onedrive.exe), the item will synchronize to the local computer as a file or folder without encryption. For encryption to occur, you must move the file or folder from the encrypted synchronized folder (such as OneDrive – Contoso) to the desktop or another folder, and then move it back to the encrypted folder in Windows 10.

Note: This article doesn't describe data encryption in SharePoint in Microsoft 365 and OneDrive for work or school.

Need more help?

Online

Get online help
See more support pages for OneDrive and OneDrive for work or school.
For the OneDrive mobile app, see Troubleshoot OneDrive mobile app problems.

OneDrive Admins can also view the OneDrive Tech Community, Help for OneDrive for Admins.

Microsoft virtual support agent icon

Contact Support
If you still need help, contact support through your browser or shake your mobile device while you're in the OneDrive app.

OneDrive Admins can contact Microsoft 365 for business support.

Office 365 community forums

Got feedback?
OneDrive UserVoice is your place to suggest the features you'd like to see us add to OneDrive. While we can't guarantee any specific features or timelines, we will respond to every suggestion that gets at least 500 votes.

Go to the OneDrive UserVoice.