In Outlook, when you want to invite people to attend a meeting or event, you usually send a meeting request. The recipient can then accept the request and the item is added to his or her calendar.
There is an alternative method that works more broadly with Outlook and other calendar programs. An Internet calendar (iCalendar) attachment or a link to an iCalendar file can be added to the message body. When the recipient opens the attachment or clicks the link, the event is added to his or her calendar program.
Note: Unlike Outlook meeting requests, when using iCalendar attachments and links you do not receive confirmations when people accept or decline.
Step 1: Create an appointment
If you already created the appointment on your calendar, skip to the next section, Step 2: Send an iCalendar attachment.
-
In Calendar, on the Home tab, in the New group, click New Appointment.
-
In the Subject and Location boxes, type the subject and location information.
-
Enter the Start time and End time.
-
On the Appointment tab, in the Actions group, click Save & Close.
Step 2: Send an iCalendar attachment
-
On your calendar, click the appointment.
-
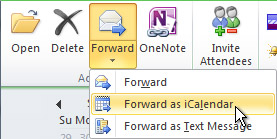
On the Appointment tab, in the Actions group, click the down arrow on the Forward command.

-
Click Forward as iCalendar.
A new message window appears and an iCalendar is attached.
Step 3: Add a link to the message body
The link can be text or any image that you choose.
Do one of the following:
Add a text link to the message body
-
In the open appointment window, right-click the iCalendar .ics attachment, and then click Save As.
-
Select a location that all of your recipients can access.
For example, within an organization, you can select a shared network location. The most common scenario is to save the iCalendar .ics file to a website. Remember, when selecting a place to save the file it is important that any recipient has access to that location.
-
Click Save.
-
Click in the message body.
-
On the Insert tab, in the Links group, click Hyperlink.
-
In the Text to display box, type the text that you to appear as the link.
-
In the Address box, enter the location where you saved the iCalendar .ics file. If you saved it to a website, enter the Web address or URL for that location.
-
Click OK.
-
Continue to complete the message as you normally would, including adding recipients, and then click Send.
Add an image link to the message body
-
In the open appointment window, right-click the iCalendar .ics attachment, and then click Save As.
-
Select a location that all of your recipients can access.
-
For example, within an organization, you can select a shared network location. The most common scenario is to save the iCalendar .ics file to a website. Remember, when selecting a place to save the file it is important that any recipient has access to that location.
-
Click Save.
-
Click in the message body.
-
On the Insert tab, in the Illustrations group, click Picture.
-
Click the picture you want to insert, and then click Insert.
-
Click the inserted image.
-
On the Insert tab, in the Links group, click Hyperlink.
-
In the Address box, enter the location where you saved the .ics file. If you saved it to a website, enter the Web address or URL for that location.
-
Click OK.
-
Continue to complete the message as you normally would, including adding recipients, and then click Send.
No comments:
Post a Comment