Introduction
Class Notebook, Staff Notebook, Skype Notebooks Content Export can be provided two different ways:
-
For Teachers and Students: an in-app experience to save a copy to either Microsoft 365 Enterprise or Education Account, or Consumer Microsoft Account. This is documented in the Class Notebook In-App Export Guide.
-
For Admins: eDiscovery for bulk or selected export of Microsoft 365 content .
This document details eDiscovery export of Class Notebooks for bulk export, enabling flexible queries for role-specific content for teacher or student. Class Notebooks enforce role-based content permission applied to the specific structure of a notebook. Therefore the structure, roles, and permissions for exported content must maintain that of the user export request, as outlined in this document.
Refer to the Microsoft 365 documentation for eDiscovery for introducing basics for Search and Export
The first section of this document introduces the Class Notebook structure and permissions model, followed by detailed steps to export using eDiscovery.
Background
OneNote storage format
-
Notebook (Folder, in SharePoint Online corresponds to SPFolder)
-
Section (file, in SharePoint Online corresponds to SPFile)
-
…
-
Section group (Folder, in SharePoint Online corresponds to SPFolder)
-
Section (file, in SharePoint Online corresponds to SPFile)
-
…
-
-
…
-
If OneNote Notebook is a folder, then the Section Groups are subfolders under the notebook folder. The Sections are files (with .one extension). Pages don't have a physical representation in SharePoint, instead, pages are contents of the Section files.
What is Class Notebook
The Class Notebook is a template allowing a teacher R/W access to the whole notebook while students have R/W access (to their own section group) and R/O access to the shared section groups with the teacher. The section groups on the second level of the tree below, can have section groups themselves (added later by the teacher).
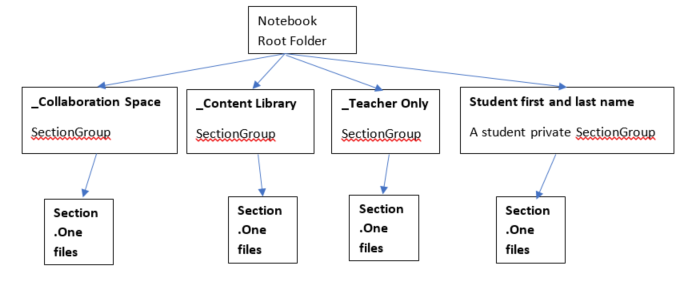
Class Notebook Permission Model
Every Folder and file in SharePoint Online has permissions associated with it:
-
Inherited from its parent
This is called permissions inheritance. It means that the permissions of the parent are passed on to the children. -
Defined at the folder/file itself
A file or a folder can break this chain of inheritance from parent to child. At this point, the permissions of the child are independent of the parent's permissions. SharePoint Online allows to add, edit and remove permissions. And none of these changes affect the original parents.
The Class Notebook Root Folder and the Class Notebook Section Groups (_Content Library, _Collaboration Space, _Teacher Only, Students private Section Groups) all have permissions defined for themselves. This implies that their permissions are broken from the chain of inheritance and they have their own permissions.
The Class Notebook Sections has inherited permissions from the Section Groups.
After we have seen how the Class Notebook looks, the following permissions are granted to users:
-
The Notebook Folder gives permissions to teachers to read/write and to students to read-only
-
The "_Content Library" gives permissions to teachers to read/write and to students to read-only The "_Collaboration Space" folder gives permissions to the teacher to read and write. Students has also read and write permissions.
-
Each private student section group gives teachers and only the student of the section group read/write access.
Corresponding Permissions in SharePoint Online based on the role
| Role | SharePoint Permission Name for Read/Write |
| Teacher/Leader | Full control |
| Student/Member | Contribute |
Incarnations of the Class Notebook
Current incarnations of the Class Notebook include:
-
Class Notebook (for teachers)
-
Skype Notebook (used by Skype edu)
-
Staff Notebook (for school administrators)
The Class and Skype Notebooks follow the structure mentioned above. As for the Staff notebook, it has a similar structure with different labels. Teachers are named leaders, students are named members.
Therefore, the structure would look as follows 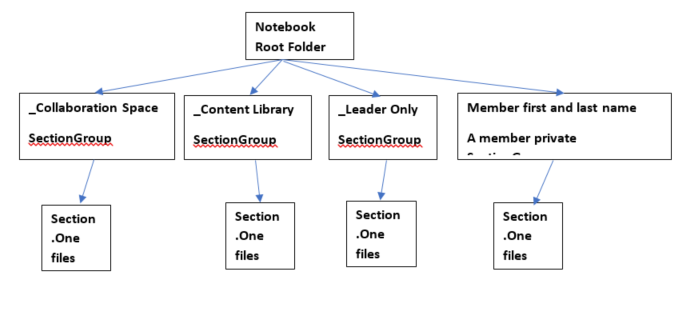
Class Notebooks are stored in SharePoint Online Sites:
Class Notebooks are stored in SharePoint Sites, across default lists under folders "Class Notebooks", "Staff Notebooks," and "Skype Notebooks". These folder names are translated based on language of the Class Notebook.
As for Teams Class Notebook, there is one class notebook for each team. Furthermore, it is provisioned to be default notebook stored in the Assets Library.
For the legacy OneNote Class Notebook Creator SharePoint Store app, the Notebooks are stored in the list with title "EduOneNoteAppDocuments." Each teacher would have a subfolder with a title "<email>_Courses" where his notebook is stored in.
Example:
EduOneNoteAppDocuments
<JohnDoe>@contoso.org_Courses
Admin Portal Steps eDiscovery Guide
-
Log in to the admin portal in-private using the Edge browser.
-
Select Admin.
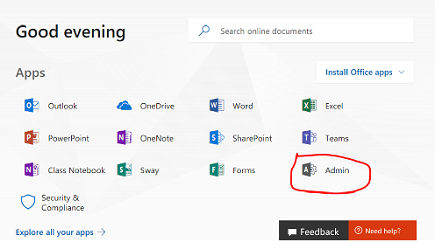
-
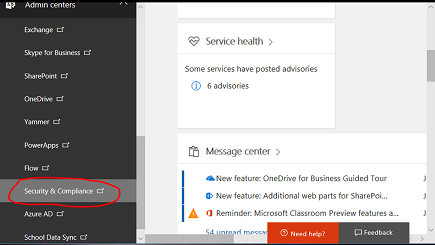
Select Admin Centers.
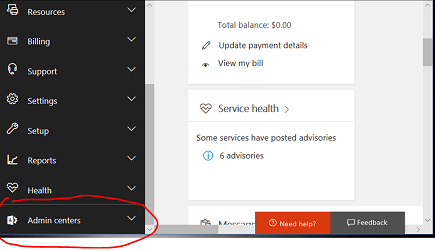
-
Expand the drop-down from Admin Centers, and then select Security and Compliance.
-
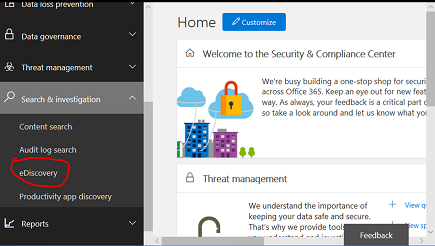
Under the dropdown, select Search & Investigation and then select eDiscovery.
-
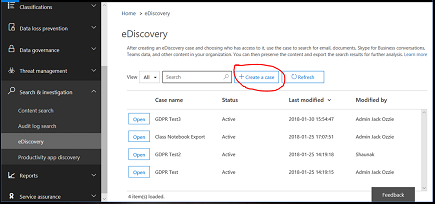
Select Create a Case to enter the name and description of the case.
Note:
-
Each query for data must be created within an eDiscovery case.
-
This nomenclature is used because this admin function is typically used in the context of a legal case or organizational case.
-
-
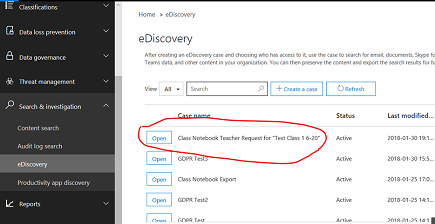
The newly created case is saved below.
-
Select Open, then Export, then select + to create a new search query.
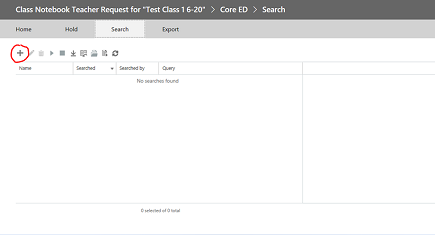
-
Enter a name for your query then select the Search Everywhere dial.
-
Select the 'SharePoint checkbox" then select Next.
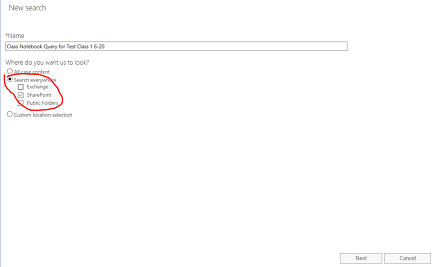
-
Select the name of the Class Notebook or alternatively the name of the Student to just get his/her folder. The Class Notebook hierarchy uses SharePoint document library folders, where the name of the Class is the Top Level folder, so specifying that will yield all subfolders - one subfolder per student section. So specifying the student name in this query would just return the result for that sub-folder for that student's section. In this case, we are searching for the entire notebook, "Test Class 1 6-20". Hit Next..
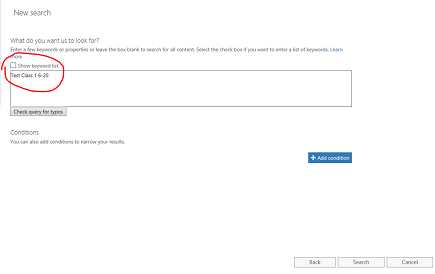
-
The query will be saved (highlighted) and results on the right pane. Notice there are 9 items listed. Select "preview search results"
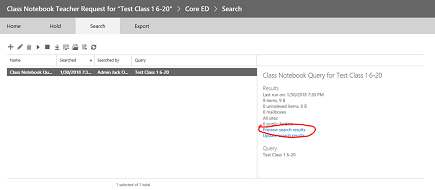
-
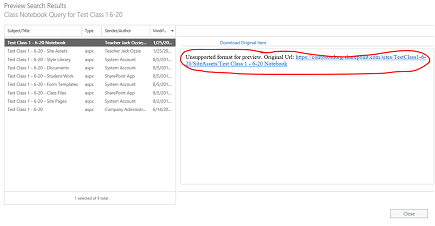
The Search Results will display the list of the 9 items. Clicking on any one of the items in the list on the left pane will display the information for that item. For the Notebook selected below, that is the FOLDER PATH on SharePoint for the root folder for the class notebook. COPY THAT FOLDER PATH TO THE CLIPBOARD as we will use it in the second query for the contents within that folder. NOTE You cannot download this item as it is just a folder. Close this window.
-
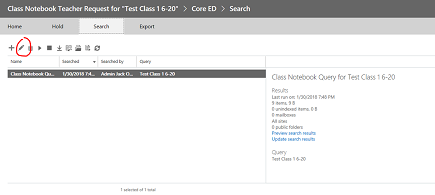
Closing the window will Return to the previous Search page. Click on the Pencil to edit the query
-
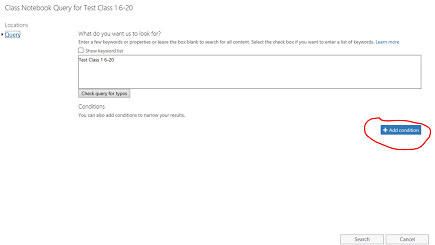
Add a new condition to the query by clicking the button:
-
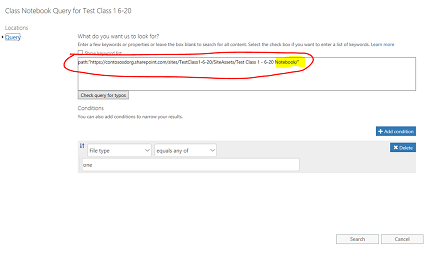
Click on the "show keyword list" to refine the query to include the Root folder path for the Class Notebook in previous step. This will drop down a list of keywords. You will want to replace the "Test Class 1 6-20" query with the folder path of class notebook, using the Keyword, path:"<path to class notebook folder/". Note the path must be in quotes as below AND MUST END IN A SLASH. Without slash in path, the query will fail.
-
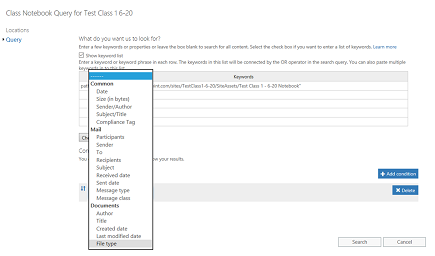
Select the "Add Condition" from above to refine the search to only One Note (.one) file types. You'll see a drop down list of condition types. Select the "File Type" highlighted below,
-
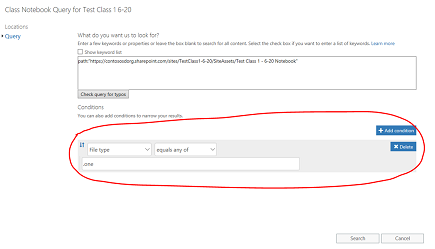
Select the "one" file type, as that is the extension for OneNote files. Then click Search.
-
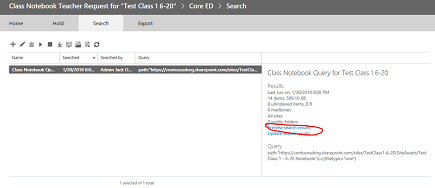
This query will return the results of all the .one files in the folder, in this case 14 items. Click on the "preview search results" to see the list of .one files in the folder:
-
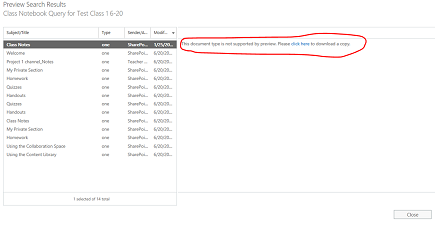
Note the list of the results includes all of the .one files in the entire hierarchy below the Class Notebook root folder path. This will include a folder for each student. If you want to select a SINGLE .one file, it could be done using the "please click here". You can select only one file at a time using this if desired, but the Folder/File hierarchy of the notebook will not be reflected if downloading single .one files. Also note that the .one file cannot be opened in OneNote because it is not a valid OneNote complete file as it requires the .TOC within the hierarchy to be a valid file (OneNote team will provide import to re-hydrate notebook from .ONE hierarchy).
-
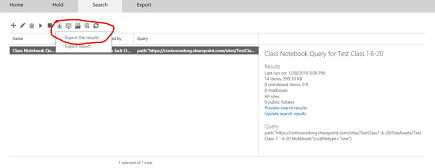
Close the dialog to return to the query page. You will want to click the Down Arrow highlighted (hover will show"export") to begin the export the entire folder hierarchy for the entire notebook. Clicking the down arrow will pop up the "Export the results". Select that option.
-
A page will now be displayed asking for Export Options. Select the 1st radio button, "All Items excluding that have unrecognized format…" and click "Start Export"
-
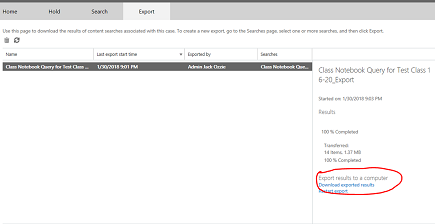
Once export completes, the results are shown in the pane on the right. Now select "Download Exported Results"
-
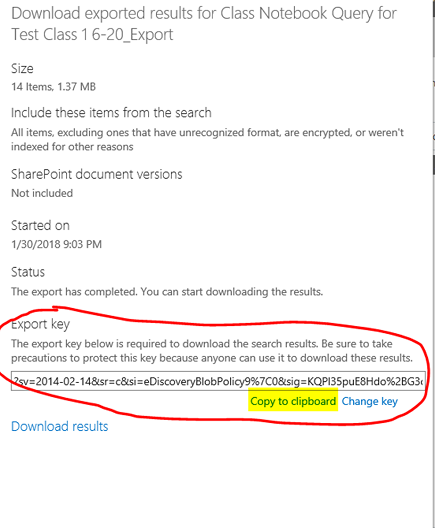
A page will display confirming download of results, and display an Export Key that must be copied to the clipboard to be used within the eDiscovery export app in the following step. After copying to clipboard, select "Download Results"
-
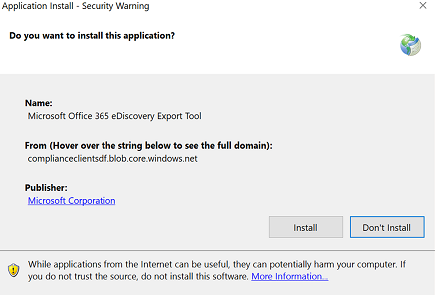
When you click "Download Results", you will be prompted to install the eDiscovery export tool, if you have not previously run an export.. Select Install.
-
Then click "Open" on the security validation prompt below to begin the download
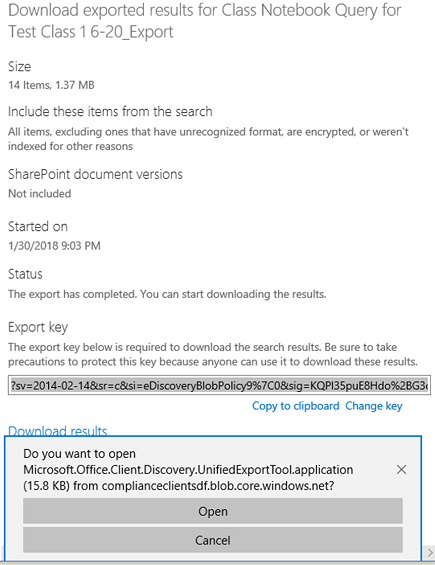
-
After opening the export tool, you will be prompted to paste in the key from above, and the selection to download the files:
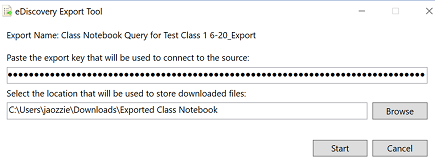
-
The export tool will report progress during the process, which could take some time depending upon the number of files to download.
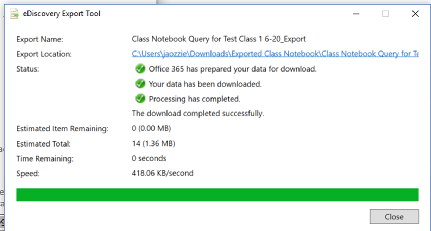
-
The results of the export are contained in the selected folder, which contains several sub folders. The first subfolder contains a summary of the export, and the "SharePoint" folder contains the OneNote file contents at the leaf node folder:
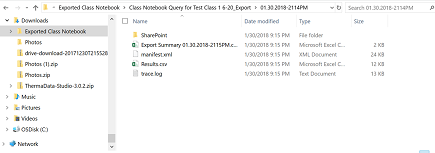
-
Navigating to the "Site Assets" folder will contain the root folder for the class notebook, showing a folder for each of the Section Groups in the notebook, and the Welcome page within the first notebook Section. Below the Collaboration Space and Content Library are the shared content for the notebook, and there is a folder for each of the students (Student 48 Victor, and Student 50 X-Ray are the 2 students)

-
Navigating to the Folder (section group) for "Student 48 Victor" will show the Sections (.one files) within the student's section group.
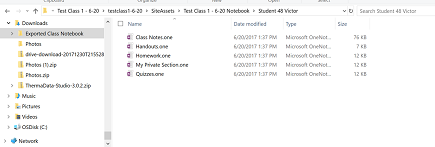
To re-create their notebook, a student can take the following steps:
-
Open OneNote 2016 and create a new notebook (preferably on OneDrive)
-
Open each .one section in OneNote 2016 by either:
-
Double clicking the .one file
-
In 2016, going to File > Open > Browse > View All Files (*.*) > Select the .One file > Click Open
-
-
Copy the sections to your new notebook by either:
-
Clicking and dragging the section into your new notebook
-
Right click the section tab and select Move or Copy, select your new notebook, and click Copy
-
//where is the OneNote commercial story of how a user opens .One files.
Note: OneNote API Permissions allow users to set specific permission to the structure of OneNote document. So it is like the class notebook.
No comments:
Post a Comment