With Business Contact Manager for Outlook 2010, you and your coworkers can share the business data that is important to all of you. Information in Account, Business Contact, Opportunity, or Business Project records is stored in the Business Contact Manager database. The creator of this database is also the database owner, who can share the database.
Note: For a greater level of security, all data that is transmitted between the shared database and the local database is encrypted.
This article describes how to share and how to stop sharing your Business Contact Manager for Outlook database.
What do you want to do?
Manage access to your Business Contact Manager database
If you are the database owner, you can share your database and grant access to selected users who are already users on your computer, or who are part of your domain. You can also change the users who have access to your database.
Note: Users' computers can be members of the same workgroup. A domain is not required to share your database.
Users who have access to your database can update records, create new records, and move records to the Deleted Items folder. They cannot permanently delete records.
Tip: If a user does not have access to your network and needs to access files that are listed in the communication history of records in a shared database, attach the files in the Comments section rather linking the files to the communication history. Note that the database size limit is 4 GB, and files that are attached increase the size of the database.
As a database owner, you can:
-
Choose to share or not share your database with others.
-
Grant or deny access to your database for individual users.
-
Change the users who have access to your database.
-
Delete the database.
-
Back up the database.
-
Restore a database that you previously backed up.
-
Permanently delete a record by emptying the Deleted Items folder.
Note: Any user can restore a record that is still in the Deleted Items folder.
-
Check for errors, and repair the database.
If you are an administrator for the computer, you can:
-
Add new users to the computer.
-
Access any shared database on that computer, including databases created by others.
Share your database
To share your database, follow these steps in the Manage Sharing wizard:
-
Step 2: Decide whether to change your E-mail Link and Track settings
-
Step 4: Verify that your computer settings will allow others to access your database
-
Step 5: Confirm that you want to grant access to your database
-
Step 6: Give the computer name and database name to each user
Important: To connect to the shared database, each computer must be running Business Contact Manager for Outlook 2010.
Step 1: Choose to share your data
Note: If your computer is running Microsoft Windows XP Home, you cannot share your database with other users.
-
Click the File tab.
-
Click the Business Contact Manager tab, and then click the Manage Sharing button.
-
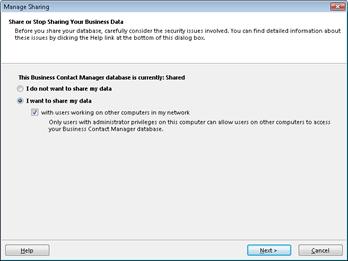
In the Manage Sharing wizard, on the Share or Stop Sharing Your Business Data page, click I want to share my data.
-
To share your database with coworkers who use different computers, select the with users working on other computers in my network check box.

-
Click Next.
Step 2: Decide whether to change your E-mail Link and Track settings
There are privacy and security considerations when you are linking and tracking e-mail messages and then decide to share your database. When you are the only user, and you share the database so that you can connect to it from another computer, there are fewer concerns. When you share your data with multiple users, you share all the information in the database with everyone who has access to it.
If you are the only user accessing your database from more than one computer
When you are the only one who uses your database, the security considerations are minimal—such as keeping your password secure. Enable any e-mail address for e-mail linking and tracking, because no one else can see the messages.
Note: You must share your Business Contact Manager database in order to use a copy of the database offline—such as on a portable computer—but there is still only one user of the database. For more information about working offline, see Work offline using Business Contact Manager.
If there are multiple users of your database
When you share a Business Contact Manager database with other users, you have several options to manage your e-mail linking and tracking settings:
-
Change your settings before you share your database If you are already linking records in your database to e-mail messages, you can change your Link and Track settings to include only the e-mail messages that you want others to see, and you can delete any e-mail messages from each individual record that you don't want others to see. Every user of your database will see all the e-mail messages that are linked to your database.
-
Keep your settings as they are This means that if any of your messages are automatically linked, any user with access to the database can see the linked messages.
-
Clear all of your settings This means that no new messages are linked, but any messages that were linked prior to clearing your settings will still be available to all users who access your database.
Note: With any of these options, you can remove any existing e-mail messages and communication history items that you do not want your coworkers to see before you share your database. For more information about deleting communication history items, see Track your communications with customers in Business Contact Manager.
Change your E-mail Link and Track settings
To change your E-mail Link and Track settings, click Cancel to close the Manage Sharing wizard, and then open the Manage Linking and Tracking dialog box. For more information on Linking and Tracking e-mail messages and changing your settings, see Link and track e-mail messages in Business Contact Manager.
Keep or clear your e-mail Link and Track settings

-
In the Manage Sharing wizard, on the E-mail Link and Track Settings page, do one of the following:
-
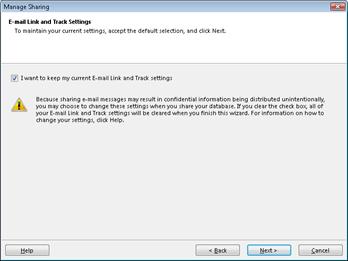
Select the I want to keep my current e-mail Link and Track settings check box if you don't want to make any changes to your settings before sharing your database.
-
Clear the check box next to I want to keep my current e-mail Link and Track settings if you no longer want to keep your settings from this point forward.
Important: When you share a database, you share all the information in this database with everyone who has access to it. If you have set up automatic linking and tracking of your e-mail messages, all existing and future e-mail messages and other communication history items that are linked with your Accounts and Business Contacts are available to all users who access the database. If you do not want to share any existing e-mail messages and communication history items, remove these items before you share your database. For more information about deleting communication history items, see Track your communications with customers in Business Contact Manager.
-
-
Click Next.
Step 3: Select users for your database
To share your database with others, you must choose the users who need access to your database. You can grant access to users who already have access to your computer, and you can grant access to new users.
Important: To connect to the shared database, each computer must be running Business Contact Manager for Outlook 2010.
Add users who already have access to your computer
-
In the Manage Sharing wizard, on the Select Users page, select the check box next to the names of users with whom you want to share your database, and then click Next.
Add a user who is not listed on the Select Users page
Note: Only the database owner can grant access to the database.
-
On the Select Users page, click the Add New User button.
-
In the Add User dialog box, do one of the following:
-
If your computer is a part of a workgroup
-
In the Temporary password box, type a password that you are certain the user has not used before.
This temporary password can be used only once. The first time this new user accesses the Business Contact Manager database, the user is prompted to type this temporary password, and then type his or her current network or local password. From that time forward, the user's network password grants the user access to both the network and to the database.Note: You must type a temporary password for each user. Any password that is used — whether it is temporary or permanent — must conform to the security standards set in your local network. The password cannot be blank.
-
In the Confirm password box, retype the temporary password.
-
Select the Also allow this user to log on to this computer check box if you want the new user to have the permission to log on and off your computer, as well as to access other files on your computer, including the database.
-
-
If your computer is a part of a domain
-
Type the name of the domain that the user is a member of.
-
Type the User Name of the user to whom you want to grant access to your computer. This name must be the same user name (or logon ID) that the user types when logging onto the network.
-Or-
Click Browse to look up a user name and domain.
-
-
-
Click Next.
Tip: You can assign records to co-workers who have been granted access to your shared database. For example, if you want to assign an Account to a co-worker who has been granted access to your database, you can select your co-worker's name in the Assigned to list on the General page of the Account record.
Step 4: Verify that your computer settings will allow others to access your database
To share your local database with other users, you may need to adjust settings on your computer to allow access. We recommend that you allow Business Contact Manager for Outlook to change these settings, but you can also clear the check box next to any setting that you do not want to change.
Notes:
-
You will see the Check Computer Settings for Database Sharing page only if you checked with users working on other computers in my network in the first step of the Manage Sharing wizard.
-
You must be an administrator, and logged on as an administrator, to allow these changes to be made, or to make them yourself. If you are not an administrator, ask a person who is an administrator on the computer to log on as administrator and make the changes on your behalf.
-
In the Manage Sharing wizard, on the Check Computer Settings for Database Sharing page, select the I want to review the settings that will be changed check box to see a list of all settings that Business Contact Manager for Outlook will change.
-
Click Next.
-
Under Settings that require changes, in the Settings box, review the list of settings.
-
Click the name of the item to see additional details next to the Settings box. If you do not want to make the recommended change, clear the check box next to that setting.
-
Click Next when you are ready to continue.
Step 5: Complete the final page of the wizard and grant access to your database
-
In the Manage Sharing wizard, on the Grant Database Access page, under The following users will now have access to your database, review the list of users who will have access to your shared database when you complete this wizard.
-
You can do any of the following:
-
If you want to go back and make changes, such as adding or removing users, click Back.
-
If you want to allow all the users in the list to access your database, click Finish.
-
If you do not want to share your database, click Cancel.
-
Step 6: Give the computer name and database name to each user
Where do I find the computer name and database name?
-
Click the File tab.
-
Click the Business Contact Manager tab.
-
In the Manage Databases section, next to Database name, the computer name and database name display (computer name\database name).
-
The users will also need information about connecting to the shared database.
Add or remove a user's access to your database
If your database is already shared, you can give other users access to your database or remove their access.
Tip: You can assign records to co-workers who have been granted access to your shared database. For example, if you want to assign an Account to a co-worker who has been granted access to your database, you can select your co-worker's name in the Assigned to list on the General page of the Account record.
-
Click the File tab.
-
Click the Business Contact Manager tab, and then click the Manage Sharing button.
-
In the Manage Sharing wizard, on the Share Your Business Contact Manager Database page, click Next.
The Users with access to this computer box lists all of the users who have access to your shared database.Note: By default, administrators on this computer are displayed in this list, but administrators on the domain are not included unless you specifically add them. Anyone who is an administrator—regardless of whether his or her user account is displayed in this list—can access all data. For information about administrators, see How do I know if I'm an administrator?.
-
Do the following:
-
Select the check box next to the names of users with whom you want to share your database.
-
Clear the check box next to the names of users whose access you want to remove.
-
To add a user who is not listed on the page, click the Add New User button, and then follow the instructions in Add a user who is not listed on the Select Users page earlier in this article.
Note: You must be the database owner to add a new user to this list.
-
-
Click Next, and then complete the wizard.
Stop sharing your database
Note: If you stop sharing your database with co-workers who have records assigned to them, the Assigned to field on those records will be blank.
-
Click the File tab.
-
Click the Business Contact Manager tab, and then click the Manage Sharing button.
-
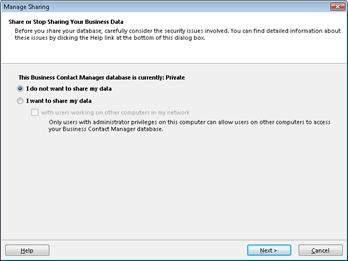
In the Manage Sharing wizard, on the Share Your Business Contact Manager Database page, click I do not want to share my data.

-
Click Next, and then complete the wizard.
No comments:
Post a Comment