Define and solve a problem by using Solver
Solver is a Microsoft Excel add-in program you can use for what-if analysis. Use Solver to find an optimal (maximum or minimum) value for a formula in one cell — called the objective cell — subject to constraints, or limits, on the values of other formula cells on a worksheet. Solver works with a group of cells, called decision variables or simply variable cells that are used in computing the formulas in the objective and constraint cells. Solver adjusts the values in the decision variable cells to satisfy the limits on constraint cells and produce the result you want for the objective cell.
Put simply, you can use Solver to determine the maximum or minimum value of one cell by changing other cells. For example, you can change the amount of your projected advertising budget and see the effect on your projected profit amount.
Note: Versions of Solver prior to Excel 2007 referred to the objective cell as the "target cell," and the decision variable cells as "changing cells" or "adjustable cells". Many improvements were made to the Solver add-in for Excel 2010, so if you're using Excel 2007 your experience will be slightly different.
Example of a Solver evaluation
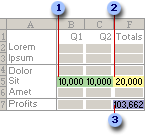
In the following example, the level of advertising in each quarter affects the number of units sold, indirectly determining the amount of sales revenue, the associated expenses, and the profit. Solver can change the quarterly budgets for advertising (decision variable cells B5:C5), up to a total budget constraint of $20,000 (cell F5), until the total profit (objective cell F7) reaches the maximum possible amount. The values in the variable cells are used to calculate the profit for each quarter, so they are related to the formula objective cell F7, =SUM (Q1 Profit:Q2 Profit).

1. Variable cells
2. Constrained cell
3. Objective cell
After Solver runs, the new values are as follows.

Define and solve a problem
-
On the Data tab, in the Analysis group, click Solver.

Note: If the Solver command or the Analysis group is not available, you need to activate the Solver add-in. See: How to activate the Solver add-in.

-
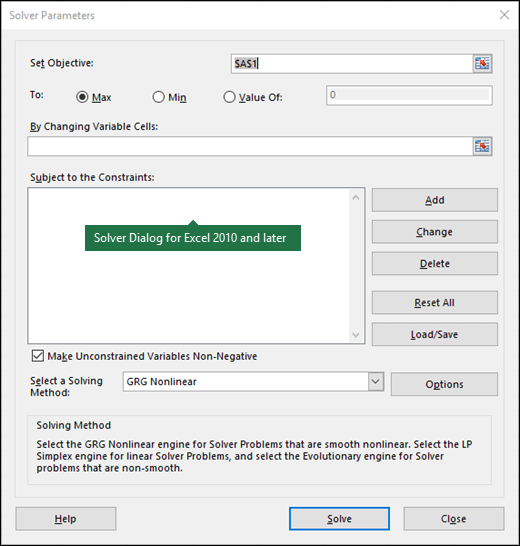
In the Set Objective box, enter a cell reference or name for the objective cell. The objective cell must contain a formula.
-
Do one of the following:
-
If you want the value of the objective cell to be as large as possible, click Max.
-
If you want the value of the objective cell to be as small as possible, click Min.
-
If you want the objective cell to be a certain value, click Value of, and then type the value in the box.
-
In the By Changing Variable Cells box, enter a name or reference for each decision variable cell range. Separate the non-adjacent references with commas. The variable cells must be related directly or indirectly to the objective cell. You can specify up to 200 variable cells.
-
-
In the Subject to the Constraints box, enter any constraints that you want to apply by doing the following:
-
In the Solver Parameters dialog box, click Add.
-
In the Cell Reference box, enter the cell reference or name of the cell range for which you want to constrain the value.
-
Click the relationship ( <=, =, >=, int, bin, or dif ) that you want between the referenced cell and the constraint.If you click int, integer appears in the Constraint box. If you click bin, binary appears in the Constraint box. If you click dif, alldifferent appears in the Constraint box.
-
If you choose <=, =, or >= for the relationship in the Constraint box, type a number, a cell reference or name, or a formula.
-
Do one of the following:
-
To accept the constraint and add another, click Add.
-
To accept the constraint and return to the Solver Parameters dialog box, click OK.
Note You can apply the int, bin, and dif relationships only in constraints on decision variable cells.You can change or delete an existing constraint by doing the following:
-
-
In the Solver Parameters dialog box, click the constraint that you want to change or delete.
-
Click Change and then make your changes, or click Delete.
-
-
Click Solve and do one of the following:
-
To keep the solution values on the worksheet, in the Solver Results dialog box, click Keep Solver Solution.
-
To restore the original values before you clicked Solve, click Restore Original Values.
-
You can interrupt the solution process by pressing Esc. Excel recalculates the worksheet with the last values that are found for the decision variable cells.
-
To create a report that is based on your solution after Solver finds a solution, you can click a report type in the Reports box and then click OK. The report is created on a new worksheet in your workbook. If Solver doesn't find a solution, only certain reports or no reports are available.
-
To save your decision variable cell values as a scenario that you can display later, click Save Scenario in the Solver Results dialog box, and then type a name for the scenario in the Scenario Name box.
-
Step through Solver trial solutions
-
After you define a problem, click Options in the Solver Parameters dialog box.
-
In the Options dialog box, select the Show Iteration Results check box to see the values of each trial solution, and then click OK.
-
In the Solver Parameters dialog box, click Solve.
-
In the Show Trial Solution dialog box, do one of the following:
-
To stop the solution process and display the Solver Results dialog box, click Stop.
-
To continue the solution process and display the next trial solution, click Continue.
-
Change how Solver finds solutions
-
In the Solver Parameters dialog box, click Options.
-
Choose or enter values for any of the options on the All Methods, GRG Nonlinear, and Evolutionary tabs in the dialog box.
Save or load a problem model
-
In the Solver Parameters dialog box, click Load/Save.
-
Enter a cell range for the model area, and click either Save or Load.
When you save a model, enter the reference for the first cell of a vertical range of empty cells in which you want to place the problem model. When you load a model, enter the reference for the entire range of cells that contains the problem model.
Tip: You can save the last selections in the Solver Parameters dialog box with a worksheet by saving the workbook. Each worksheet in a workbook may have its own Solver selections, and all of them are saved. You can also define more than one problem for a worksheet by clicking Load/Save to save problems individually.
Solving methods used by Solver
You can choose any of the following three algorithms or solving methods in the Solver Parameters dialog box:
-
Generalized Reduced Gradient (GRG) Nonlinear Use for problems that are smooth nonlinear.
-
LP Simplex Use for problems that are linear.
-
Evolutionary Use for problems that are non-smooth.
Important: You should enable the Solver add-in first. For more information, see Load the Solver add-in.
Example of a Solver evaluation
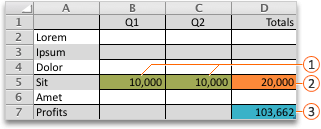
In the following example, the level of advertising in each quarter affects the number of units sold, indirectly determining the amount of sales revenue, the associated expenses, and the profit. Solver can change the quarterly budgets for advertising (decision variable cells B5:C5), up to a total budget constraint of $20,000 (cell D5), until the total profit (objective cell D7) reaches the maximum possible amount. The values in the variable cells are used to calculate the profit for each quarter, so they are related to the formula objective cell D7, =SUM(Q1 Profit:Q2 Profit).

 Variable cells
 Constrained cell
 Objective cell
After Solver runs, the new values are as follows.

Define and solve a problem
-
In Excel 2016 for Mac: Click Data > Solver.

In Excel for Mac 2011: Click the Data tab, under Analysis, click Solver.

-
In Set Objective, enter a cell reference or name for the objective cell.
Note: The objective cell must contain a formula.
-
Do one of the following:
To
Do this
Make the value of the objective cell as large as possible
Click Max.
Make the value of the objective cell as small as possible
Click Min.
Set the objective cell to a certain value
Click Value Of, and then type the value in the box.
-
In the By Changing Variable Cells box, enter a name or reference for each decision variable cell range. Separate the nonadjacent references with commas.
The variable cells must be related directly or indirectly to the objective cell. You can specify up to 200 variable cells.
-
In the Subject to the Constraints box, add any constraints that you want to apply.
To add a constraint, follow these steps:
-
In the Solver Parameters dialog box, click Add.
-
In the Cell Reference box, enter the cell reference or name of the cell range for which you want to constrain the value.
-
On the <= relationship pop-up menu, select the relationship that you want between the referenced cell and the constraint.If you choose <=, =, or >=, in the Constraint box, type a number, a cell reference or name, or a formula.
Note: You can only apply the int, bin, and dif relationships in constraints on decision variable cells.
-
Do one of the following:
To
Do this
Accept the constraint and add another
Click Add.
Accept the constraint and return to the Solver Parameters dialog box
Click OK.
-
-
Click Solve, and then do one of the following:
To
Do this
Keep the solution values on the sheet
Click Keep Solver Solution in the Solver Results dialog box.
Restore the original data
Click Restore Original Values.
Notes:
-
To interrupt the solution process, press ESC . Excel recalculates the sheet with the last values that are found for the adjustable cells.
-
To create a report that is based on your solution after Solver finds a solution, you can click a report type in the Reports box and then click OK. The report is created on a new sheet in your workbook. If Solver doesn't find a solution, the option to create a report is unavailable.
-
To save your adjusting cell values as a scenario that you can display later, click Save Scenario in the Solver Results dialog box, and then type a name for the scenario in the Scenario Name box.
Step through Solver trial solutions
-
In Excel 2016 for Mac: Click Data > Solver.

In Excel for Mac 2011: Click the Data tab, under Analysis, click Solver.

-
After you define a problem, in the Solver Parameters dialog box, click Options.
-
Select the Show Iteration Results check box to see the values of each trial solution, and then click OK.
-
In the Solver Parameters dialog box, click Solve.
-
In the Show Trial Solution dialog box, do one of the following:
To
Do this
Stop the solution process and display the Solver Results dialog box
Click Stop.
Continue the solution process and display the next trial solution
Click Continue.
Change how Solver finds solutions
-
In Excel 2016 for Mac: Click Data > Solver.

In Excel for Mac 2011: Click the Data tab, under Analysis, click Solver.

-
Click Options, and then in the Options or Solver Options dialog box, choose one or more of the following options:
To
Do this
Set solution time and iterations
On the All Methods tab, under Solving Limits, in the Max Time (Seconds) box, type the number of seconds that you want to allow for the solution time. Then, in the Iterations box, type the maximum number of iterations that you want to allow.
Note: If the solution process reaches the maximum time or number of iterations before Solver finds a solution, Solver displays the Show Trial Solution dialog box.
Set the degree of precision
On the All Methods tab, in the Constraint Precision box, type the degree of precision that you want. The smaller the number, the higher the precision.
Set the degree of convergence
On the GRG Nonlinear or Evolutionary tab, in the Convergence box, type the amount of relative change that you want to allow in the last five iterations before Solver stops with a solution. The smaller the number, the less relative change is allowed.
-
Click OK.
-
In the Solver Parameters dialog box, click Solve or Close.
Save or load a problem model
-
In Excel 2016 for Mac: Click Data > Solver.

In Excel for Mac 2011: Click the Data tab, under Analysis, click Solver.

-
Click Load/Save, enter a cell range for the model area, and then click either Save or Load.
When you save a model, enter the reference for the first cell of a vertical range of empty cells in which you want to place the problem model. When you load a model, enter the reference for the entire range of cells that contains the problem model.
Tip: You can save the last selections in the Solver Parameters dialog box with a sheet by saving the workbook. Each sheet in a workbook may have its own Solver selections, and all of them are saved. You can also define more than one problem for a sheet by clicking Load/Save to save problems individually.
Solving methods used by Solver
-
In Excel 2016 for Mac: Click Data > Solver.

In Excel for Mac 2011: Click the Data tab, under Analysis, click Solver.

-
On the Select a Solving Method pop-up menu, select one of the following:
| Solving Method | Description |
| GRG (Generalized Reduced Gradient) Nonlinear | The default choice, for models using most Excel functions other than IF, CHOOSE, LOOKUP and other "step" functions. |
| Simplex LP | Use this method for linear programming problems. Your model should use SUM, SUMPRODUCT, + - and * in formulas that depend on the variable cells. |
| Evolutionary | This method, based on genetic algorithms, is best when your model uses IF, CHOOSE, or LOOKUP with arguments that depend on the variable cells. |
Note: Portions of the Solver program code are copyright 1990-2010 by Frontline Systems, Inc. Portions are copyright 1989 by Optimal Methods, Inc.
More help on using Solver
For more detailed help on Solver contact:
Frontline Systems, Inc.
P.O. Box 4288
Incline Village, NV 89450-4288
(775) 831-0300
Web site: http://www.solver.com
E-mail: info@solver.com
Solver Help at www.solver.com.
Portions of the Solver program code are copyright 1990-2009 by Frontline Systems, Inc. Portions are copyright 1989 by Optimal Methods, Inc.
Need more help?
You can always ask an expert in the Excel Tech Community, get support in the Answers community, or suggest a new feature or improvement on Excel User Voice.
See Also
Using Solver for capital budgeting
Using Solver to determine the optimal product mix
Introduction to what-if analysis
Keyboard shortcuts in Excel 2016 for Windows
Keyboard shortcuts in Excel 2016 for Mac
No comments:
Post a Comment