Create, run, edit, or delete a macro
To save time on tasks you do often, you can record the steps of those tasks as a macro. Then, when you want to perform one of those recorded tasks, you can activate the macro to perform the steps for you.
Word
In Word 2016 for Mac, you can create a macro that has a keyboard shortcut, run a macro, and delete a macro that you no longer need.
Create a macro with a keyboard shortcut
-
Click View > Macros > Record Macro.

-
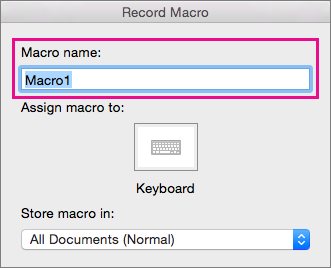
Type a name for the macro, or accept the default that Word provides.
-
To use this macro in any new documents you create, verify that All Documents (Normal) is selected in the Store macro in list.
-
Click Keyboard to assign a key combination to your macro.
Word displays the Customize Keyboard dialog box.
-
Type a combination of keys in the Press new keyboard shortcut box.
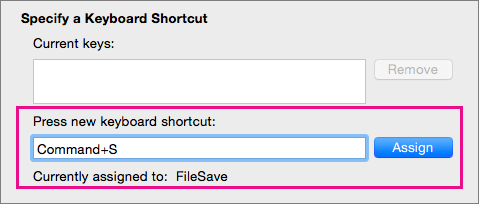
When you press a key combination, Word displays the command or action currently assigned to that key combination, if any.
-
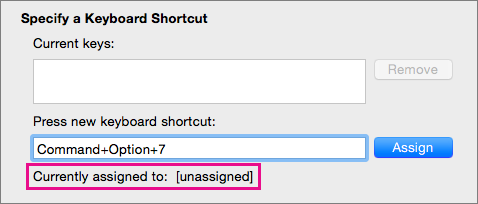
If the key combination that you chose is already assigned, delete it from the Press new keyboard shortcut box, and then choose a new key combination.
Go on to the next step after you have found an unassigned key combination.
-
To use this keyboard shortcut in any new documents, be sure Normal.dotm, the global template, is selected in the Save changes in list.

-
Click Assign.
-
When you are ready to record the macro, click OK.
-
Click the commands or press the keys for each step in the task.
Word records your clicks and keystrokes, but it does not record text that you select with the mouse. To select text while recording a macro, use the keyboard.
-
To stop recording, click View > Macros > Stop Recording.

Run a macro
To run a macro, press the keyboard shortcut assigned to it, or run the macro from the Macros list.
-
Click View > Macros > View Macros.

-
In the list under Macro name, select the macro that you want to run.
-
Click Run.

Delete a macro
-
Click View > Macros > View Macros.

-
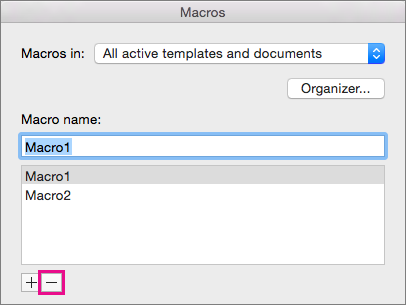
Verify that the location specified by Macros in includes the location of the macro that you want to delete.
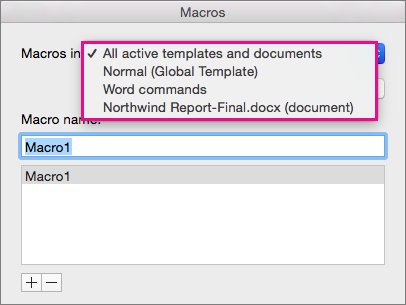
The list will include the document that is open in the current window, as well as the global template and Word commands.
-
Under Macro name, select the macro that you want to delete, and then click the minus sign below the list.
-
When Word asks to confirm that you want to delete the macro, click Yes.
Excel
In Excel 2016 for Mac, you can create a macro that has a keyboard shortcut, run a macro, and delete a macro that you no longer need.
When you record a macro, the macro recorder records all the steps required to complete the actions that you want your macro to perform. These steps can include typing text or numbers, clicking cells or commands on the ribbon or on menus, formatting, selecting cells, rows, or columns, and dragging your mouse to select cells on your spreadsheet.
Note: The commands for recording, creating, and deleting macros, as well as other advanced features, are also available on the Developer tab on the Ribbon. For more information about using the Developer tab, see Use the Developer tab to create or delete a macro in Excel 2016 for Mac.
Create a macro with a keyboard shortcut
-
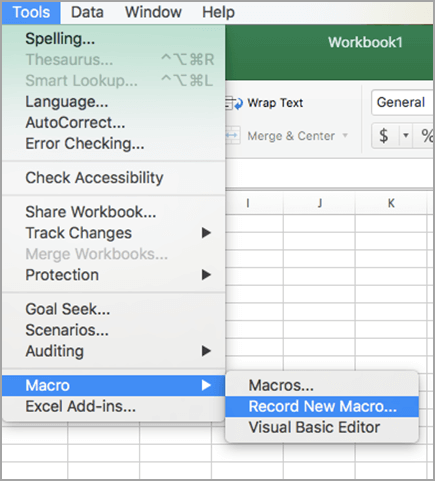
Select Tools > Macro > Record New.
-
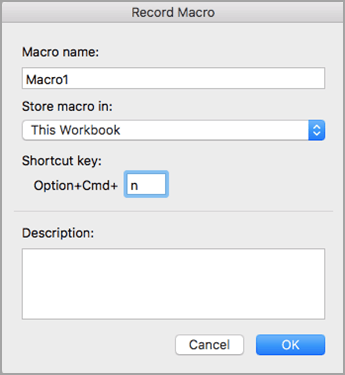
In the Macro name box, enter a name for the macro.
-
To create a keyboard shortcut for the macro, type a letter in the Option + Cmd box.
-
Select a location for the macro from the drop-down list.
To save the macro
Click
In the document that you are creating macro in
This Workbook
In all open documents
New Workbook
To be available whenever you use Excel
Personal Macro Workbook
-
(Optional) Add a description of your macro.
-
When you are ready to record, click OK.
-
Click the commands or press the keys for each step in the task.
-
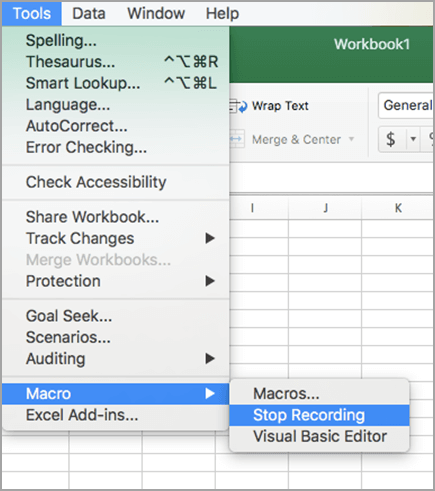
To stop recording, select Tools > Macro > Stop Recording. (This step will not be recorded in your macro.)
Run a macro
To run a macro, press the keyboard shortcut assigned to it, or run the macro from the Macros dialog.
-
On the View tab, click View Macros.
-
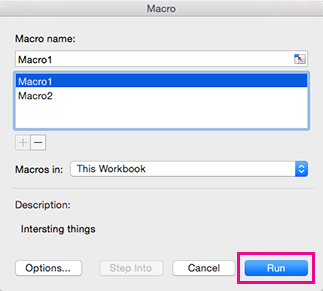
Click Macros in the pop up menu and select This Workbook.
-
Select your macro from the list and click Run.
Delete a macro
-
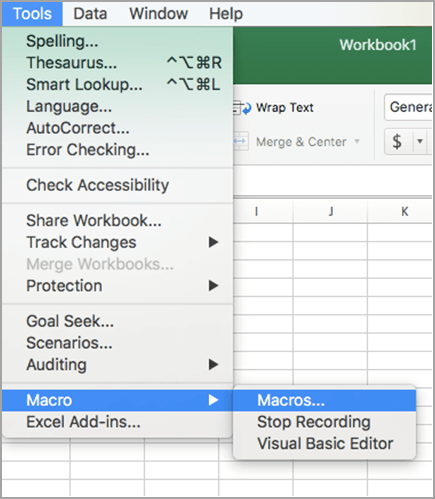
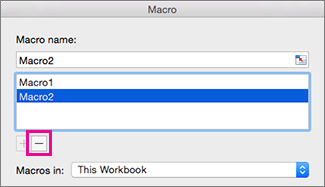
Select Tools > Macro > Macros.
-
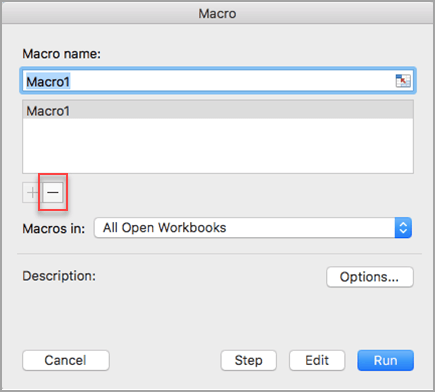
Select the macro to delete, and then press the minus sign.
-
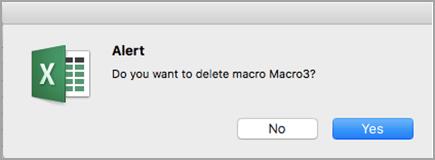
A confirmation message will appear. Click Yes to confirm the deletion.
You can also delete a macro from the Developer tab.
-
On the Developer tab, click Macros.
-
In the list, click the macro that you want to delete, and click the delete button.
Word
To automate a repetitive task, you can quickly create a macro in Word. You can also use the Visual Basic Editor in Microsoft Visual Basic for Applications to write your own macro script, or to copy all or part of a macro to a new macro.
Record a macro
When you record a macro, all the steps that are required to complete the actions that you want your macro to perform are recorded. However, navigation back to the tab to stop recording is not included in the recorded steps.
-
On the Developer tab, under Visual Basic, click Record.

If the Developer tab is not available
-
On the right side of the ribbon, click
 , and then click Ribbon Preferences.
 -
Under Customize, select the Developer check box.
-
-
In the Macro name box, enter a name for the macro.
-
On the Store macro in pop-up menu, do one of the following:
To save the macro
Click
In the document that you are creating the macro in
[document name] (document)
In all open documents
All Documents (Normal)
-
Click OK, and then perform the actions that you want to record.
-
On the Developer tab, under Visual Basic, click Stop.
Use Visual Basic for Applications to create a macro
You can use the built-in Visual Basic Editor to create a macro.
-
On the Developer tab, under Visual Basic, click Editor.

If the Developer tab is not available
-
On the right side of the ribbon, click
 , and then click Ribbon Preferences.
 -
Under Customize, select the Developer check box.
-
-
If you need to insert a module, in the Visual Basic Editor, on the Insert menu, click Module.
-
In the code window of the module, type or paste the macro code that you want to use.
-
When you are finished, on the Word menu, click Close and Return to Microsoft Word.
Run a macro
-
On the Developer tab, under Visual Basic, click Macros.

If the Developer tab is not available
-
On the right side of the ribbon, click
 , and then click Ribbon Preferences.
 -
Under Customize, select the Developer check box.
-
-
In the list, click the macro that you want to run, and then click Run.
Edit a macro
To edit a macro, you use the Visual Basic Editor.
-
On the Developer tab, under Visual Basic, click Macros.

If the Developer tab is not available
-
On the right side of the ribbon, click
 , and then click Ribbon Preferences.
 -
Under Customize, select the Developer check box.
-
-
In the list, click the macro that you want to edit, and then click Edit.
The Visual Basic Editor opens.
-
Make the changes that you want.
-
When you are finished, on the Word menu, click Close and Return to Microsoft Word.
Copy part of a macro to create another macro
-
On the Developer tab, under Visual Basic, click Macros.

If the Developer tab is not available
-
On the right side of the ribbon, click
 , and then click Ribbon Preferences.
 -
Under Customize, select the Developer check box.
-
-
In the list, click the macro that you want to copy, and then click Edit.
The Visual Basic Editor opens.
-
In the code window of the Visual Basic Editor, select the lines of the macro that you want to copy.
Tip: To copy the whole macro, include the Sub and End Sub lines in the selection.
-
On the Edit menu, click Copy.
-
In the Project box of the code window, click the module where you want to put the code.
-
On the Edit menu, click Paste.
Delete a macro
-
On the Developer tab, under Visual Basic, click Macros.

If the Developer tab is not available
-
On the right side of the ribbon, click
 , and then click Ribbon Preferences.
 -
Under Customize, select the Developer check box.
-
-
In the list, click the macro that you want to delete, and then click Delete.
PowerPoint
To automate a repetitive task, you can use Visual Basic for Applications to create a macro in PowerPoint.
Use Visual Basic for Applications to create a macro
You can use the built-in Visual Basic Editor to create a macro.
-
On the Developer tab, under Visual Basic, click Editor.

If the Developer tab is not available
-
On the right side of the ribbon, click
 , and then click Ribbon Preferences.
 -
Under Customize, select the Developer check box.
-
-
If you need to insert a module, in the Visual Basic Editor, on the Insert menu, click Module.
-
In the code window of the module, type or paste the macro code that you want to use.
-
When you are finished, on the PowerPoint menu, click Close and Return to Microsoft PowerPoint.
Run a macro
-
On the Developer tab, under Visual Basic, click Macros.

If the Developer tab is not available
-
On the right side of the ribbon, click
 , and then click Ribbon Preferences.
 -
Under Customize, select the Developer check box.
-
-
In the list, click the macro that you want to run, and then click Run.
Edit a macro
To edit a macro, you use the Visual Basic Editor.
-
On the Developer tab, under Visual Basic, click Macros.

If the Developer tab is not available
-
On the right side of the ribbon, click
 , and then click Ribbon Preferences.
 -
Under Customize, select the Developer check box.
-
-
In the list, click the macro that you want to edit, and then click Edit.
The Visual Basic Editor opens.
-
Make the changes that you want.
-
When you are finished, on the PowerPoint menu, click Close and Return to Microsoft PowerPoint.
Copy part of a macro to create another macro
-
On the Developer tab, under Visual Basic, click Macros.

If the Developer tab is not available
-
On the right side of the ribbon, click
 , and then click Ribbon Preferences.
 -
Under Customize, select the Developer check box.
-
-
In the list, click the macro that you want to copy, and then click Edit.
The Visual Basic Editor opens.
-
In the code window of the Visual Basic Editor, select the lines of the macro that you want to copy.
Tip: To copy the whole macro, include the Sub and End Sub lines in the selection.
-
On the Edit menu, click Copy.
-
In the Project box of the code window, click the module where you want to put the code.
-
On the Edit menu, click Paste.
Delete a macro
-
On the Developer tab, under Visual Basic, click Macros.

If the Developer tab is not available
-
On the right side of the ribbon, click
 , and then click Ribbon Preferences.
 -
Under Customize, select the Developer check box.
-
-
In the list, click the macro that you want to delete, and then click Delete.
Excel
To automate a repetitive task, you can quickly create a macro in Excel. You can also use the Visual Basic Editor in Microsoft Visual Basic for Applications to write your own macro script, or to copy all or part of a macro to a new macro.
Record a macro
All the steps that are required to complete the actions that you want your macro to perform are recorded. However, navigation back to the tab to stop recording is not included in the recorded steps.
-
On the Developer tab, under Visual Basic, click Record.

If the Developer tab is not available
-
On the right side of the ribbon, click
 , and then click Ribbon Preferences.
 -
Under Customize, select the Developer check box.
-
-
In the Macro name box, enter a name for the macro.
Tip: To create a keyboard shortcut for the macro, type a letter in the Option+Cmd+ box.
-
On the Store macro in pop-up menu, do one of the following:
To save the macro
Click
In the document that you are creating the macro in
This Workbook
In all open documents
New Workbook
To be available whenever you use Excel
Personal Macro Workbook
The personal macro workbook is located at Users/ username/Library/Application Support/ Microsoft/Office/Excel.
-
Click OK, and then perform the actions that you want to record.
-
On the Developer tab, under Visual Basic, click Record again.
Use Visual Basic for Applications to create a macro
You can use the built-in Visual Basic Editor to create a macro.
-
On the Developer tab, under Visual Basic, click Editor.

If the Developer tab is not available
-
On the right side of the ribbon, click
 , and then click Ribbon Preferences.
 -
Under Customize, select the Developer check box.
-
-
If you need to insert a module, in the Visual Basic Editor, on the Insert menu, click Module.
-
In the code window of the module, type or paste the macro code that you want to use.
-
When you are finished, on the Excel menu, click Close and Return to Microsoft Excel.
Run a macro
-
On the Developer tab, under Visual Basic, click Macros.

If the Developer tab is not available
-
On the right side of the ribbon, click
 , and then click Ribbon Preferences.
 -
Under Customize, select the Developer check box.
-
-
In the list, click the macro that you want to run, and then click Run.
Tip: To run a macro by using a keyboard shortcut, press OPTION +
 +the letter you typed when you created the keyboard shortcut.
Edit a macro
To edit a macro, you use the Visual Basic Editor.
-
On the Developer tab, under Visual Basic, click Macros.

If the Developer tab is not available
-
On the right side of the ribbon, click
 , and then click Ribbon Preferences.
 -
Under Customize, select the Developer check box.
-
-
In the list, click the macro that you want to edit, and then click Edit.
The Visual Basic Editor opens.
-
Make the changes that you want.
-
When you are finished, on the Excel menu, click Close and Return to Microsoft Excel.
Configure a macro to run automatically when a workbook is opened
After you complete this procedure, the macro will run whenever you open the workbook that contains the macro.
-
On the Developer tab, under Visual Basic, click Record.

If the Developer tab is not available
-
On the right side of the ribbon, click
 , and then click Ribbon Preferences.
 -
Under Customize, select the Developer check box.
-
-
In the Macro name box, type Auto_Open.
-
On the Store macro in pop-up menu, do one of the following:
To save the macro
Click
In the document that you are creating the macro in
This Workbook
In all open documents
New Workbook
To be available whenever you use Excel
Personal Macro Workbook
-
Click OK, and then perform the actions that you want to record.
-
On the Developer tab, under Visual Basic, click Record again.
-
On the File menu, click Save As.
-
On the Format pop-up menu, click Excel Macro-Enabled Workbook (.xlsm), and then click Save.
Copy part of a macro to create another macro
-
On the Developer tab, under Visual Basic, click Macros.

If the Developer tab is not available
-
On the right side of the ribbon, click
 , and then click Ribbon Preferences.
 -
Under Customize, select the Developer check box.
-
-
In the list, click the macro that you want to copy, and then click Edit.
The Visual Basic Editor opens.
-
In the code window of the Visual Basic Editor, select the lines of the macro that you want to copy.
Tip: To copy the whole macro, include the Sub and End Sub lines in the selection.
-
On the Edit menu, click Copy.
-
In the Project box of the code window, click the module where you want to put the code.
-
On the Edit menu, click Paste.
Delete a macro
-
On the Developer tab, under Visual Basic, click Macros.

If the Developer tab is not available
-
On the right side of the ribbon, click
 , and then click Ribbon Preferences.
 -
Under Customize, select the Developer check box.
-
-
In the list, click the macro that you want to delete, and then click Delete.
No comments:
Post a Comment